DELPHI MOBILE VIDEO DVDM-800 INSTALLATION GUIDE Professional Installation Recommended Caution: Fragile, do not drop! Important: This manual contains important safety and operating information. Please read and follow the instructions in this manual. Failure to do so could result in personal injury, death, and/or damage to your DVDM-800 and/or to your vehicle.
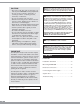
CAUTION • Use only a soft, dry cloth to clean the outside of your DVDM-800 and any peripherals. • Do not use any solvents, chemicals, or cleaning solutions containing alcohol, ammonia, or abrasives. • Do not use sprays near your unit. • Refrain from using food or drinks near the remote control. Spilling food or drinks on the remote could damage it. • Keep hands or materials away from the LCD video monitor to avoid surface scratches. • Push the panel buttons gently to avoid damage to the hinge.
DVDM-800 The DVDM-800 unit is intended for overhead, drop-down installation only. It is not designed for seat-back or any other type of mounting. When installed, rear-seat passengers should be able to comfortably view DVDM-800. Warning: Do not install DVDM-800 where it will be within the driver’s view.
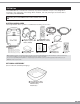
INSTALLATION OVERVIEW Generally, it is best to install the DVDM-800 unit in place of the vehicle’s dome light. For vehicles with factory-installed overhead consoles in the headliner, consult the console manufacturer for complete installation instructions. Professional installation is recommended. The exact method for mounting the DVDM-800 unit will vary from vehicle to vehicle. Here is an overview of the installation process: 1. Unpack DVDM-800 and identify all components. 2.
3. Trim the shroud. Using a sharp utility knife or shears, score the plastic along the cutline with several passes, cutting a little deeper each time. When you have cut about halfway through the plastic, bend it back and forth several times for a clean cut. See Figure 1. Figure 1. 4. Remove the video monitor and hold the shroud in place, checking the fit. 5. Make minor adjustments, if necessary. 6. Attach DVDM-800 and shroud using screws through the perimeter screw bosses.
Figure 3.
CONNECTING THE DOME LIGHTS The dome lights on DVDM-800 require three connections to the vehicle wiring. First, determine which of the two common types of dome light circuits your vehicle has: positive or negative switched. Positive switched systems turn the interior lights on by supplying voltage to them. Negative switched systems illuminate the bulbs by applying ground. The wires at the dome light will help you determine which system you have.
Delphi Corporation 1441 West Long Lake Road Troy, Michigan 48098-5090 U.S.A. Customer Service: [1] 877.GO DELPHI www.delphi.com ©2004 Delphi Corporation. All rights reserved.