ESM 460 electric multifunction oven Users Operating Instructions Before operating this oven, please read these instructions carefully
Dear Customer Thank you for choosing one of our appliances which has been carefully designed and built by our specialist staff and thoroughly tested to satisfy your cooking requirement. We suggest that you read this Instruction Booklet so that you will understand fully how to operate the appliances. Please keep the booklet handy. You may wish to refer to it at a later date. De Longhi Contents Model ESM 460 Page Number Installation . . . . . . . . . . . . . . . . . . . . . . . . . . . . . . . . . . . . . .
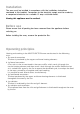
Installation The oven must be installed in accordance with the installation instructions contained in this booklet. Connection to the electricity supply must be made by a competent electrician to a suitable 13 amp. switched socket. Warning this appliance must be earthed. Before use Please ensure that all packing has been removed from the appliance before switching on. Before installing the oven, remove the protective film.
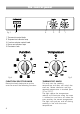
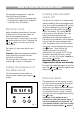
The control panel A U T O Fig. 1 5 4 3 2 1 1. Thermostat control knob 2. Temperature indicator lamp 3. Function selector control knob 4. Power on indicator lamp 5. Electronic clock Fig. 2 Fig. 3 FUNCTION SELECTOR KNOB THERMOSTAT KNOB Rotate the knob clockwise to set the oven for one of the following functions. This only sets the cooking temperature and does not switch the oven on. Rotate clockwise until the required temperature is reached (from 50 to 250°C).
OVEN LIGHT By setting the knob to this position, only the oven light comes on (15 W). It remains on in all the cooking modes. TRADITIONAL CONVECTION COOKING The upper and lower heating elements come on. The heat is dispersed by natural convection and the temperature must be set to between 50° and 250°C via the thermostat knob. The oven must be preheated before cooking. Recommended for: Food that requires the same degree of cooking both inside and out, for example roasts, spare pork ribs, meringues etc.
HOT AIR COOKING The circular resistance and fan come on. The heat is dispersed by forced convection and the temperature can be regulated to between 50° and 250°C via the thermostat knob. The oven does not require preheating. Recommended for: Food which has to be well-cooked outside and soft or rosy inside, for example lasagne, lamb, roast beef, whole fish etc. VENTILATED GRILL COOKING The infrared grill and the fan come on.
CONVECTION COOKING WITH VENTILATION The upper and lower heating elements come on and the fan. The heat coming from above and below is dispersed by convection with ventilation. The temperature can be set to between 50° and 250°C via the thermostat knob. Recommended for: Voluminous dishes and large quantities which require the same degree of cooking both inside and out, for example rolled roasts, turkey, roast legs, cakes etc.
ROASTING To obtain classical roasting, it is necessary to remember: – that it is advisable to maintain a temperature between 180° and 200 °C. – that the cooking time depends on the quantity and the type of foods. GRILLING AND COOKING “AU GRATIN” Grilling may be done without the roasting jack on position of the switch, because the hot air completely envelops the food that is to be cooked. Set the thermostat to position 175 °C and after having preheated the oven, simply place the food on the rack.
How to use the electronic clock The electronic programmer is a device with the following functions: – 24 hours clock with illuminated display – Timing of oven cooking with automatic switch-off (max. 99 minutes). Electronic clock Upon immediate connection of the oven or after a mains failure, three zeros will flash on the programmer panel. To set the clock it is necessary to push the button and then, within 7 seconds, the or button until you have set the correct time.
Cleaning and Maintenance Using the oven for the first time You are advised to carry out the following operations: • Clean the inside of the oven with a cloth soaked in water and neutral detergent and dry thoroughly. • Hang the wire racks, together with the self cleaning liners, on the oven sides (Figure 5). • Slide in, on the guides, the shelf and the tray etc. (Figure 6). • To eliminate traces of grease from the heating elements, switch the oven on to the maximum temperature for 90 minutes. Fig. 5 Fig.
Cleaning General After use allow the oven to cool and whilst the oven is still “warm” it should be wiped with a damp cloth using warm soapy water. With regular cleaning the oven will remain in good condition. It is advisable to disconnect the electrical supply to the oven before cleaning is undertaken. Enamel Parts In order to maintain the condition of the enamel parts, clean and wipe frequently with hot soapy water.
Important notes Installation, and any demonstration, information or adjustments are not included in the warranty. We recommend that the installation is carried out by qualified personnel. To replace the interior oven lamp, unscrew the glass guard and make sure that the new lamp has identical specifications, i.e. 15 Watts, 300°Centigrade. Be sure to switch off the electrical supply.
Do’s and do not’s Do’s and do not’s • Do always grill with the oven door closed. • Do always remove the detachable handle when using the grill pan. • Do read the user instructions carefully before using the cooker for first time. • Do allow the oven to heat for one and a half hours, before using for the first time, in order to expel any smell from the new oven insulation, without the introduction of food. • Do clean your oven regularly. • Do remove spills as soon as they occur.
For the installer Building in the oven All our ovens are designed for being easily built in - whether masonry or a cabinet made of wood laminated plastic or metal, provided it is heat resistant. To fit the oven properly, any such enclosure, should be as shown in figures 8 and 9. The oven should then be secured by 4 screws fitted into the holes provided at the sides of the oven.
50 585 560 Fig. 9 560 594 591 555 . in m 50 5 0 54 594 Fig.
Fixing the oven Introduce the oven into the furniture opening and fix it with screws as figure 7. It is essential that the oven rests on a surface which will support its weight, as the screw fixing is only complementary. Warning! It is very important that the upper slits of the control panel are not obstructed. These slits are part of the ovens air circulation system and any blockage could result in overheating.
Electrical connection All electrical wiring must be in compliance with the appropriate I.E.E. and local Electricity Board regulations and carried out by a qualified electrician, e.g. your local Electricity Board or a contractor who is on the roll of the National Inspection Council For Electrical Contracting (N.I.C.E.I.C.).
How to wire a 13 amp plug Important.
Technical Data Overall dlmensions Width 594 mm Height 594 mm Depth 560 mm Aperture sizes for kitchen base unit Width 560 mm Height 591 mm Depth 550 mm Aperture sizes for tall housing unit Width 560 mm Height 585 mm Depth 550 mm Rated voltage and frequenoy 230V - 50 Hz Maximum input 2560 W Top element 1.00kW Bottom element 1.40kW Fan element 2.50kW Grill element 2.50kW Oven lamp 15 W Fan motor 25 W Cooling fan 20 W De Longhi continually strive to improve their products.
ESM 460 electric multifunction oven 1101503 ß3