
Instruction Manual


13
5. The appliance proceeds with preparation and the image
of the selected beverage appears on the control panel,
together with a progress bar which gradually lls as the
operation proceeds and a description of each individual
phase (grinding, brewing coee).
Once the coee has been made, the appliance is ready to make
the next beverage.
Please note!
• "Cancel" or "Stop": press to stop preparation completely
and go back to the homepage.
SAFETY WARNING:
After making the carafe of coee, leave the
appliance to cool for 5 minutes before mak-
ing another beverage. Risk of overheating!
9. MAKING MILKBASED BEVERAGES
Please note!
To avoid milk with poor froth or large bubbles, always clean
the milk container (D) as described in sections “9.5 Cleaning
the milk container after use” and “17.10 Cleaning the milk
container”.
9.1 Filling and attaching the milk container
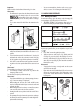
1. Press the release buttons (D4) and lift the lid (D1) (g. 18);
2. Fill the milk container (D7) with a sucient quantity of
milk, not exceeding the MAX level marked on the container
(g. 19). Each mark on the container corresponds to about
100 ml of milk;
Please note!
• For a denser more even froth, you must use skimmed or
partially skimmed milk at refrigerator temperature (about
5°C).
• If "Energy Saving" mode is enabled (see section “6.7 Gen-
eral”), you may have to wait a few seconds before the bev-
erage is delivered.
3. Make sure the milk intake tube (D5) is correctly inserted on
the bottom of the milk container lid (g. 20);
4. Attach the lid back on the milk container;
Please note!
The milk container lid incorporates a rell lid (D3). If during
preparation you notice that the level of the milk is low, add
milk through the rell lid without extracting the container, then
complete preparation of the beverage.
5. If present, extract the hot water/steam spout (F1) by press-
ing the release button (F3) (g. 21);
6. Attach the milk container (D) to the connection nozzles
(A11) and push as far as it will go (g. 22). The machine
emits a beep (if the beep function is enabled);
7. Adjust the milk spout (D6) by turning it anticlockwise (g.
23);
8. Place a suciently large cup under the coee spouts and
milk spout (A17) (g. 24);
9. Select the desired beverage as described in the following
paragraphs.
9.2 Your milk-based beverage at a touch
To deliver milk-based beverages, on the homepage (B), press
the image corresponding to the desired beverage. The appliance
proceeds with preparation and the image of the selected bever-
age appears on the control panel, together with a progress bar
which gradually lls as the operation proceeds and a description
of each individual phase (grinding, brewing coee, milk deliv-
ery, etc.).
At the end of preparation, the message "Your beverage is
ready!" appears on the display. The appliance is now ready to
be used again.
Please note!
As soon as delivery has ended, to increase the quantity of coee,
just press "Extra". When the required quantity is reached, press
"Stop".
9.3 Customising the beverages
To deliver a customised milk-based beverage, proceed as
follows:
1. Press at the bottom of the image corresponding to the
desired beverage. The parameters that can be customised
according to your tastes appear on the display:
"Quantity"
"Froth"
NO MIN MED MAX
"Aroma"
"Coee type"
"Temperature"
2. After setting the parameters, press
1X
2X
to make 1 or
(if possible for the selected beverage)
1X
2X
to make
2 cups;
3. The appliance proceeds with preparation and the image of
the selected beverage appears on the control panel, together