
Instruction Manual


11
9. "Insert water tank. Press OK to empty water circuit": put
the tank back in the appliance and press "OK";
10. Water circuit emptying underway": wait for the appli-
ance to empty the circuit; (Important: hot water from the
spouts!). As the water circuit empties, the appliance could
become noisier. This is part of normal operation.
11. "Empty drip tray": extract and empty the drip tray, then
put back in the appliance and press "Next";
12. "Emptying complete. Press OK to turn o": press "OK". The
appliance goes o.
The next time the appliance is turned on, follow the instructions
in section “3. Setting up the appliance”.
6.12 Edit prole
You can use this function to modify the image and colour of the
icon for each prole. To customise the icon, proceed as follows:
1. Press the settings menu (B6);
2. Select "Edit prole";
3. "Select prole to edit": select the prole and press "Next";
4. "Select your favourite icon and colour. Use the COFFEE LINK
App to personalize prole name": customise the prole as
you want, then press "OK" to conrm.
5. Press "←" to save the new selection and go back to the
homepage.
6.13 Default values
This resets all menu settings and user customisation back to
the default values (with the exception of the language, which
remain as set, and the statistics).
Proceed as follows:
1. Press the settings menu (B6);
2. Select "Default values";
3. "Press OK to reset machine to default values or go to next
page to reset single prole":
• To reset the appliance to the default values: press "OK";
• To reset the individual proles to the default values:
press the arrow to pass to the next screen, select the
prole to reset and press "OK.
4. "Press OK to conrm reset to default values": press "OK";
5. "Default values set": press "OK" to exit the menu and go
back to the homepage (main screen).
Please note!
When the appliance (not the individual proles) has been reset
to the default values, the machine proposes the introductory
video again.
6.14 Statistics
This displays statistics relating to the machine. To view the sta-
tistics, proceed as follows:
1. Press the settings menu (B6);
2. Select "Statistics". To display the information and scroll be-
tween screens, press "Next" or "Back".
3. Press "←" to go back to the homepage.
7. MAKING COFFEE
7.1 Making coee using coee beans
Important!
Do not use green, caramelised or candied coee beans as they
could stick to the coee mill and make it unusable.
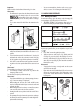
1. Fill beans containers (I) (A4) and/or (II) (A6) with coee
beans ( g. 12);
2. Place 1 or 2 cups under the coee spouts (A17);
3. Lower the spouts as near as possible to the cup (g. 13).
This makes a creamier coee.
4. Select the coee you want to make as described in the fol-
lowing paragraphs.
7.2 Your coee at a touch
To deliver coee-based beverages, press the image on the
homepage (B) corresponding to the desired coee (e.g. espres-
so, g. 14). The appliance proceeds with preparation. The image
of the selected beverage appears on the display (B1), together
with a progress bar which gradually lls as the operation pro-
ceeds and a description of each individual phase (grinding,
brewing coee).
At the end of preparation, the message "Your beverage is
ready!" appears on the display. The appliance is now ready to
be used again.
7.3 Customising the beverages
To make coee-based beverages with customised parameters,
proceed as follows:
1. Press at the bottom of the image corresponding to
the desired coee (e.g. espresso, g. 15). The parameters
that can be customised according to your tastes appear on
the display (B1):
"Quantity"
"Aroma"
"Coee type"
"Temperature"
Please note!
When "pre-ground coee" is selected, but the chosen beverage
is not suitable for this mode, the message "PRE-GROUND MODE
IS NOT ALLOWED WITH THIS BEVERAGE" is displayed.