5713250292_02_0521 De’Longhi Appliances via Seitz, 47 31100 Treviso Italia www.delonghi.
ECAM29X.6Y - 29X.
IT EN pag.
1. INTRODUZIONE SOMMARIO 1. INTRODUZIONE ....................................... 3 2. AL PRIMO UTILIZZO ................................ 3 3. ACCENSIONE E SPEGNIMENTO ................. 3 4. EROGAZIONE BEVANDE CAFFÈ ................. 4 Le operazioni principali della macchina sono illustrate passo a passo nella Quick Guide. Prendetevi un paio di minuti per leggere le presenti istruzioni per l’uso. Eviterete così di incorrere in pericoli o di danneggiare la macchina.
• Ad ogni spegnimento, l’apparecchio esegue un risciacquo automatico, qualora sia stato preparato un caffè. Pericolo scottature! Durante il risciacquo, dai beccucci dell’erogatore del caffè fuoriesce un po’ di acqua calda. Prestare attenzione a non venire in contatto con spruzzi d’acqua. • Per accendere o spegnere l’apparecchio, premere il tasto . Se l’apparecchio non viene utilizzato per periodi prolungati, disconnettere l’apparecchio dalla rete elettrica. • 4.
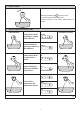
Per un’erogazione del caffè Girare di uno scatto verso il più corposa e migliorare numero 1 l’aspetto della crema 5. PREPARAZIONE DELLE BEVANDE LATTE L’effetto di questa correzione si avverte solo dopo l’erogazione di almeno 2 caffè successivi. 5.1 Nota Bene: La manopola di regolazione deve essere ruotata solo mentre il macinacaffè è in funzione nella fase iniziale di preparazione delle bevande caffè. 4.7 1. 2. ; sul coperchio deve arrivare sul simbolo 2. Sollevare quindi il coperchio.
Per versare la quantità corretta, fate riferimento alla scala graduata sul contenitore latte, tenendo presente che: 3. Al raggiungimento della quantità in tazza desiderata, ripremere il tasto della bevanda: l’erogazione si interrompe e la quantità è memorizzata. Nota Bene ! • Per annullare la programmazione in corso, premere un tasto relativo ad un’altra bevanda • Per la bevanda My Latte è programmabile solo la quantità di caffè, mentre il latte sarà utilizzato tutto come previsto dalla ricetta.
dratini di colore rosso, a seconda della durezza dell’acqua ogni quadratino corrisponde a 1 livello. Total Hardness Test 8.1 Sostituzione del filtro Please note! Quando sono trascorsi i due mesi di durata (vedi datario), oppure se non viene utilizzato l’apparecchio per 3 settimane, procedere alla sostituzione del filtro anche se la macchina non lo richiede ancora. Livello durezza 1 Bassa 2 Media 8.
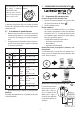
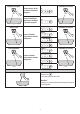
1. Entrare nel menù: x5 sec Mantenere premuto il tasto per alcuni secondi: si accendonoi tasti relativi alle impostazioni. Procedere premendo il tasto relativo all’impostazione da regolare. 2.
Risparmio energetico 2 Confermare la selezione Premere uno dei chicchi per attivare il risparmio energetico ON Premere il simbolo premacinato per disattivare il risparmio energetico 2 OFF LIVELLO 1 Durezza acqua 3 Confermare la selezione 3 LIVELLO 2 Premere il simbolo corrispondente al livello da impostare LIVELLO 3 LIVELLO 4 15 MINUTI Autospegnimento 4 Confermare la selezione 30 MINUTI Premere il simbolo corrispondente al tempo da impostare 4 1 ORA 3 ORE 3.
10.1 Reset ai valori di fabbrica Verificare che la macchina sia in stand-by (spenta, ma collegata alla rete elettrica). Mantenere premuti per 5 secondi i tasti relativi alle bevande 1, : ritornano ai valori di fabbrica tutte le impostazioni e 2e anche le quantità delle bevande. x5 La macchina emette un beep prolungato e tutte le spie lampeggiano a conferma del reset sec 1 2 P BEE 11.
Componente Frequenza Procedura Componenti vaschetta raccogligocce La vaschetta raccogligocce è provvista • di un indicatore galleggiante di colore • rosso) del livello dell’acqua contenuta. Prima che questo indicatore cominci a sporgere dal vassoio poggiatazze, è ne• cessario svuotare la vaschetta e pulirla Interno della macchina Controllare periodicamente (circa una Spegnere e scollegare dalla rete elettrica la macchina.
. PULIZIA DELL’INFUSORE Attenzione! L’infusore non può essere estratto quando la macchina è accesa. 1. Premere il tasto per spegnere la macchina; 2. Estrarre il serbatoio acqua; 3. Aprire lo sportello infusore posizionato sul fianco destro; 1 PU SH 2 4. Premere il pulsante per estrarre il connettore; 1 4. Premere verso l’interno i due tasti di sgancio colorati e contemporaneamente estrarre l’infusore verso l’esterno; SH 2 PU 5.
Per completare correttamente il ciclo di decalcificazione fare molta attenzione alle quantità richieste nel serbatoio acqua per ogni fase: Fase 2: Primo risciacquo Fase 3: Secondo risciacquo 9. Una volta inserito, assicurarsi che i due tasti colorati siano scattati verso l’esterno; • PU SH • • Prima dell’uso, leggere le istruzioni e l’etichettatura del decalcificante, riportate sulla confezione del decalcificante stesso. Si raccomanda di utilizzare esclusivamente decalcificante De’Longhi.
. SIGNIFICATO DELLE SPIE Spia Spia Significato Significato Mancanza chicchi: riempire il contenitore chicchi, quindi premere un tasto qualsiasi per uscire dall’allarme. Le spie relative alle bevande La macchina si sta riscaldanlampeggiano do: attendere Le spie relative alle bevande La macchina è pronta all’ue ai relativi settaggi sono so: procedere selezionando accese fisse la bevanda da erogare e le relative opzioni Sostituire il filtro (vedi capitolo “8.
Spia Significato Spia • Il contenitore latte è stato estratto durante l’erogazione latte. Reinserire il contenitore latte: la macchina ritorna pronta all’uso. • Il contenitore latte è stato estratto durante l’erogazione del caffè. Reinserire il contenitore latte: la macchina completa la preparazione erogando il caffè. • • Significato Il circuito idraulico è vuoto.
16. RISOLUZIONE DEI PROBLEMI In basso sono elencati alcuni possibili malfunzionamenti. Se il problema non può essere risolto nel modo descritto, si deve contattare l’Assistenza Tecnica. PROBLEMA POSSIBILE CAUSA RIMEDIO L’apparecchio non si accende. La spina non è collegata alla presa. Collegare la spina alla presa. Il caffè non è caldo. Le tazze non sono state pre-riscaldate. Riscaldare le tazze risciacquandole con dell’acqua calda (N.B: si può utilizzare la funzione acqua calda).
PROBLEMA POSSIBILE CAUSA RIMEDIO Al termine della decalcificazione, l’appa- Durante i due cicli di risciacquo, il serba- Svuotare la vaschetta raccogligocce, riempire recchio richiede un terzo risciacquo toio acqua non è stato riempito fino al il serbatoio fino al livello MAX e effettuare il livello MAX terzo risciacquo. Il latte ha bolle grandi Il latte non è sufficientemente freddo o Utilizzare latte o totalmente scremato, non è parzialmente scremato o scremato.
1. INTRODUCTION CONTENTS 1. INTRODUCTION......................................18 2. SETTING UP THE APPLIANCE ..................18 3. TURNING THE MACHINE ON AND OFF ......18 4. MAKING COFFEE BEVERAGES ..................19 4.1 4.2 4.3 4.4 4.5 4.6 4.7 The principal functions of the machine are illustrated step by step in the Quick Guide. Take a few minutes to read this Instruction for Use. This will avoid all risks and damage to the appliance.
• Whenever the machine is turned off after being used to make coffee, it performs an automatic rinse cycle. Danger of scalding! During rinsing, a little hot water flows from the coffee spouts. Take care to avoid contact with splashes of water. • To turn the appliance on or off, press the button. If you will not be using the appliance for some time, unplug from the mains socket. button To perform the rinse cycle, just press and hold the for about 5 seconds.
2. menu is accessed when the indicator switches to fast blink. Delivery begins; Once the cup is filled to the desired level, press the beverage button again. Delivery stops and the quantity is memorised.
ternatively, you can select pre-ground coffee and then add one measure of coffee as indicated in the Quick Guide ( ). 5.3 • • 5.4 At the end of preparation To prepare a number of cappuccinos and milk based coffees, only clean the milk container after you have prepared the last beverage. • If there is some milk left, place the container in the refrigerator immediately after cleaning. For optimum results over time, clean the Lattecrema system thoroughly as described in chapter “12.
9. TIPS FOR ENERGY SAVING 2. See instructions in section “10. Settings menu” to set the machine. Please note! After two months (see date indicator) or when the appliance has not been used for 3 weeks, you should replace the filter even if the message has not yet been displayed. • • • • To reduce energy consumption, after delivering one or more beverages, remove the milk container. Set auto-off to 15 minutes (see “10. Settings menu”); Enable Energy Saving (see “10.
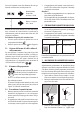
Beep Confirm selection Press one of the bean symbols to enable the beep ON Press the pre-ground symbol to disable the beep OFF Coffee temperature LOW 1 Confirm selection 1 Press the bean symbol corresponding to the required temperature MEDIUM HIGH Energy saving 2 Confirm selection Press one of the bean symbols to enable energy saving ON Press the pre-ground symbol to disable energy saving OFF LEVEL 1 Water hardness 3 LEVEL 2 Press the symbol corresponding to the level to set 2 Confir
15 MINUTES Auto-off 4 Confirm selection 4 30 MINUTES Press the symbol corresponding to the time to set 1 HOUR 3 HOURS 3. Exit the menu: Press the button: The machine is ready for use. Please note! The machine exits the settings menu automatically if there is no activity for 30 seconds. 10.1 Reset default values Make sure the machine is in stand-by (off, but connected to the mains power supply). Press the buttons corresponding to beverages 1, 2 and and hold for 5 seconds.
11. CLEANING THE MACHINE Important! • Do not use solvents, abrasive detergents or alcohol to clean the coffee machine. With De’Longhi superautomatic coffee machines, no chemical products are required for cleaning purposes. • Do not use metal objects to remove encrustations or coffee deposits as they could scratch metal or plastic surfaces. Component Frequency Procedure Grounds container When the light comes on, the • grounds container must be emptied and • the machine can no longer make coffee.
Component Frequency Procedure Coffee spouts Clean the coffee spouts regularly (once a • month) • Clean the coffee spouts regularly with a sponge or cloth; Check the holes in the coffee spout are not blocked. If necessary, remove coffee deposits with a toothpick. 12. CLEANING THE MILK CONTAINER Important! • When cleaning the milk container, do not use detergents, abrasive sponges or metal objects to remove any milk deposits. Clean the milk container each time you prepare milk as described below: 1.
PU SH 3. Open the infuser door on the right side of the machine; 9. Once inserted, make sure the two coloured buttons have snapped out; Press the two coloured release buttons inwards, at the same time pulling the infuser outwards; PU SH PU SH 4. 10. Close the infuser door; 11. Put the water tank back. 5. Soak the infuser in water for about 5 minutes, then rinse under the tap; Important! RINSE WITH WATER ONLY NO DETERGENTS - NO DISHWASHER 6.
15. EXPLANATION OF INDICATOR LIGHTS To complete the descaling cycle correctly, pay close attention to the quantities required in the water tank for each step: Step 3: Second rinse Light Meaning The beverage lights flash The machine is warming up: wait The beverage and settings The machine is ready for lights are on steadily use: select the desired beverage and relative options • • • Replace the filter (see section “8.
Light Meaning Light No coffee beans: fill the beans container, then press any button to reset the alarm. Meaning • The grinding is too fine and the coffee is delivered too slowly or not at all. Adjust the coffee mill (section “4.6 Adjusting the coffee mill”) • Too much coffee has been used.
Light Meaning Light Meaning The grounds container needs emptying Descaling is required (“14. Descaling ” and the dedicated section of the Quick Guide) Descaling has been interrupted. To use the machine The grounds container is missing or not inserted correctly: Insert the drip tray complete with grounds container and press as far as it will go again, press the BUTTON: delivery will begin and descaling will resume from Fig. 15, page 13 of the quick guide. → 16.
PROBLEM POSSIBLE CAUSE REMEDY The coffee is delivered too slowly or a The coffee is ground too finely. drop at a time. The machine does not make coffee Adjust the grinding level (“4.6 Adjusting the coffee mill”). The effect is not visible until at least 2 coffees have been made. Impurities have been detected in the in- Wait until the machine is ready for use ternal circuits again, and proceed to select the required beverage. Contact customer services if the problem persists.