
Instruction Manual


31
peut être remplacée: pour cette opération s’adresser à un centre
d’assistance agréé.
Le retrait de la meule peut aussi s'avérer nécessaire au cas où
un corps étranger bloquerait la meule. Dans ce cas, procéder au
nettoyage comme suit:
1. Vider le réservoir à grains (éventuellement en aspirant les
grains résiduels).
2. Accrocher la coupelle porte-ltre et faire une mouture “à
vide” pour libérer le conduit du café: accrocher le porte-l-
tre à la sortie moulin à café (A22) en l’alignant à l’inscrip-
tion INSERT et tourner la coupelle vers la droite (g. 18). La
mouture commence lorsque la coupelle atteint la position
CLOSE et s’interrompt automatiquement;
3. Éteindre l’appareil;
4. Enlever le réservoir à grains comme indiqué au paragraphe
précédent "13.7 Nettoyage du réservoir à grains".
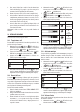
19
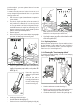
1942 43
5. Tourner le régulateur de mouture dans le sens inverse des
aiguilles d’une montre jusqu’en butée, sur la position “RE-
MOVE” (g. 42).
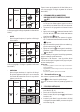
6. Extract the upper burr,
gripping it by the handle
(g. 43).
7. Clean the burr with a
brush (g. 44) and remove
the coee residues using a
vacuum cleaner (g. 41).
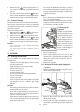
8. Put the upper burr back in place:
• Insert the burr in its housing (g. 45);
• Turn the selector to select the desired grinding level (g. 46);
45
46
• Make sure the burr is inserted correctly by pulling it by the
handle. If it is correctly inserted, it will not move;
9. Use a brush to remove any coee residues from the outlet
of the coee grinder (A22).
13.9 Replacing the burrs
Over time, the burrs will wear down. If you are unable to achieve
the ideal quantity of coee outlined in section "4.5 Régler la
quantité de café moulu dans le ltre", contact De'Longhi Cus-
tomer Service (see "www.delonghi.com").
13.10
Cleaning the "Sm
art tampi
ng station"
To guarantee top quality grinding, clean the “Smart tamping
station” regularly as follows:
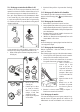
47 48
1. Clean the attachment area with a brush (g. 7).
2. Pull the
lever
(A23) as far as it will go and clean the presser
cylinder with a brush (g. 48). Then release the lever.
3. Use the tube brush (C8) to clean the coee guide (g. 49).
44