
Instruction Manual


12
12.2 Water hardness
The descale light (B9) comes on after a period of time es-
tablished according to water hardness. The machine can also
be programmed according to the actual hardness of the water
supply in the various regions, in which case descaling may be
required less frequently.
Proceed as follows:
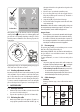
1. Remove the "TOTAL HARDNESS TEST" indicator paper (C4)
from its pack.
2. Immerse the paper completely in a glass of water for one
second.
3. Remove the paper from the water and shake lightly. After
about a minute, 1, 2, 3, or 4 red squares form, depending
on the hardness of the water. Each square corresponds to
one level.
4. Press and hold the
(B3) and (B7) buttons to-
gether for at least 3 seconds to access the menu. The
(B15) and
(B16) lights alternate;
5. Turn the mode selection dial (B8) to the
AMERICANO
position. The
light (B9) remains on steadily;
6. Press the button corresponding to the desired selection as
shown in the following table:
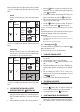
Total Hardness Test result Button Level
1
soft water
2
medium
water
3
hard or
very hard
water
7. Press the button (B1) to exit the menu. (If the appliance
is left idle for
about 1 minute, it exits automatically from
the settings menu and returns to regular use mode).
12.3 Auto-o
Auto-o can be set so that the appliance goes o after 9 min-
utes, one and a half hours, or three hours. Proceed as follows:
1. Press and hold the
(B3) and
(B7) buttons to-
gether for at least 3 seconds to access the menu. The
(B15) and
(B16) lights alternate;
2. Turn the mode selector dial (B8) to the
COFFEE posi-
tion: The
light (B13) remains on steadily;
3. Press the button corresponding to the desired selection as
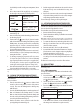
shown in the following table:
Button Time
9 minutes
1.5 hours
3 hours
4. Press the button (B1) to exit the menu. (If the appliance
is left idle for
about 1 minute, it exits automatically from
the settings menu and returns to regular use mode).
12.4 Default values
The appliance can be reset to the default values. Proceed as
follows:
1. Press and hold the
(B3) and
(B7) buttons togeth-
er for at least 3 seconds to access the menu;
2. Press and hold the
button for a few seconds until the
corresponding light starts ashing;
3. Press the
button (B1) to exit the menu. (If the appliance
is left idle for
about 1 minute, it exits automatically from
the settings menu and is ready for use again).
12.5 Energy saving
Use this function to enable or disable energy saving. When en-
abled, the function reduces energy consumption in compliance
with European regulations.
Proceed as follows:
1. Press and hold the
(B3) and
(B7) buttons togeth-
er for at least 3 seconds to access the menu;
2. Press the
button (B6). The light (B12) comes on ;
3. Press the
button (B1) to exit the menu. (If the appliance
is left idle for
about 1 minute, it exits automatically from
the settings menu and is ready for use again).
Please note:
• If energy saving mode is active, you may have to wait a few seconds before
delivery.
• When energy saving mode is disabled, steam is delivered immediately.
13. CLEANING
13.1 Cleaning the machine
The following parts of the machine must be cleaned regularly:
- drip tray (A13) complete with cup grille (A11) and drip tray
grille (A12);
- espresso cup grille (A10);
- coee lters (C2) and (C3);
- the bean container (A2);
- the coee grinder burrs;
- the coee grinder outlet (A22) (smart tamping station);
- boiler outlet (A21);
- water tank (A17);
- frothing wand (A8) as described in section "10. Cleaning
the frothing wand after use".