MACCHINA DA CAFFÉ COFFEE MAKER CAFETERIE KAFFEEAUTOMATEN KOFFIEZETTER CAFETERA CAFETEIRA MHXANH KAºE KAHVINKEITIN ESPRESSOMASKIN KAFFEMASKINE ESPRESSOMASKIN EKSPRES DO KAWY KÁVÉFŐZŐGÉP äéîÖÇÄêäÄ KÁVOVAR Istruzioni per l’uso Owner’s instructions Mode d’emploi Bedienungsanleitung Gebruiksaanwijzingen Instrucciones para el uso Manual de instruções O‰Ëy˜ xÚËÛ˘ Käyttöohjeet Bruksanvisning Brugervejledning Bruksanvisning Návod k pouÏití Kezelési utasítás àÌÒÚÛ͈Ëfl ÔÓ ˝ÍÒÔÎÛ‡Ú‡ˆËË Instrukcja użytkowanie
ELECTRICAL CONNECTION (UK ONLY) A) If your appliance comes fitted with a plug, it will incorporate a 13 Amp fuse. If it does not fit your socket, the plug should be cut off from the mains lead, and an appropriate plug fitted, as below. WARNING: Very carefully dispose of the cut off plug after removing the fuse: do not insert in a 13 Amp socket elsewhere in the house as this could cause a shock hazard. With alternative plugs not incorporating a fuse, the circuit must be protected by a 15 Amp fuse.
2 1 21 4 5 20 17 19 6 18 16 7 8 15 13 10 14 9 12 11
MAX 1 2 3 4 5 6 7 8 9 1 2 10 13 11 14 12 15
1 16 17 2 18 A B 19 20 21 22 23 24 5
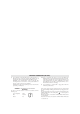
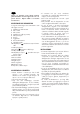
I Leggere con attenzione questo libretto istruzioni prima di installare ed usare l’apparecchio. Solo così potrete ottenere i migliori risultati e la massima sicurezza d’uso. DESCRIZIONE DELL’APPARECCHIO La seguente terminologia sarà continuamente usata nelle pagine successive.
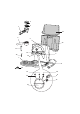
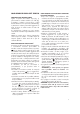
COME OPERARE PER FARE IL CAFFÉ ESPRESSO RIEMPIMENTO DEL SERBATOIO ACQUA Togliere il coperchio del serbatoio acqua (fig. 1), quindi estrarre il serbatoio tirandolo verso l'alto (fig. 2). Riempire il serbatoio di acqua fresca e pulita facendo attenzione a non superare la scritta MAX. (fig. 3). Reinserire il serbatoio premendolo leggermente in modo da aprire la valvola situata sul fondo del serbatoio stesso.
COME PREPARARE L’ESPRESSO CON IL PORTAFILTRO PER CIALDE (SE PREVISTO) 1.Eseguire il preriscaldamento della macchina come descritto nel paragrafo “PRERISCALDAMENTO DEL GRUPPO CAFFÉ”. Assicurandosi di lasciare il portafiltro agganciato alla macchina. Così facendo si ottiene il caffé più caldo. Inoltre il preriscaldamento garantisce una tenuta più efficace delle guarnizioni del portafiltro. 2.Premere il pulsante del portafiltro e inserire la cialda centrandola il più possibile sopra il filtro (fig. 14).
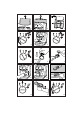
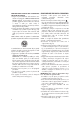
7.Rimontare l’ugello vapore infilandolo e ruotandolo in senso antiorario (fig. 21). PRODUZIONE DI ACQUA CALDA 1.Accendere la macchina ruotando la manopola selettore nella posizione (fig. 4). 2.Posizionare un recipiente sotto il cappuccinatore; 3.Quando la lampada spia OK si accende, posizionare la manopola selettore in (fig. 7) e contemporanemente ruotare la manopola vapore in senso antiorario (fig. 17): l'acqua calda uscirà dal cappuccinatore; 4.
PROBLEMA CAUSE POSSIBILI Non esce più il caffè espresso • Mancanza di acqua nel serbatoio • I fori dei beccucci del portafiltro sono otturati • La doccia della caldaia espresso é ostruita • Il serbatoio é mal inserito e la valvola sul suo fondo non é aperta. Il caffè espresso gocciola dai bordi del portafiltro anziché dai fori • Il portafiltro è male inserito; • La guarnizione della caldaia espresso ha perso elasticità • I fori dei beccucci del portafiltro sono otturati.
GB Thank you for choosing this Delonghi coffee machine. To get the very best out of your new coffee machine it is advisable to read these instructions before using the appliance. This is the only way to ensure optimum results and maximum safety.
USING YOUR MACHINE FOR THE FIRST TIME When you are using the machine for the first time, you should wash all the accessories i.e. filter holder, steam nozzle etc in warm soapy water and rinse. To ensure best tasting coffee the internal circuits must also be flushed through at least five times. To do this follow the directions below in “How to prepare espresso coffee” but use only water and not coffee.
the filter holder while the machine is dispensing coffee. 7. To remove the used coffee, hold the filter locked with the special lever that is built into the handle and let the coffee fall out by knocking the overturned filter holder (Fig. 12).
6.Re-attach the steam nozzle by inserting it firmly into the steam tube (fig. 20). 7.Re-attach the cappuccino maker by sliding it all the way into the steam nozzle and then turning it in an anti-clockwise direction (fig. 21). PRODUCING HOT WATER 1. Turn on the coffee unit by turning the selector knob to the position (fig. 4). 2. Position a container under the cappuccino maker. 3. When the ‘OK’ pilot light comes on, position the selector knob at (fig.
PROBLEM Espresso coffee no longer comes out. Espresso coffee drips from the edges of the filter holder, instead of from its holes. The espresso coffee is cold. POSSIBLE CAUSES • Lack of water in the tank. • The holes in the filter holder spouts are blocked. • The outlet of the espresso boiler is blocked. • Fill the water tank. • Clean the holes in the spouts. • The tank is badly inserted and the valve at the bottom is not open. • Press the tank lightly so as to open the valve at the bottom.
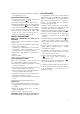
F Nous vous recommandons de lire ce mode d’emploi dans sa totalité pour une utilisation optimale et en toute sécurité. DESCRIPTION DE L’APPAREIL Termes utilisés dans la suite de la notice 1. Porte-filtre pour mouture 2. Filtre 1 tasse 3. Filtre 2 tasses 4. Porte-filtre pour doses de café pré-confectionnées (selon le modèle) 5. Commande ouverture vapeur 6. Tasseur de mouture 7. Plan d’appui tasses 8. Cordon d'alimentation 9. Voyant OK 10. Voyant (machine allumée) en fonction café 11.
COMMENT PROCEDER POUR FAIRE LE CAFE ESPRESSO REMPLISSAGE DU RESERVOIR Retirer le couvercle du réservoir d'eau (fig.1), puis sortir le réservoir en le tirant vers le haut (fig.2). Remplir le réservoir d'eau fraîche et propre. Ne dépassez jamais le niveau MAX indiqué sur le réservoir (fig.3). Remettre le réservoir en place en appuyant légèrement de façon à ouvrir le clapet situé au fond du réservoir. Plus simplement on peut remplir le réservoir sans le retirer en versant l'eau directement avec une carafe.
meilleure étanchéité des joints du porte-filtre. 2.Appuyer sur le bouton du porte-filtre et mettre la dose pré confectionnée sur le filtre (fig. 14). Toujours suivre les indications sur l’emballage des dosettes pour bien positionner la dosette sur le filtre. REMARQUE: utiliser des doses de café préconfectionnées respectant le standard ESE.
6.Remonter le gicleur vapeur sur le tuyau sortie vapeur en tournant à bloc (fig. 20). 7.Remonter la buse pour cappuccino en l’introduisant et en la tournant en sens inverse des aiguilles d’une montre (fig. 21) AUTRES NETTOYAGES 1.Pour le nettoyage de la machine ne pas utiliser de solvants ou de détergents abrasifs. Seulement un chiffon doux humide. 2.Enlever l’égouttoir, le vider et le laver régulièrement. 3.Nettoyer le réservoir d’eau pour l’espresso PRODUCTION D'EAU CHAUDE 1.
PROBLEME Le café espresso ne sort plus CAUSES PROBABLES • Manque d’eau dans le réservoir • Remplir le réservoir • Les trous du porte-filtre sont obstrués • Nettoyer les buses • Nettoyer comme indiqué au paragraphe" Nettoyage de la douche chaudière espresso ". • Appuyer légèrement sur le réservoir de façon à ouvrir le clapet sur le fond.
D Bitte vor Installation und Gebrauch des Gerätes die vorliegende Bedienungsanleitung sorgfältig lesen. Sie erzielen dadurch optimale Ergebnisse und Betriebssicherheit. BESCHREIBUNG DES GERÄTES Die folgende Terminologie gilt für alle darauffolgenden Seiten. 1. Filterhalter für Kaffeepulver 2. Sieb für 1 Tasse 3. Sieb für 2 Tassen 4. Filterhalter für Kaffeepads (falls vorgesehen) 5. Dampfaustrittshebel 6. Kaffeestopfer 7. Rohrbürste 8. Netzanschlusskabel 9. Kontrolllampe “OK” 10.
Behälter leicht andrücken, damit sich das am Behälterboden befindliche Ventil öffnet. Der Behälter kann auch aufgefüllt werden, ohne herausgezogen zu werden, indem man das Wasser direkt mit einer Kanne eingießt. HINWEIS: Setzen Sie das Gerät niemals mit leerem Wasserbehälter in Betrieb und sorgen Sie dafür, ihn immer aufzufüllen sobald der Wasserstand einige Zentimeter vom Behälterboden erreicht hat.
ZUBEREITUNG VON ESPRESSO KAFFEE MIT DEM FILTERHALTER FÜR KAFFEEPADS (FALLS VORGESEHEN) 1. Das Gerät wie im Abschnitt „Vorheizen der KaffeeEinheit” beschrieben vorheizen. Dabei ist darauf zu achten, dass der Filterhalter in der Maschine eingerastet bleibt. Auf diese Weise erhalten Sie einen wärmeren Kaffee und das Vorheizen gewährleistet zudem, dass die Dichtungen des Filterhalters besser halten. 2. Die Drucktaste des Filterhalters drücken und das Pad auf den Filter legen (Abb.14).
WARMWASSERERZEUGUNG 1.Die Maschine durch Drehen des Wahldrehschalters auf die Position (Abb. 4) stellen. 2.Ein Gefäß unter die Aufschäumdüse stellen. 3.Sobald die Kontrolllampe „OK“ aufleuchtet, den Wahldrehschalter auf stellen (Abb.7) und gleichzeitig den Dampfdrehknopf gegen den Uhrzeigersinn drehen (Abb.17): Das warme Wasser wird aus der Aufschäumdüse austreten; 4.Zur Unterbrechung des Warmwasseraustritts, den Dampfdrehknopf im Uhrzeigersinn drehen und den Wahldrehschalter auf “O” stellen.
STÖRUNG Es kommt kein Kaffee mehr heraus WAHRSCHEINLICHE URSACHEN • Kein Wasser im Behälter. • Die Öffnungen der Ausgüsse des Filterhalters sind verstopft. • Die Dusche des Espressokessels ist verstopft. • Der Behälter wurde nicht korrekt eingesetzt und das Ventil am Behälterboden ist nicht geöffnet. Der Espressokaffee tropft aus den Rändern des Filterhalters anstatt aus den Löchern • Der Filterhalter wurde nicht richtig eingesetzt. • Die Kesseldichtung hat an Elastizität verloren.
NL Alvorens het apparaat te installeren en te gebruiken eerst deze handleiding zorgvuldig lezen. Alleen op deze wijze bereikt U de beste resultaten en de hoogste veiligheid. BESCHRIJVING VAN HET APPARAAT De volgende termen zullen voortdurend worden gebruikt op de volgende bladzijden. 1. Filterhouder voor gemalen koffie 2. Filter voor 1 kopje 3. Filter voor 2 kopjes 4. Filterhouder voor servings (indien voorzien) 5. Stoomknop 6. Aandrukplaatje 7. Borsteltje 8. Elektriciteitssnoer 9. OK-lampje 10.
VOORVERWARMING VAN DE KOFFIEGROEP Om espressokoffie op de juiste temperatuur te krijgen, moet het apparaat beslist worden voorverwarmd: draai de keuzeknop minstens een half uur voordat u koffie wilt zetten in de stand (afb. 4). Laat hierbij de filterhouder in het apparaat zitten (en controleer altijd of de stoomknop dicht is). De filterhouder wordt bevestigd door hem onder de sproeier van het hogedrukreservoir te steken met de handgreep naar links, zie afb.
De norm ESE is een systeem dat wordt aangenomen door de grootste producenten van servings, met het oog op de eenvoudige en schone bereiding van espresso. 3. Maak het filterhouder aan het apparaat vast door altijd zo ver mogelijk te draaien (afb. 5). BELANGRIJK: Als u een filterhouder voor servings gebruikt, dient u na het gebruik van de filterhouder voor gemalen koffie, eventueel koffiegruis te verwijderen (zie figuur) dat zich vastgehecht heeft aan de opening van het stoomreservoir.
SCHOONMAAK VAN DE SPROEIER VAN HET ESPRESSO HOGEDRUKRESERVOIR Tenminste eenmaal per jaar moeten de openingen van het espresso hogedrukreservoir schoongemaakt worden op de volgende wijze: • controleer dat het koffieapparaat niet warm is en dat de stekker uit het stopcontact gehaald is; • draai met behulp van een schroevedraaier de schroef los die de sproeier van het espresso hogedrukreservoir vastmaakt (afb.
PROBLEEM WAARSCHIJNLIJKE OORZAKEN OPLOSSING Er komt geen espresso uit het apparaat • Geen water in het reservoir • De openingen van het mondstuk van de filterhouder zitten verstopt • De sproeier van het espresso hogedrukreservoir zit verstopt • Het reservoir is niet goed ingevoerd en de klep op de bodem is niet open. • Vul het waterreservoir • Maak de openingen van het mondstuk schoon.
E Leer atentamente este manual de instrucciones antes de instalar y utilizar el aparato. Solamente así se obtendrán los mejores resultados y la máxima seguridad durante su utilización. DESCRIPCIÓN DEL APARATO La siguiente terminología se repetirá en las páginas sucesivas. 1. Portafiltro para café molido 2. Filtro 1 taza 3. Filtro 2 tazas 4. Portafiltro para pastillas (si está previsto) 5. Manecilla vapor 6. Pisacafé 7. Apoya tazas 8. Cable de alimentación 9. Luz testigo OK 10.
A continuación, llenar el depósito simplemente sin quitarlo y verter el agua directamente con una jarra. NOTA: no poner nunca en funcionamiento el aparato sin el agua en el depósito y no olvidarse nunca de llenarlo cuando el nivel se encuentra a un par de centímetros del fondo. PRECALENTAMIENTO DEL GRUPO CAFÉ Para obtener un café exprés a la temperatura ideal, es absolutamente necesario precalentar la máquina. Girar la llave selector en la posición (fig.
NOTA: Utilizar pastillas que respeten la norma ESE: indicada en todos los envases con la siguiente marca: La norma ESE es un sistema aceptado por los productores de pastillas más grandes que permite preparar un café exprés de forma fácil y limpia. 3. Enganchar el portafiltro a la máquina apretándolo del todo (fig. 5).
LIMPIEZA Y MANTENIMIENTO DECALCIFICACIÓN LIMPIEZA DEL PORTAFILTRO PARA PASTILLAS (CUANDO ESTÁ EN DOTACIÓN). Limpiar periódicamente el portafiltro para pastillas en el modo siguiente: • pulsar el pulsador del portafiltro y quitar el filtro como se indica en la figura 22. • controlar que los orificios del filtro no estén obstruidos. Si es necesario, limpiarlo meticulosamente con agua caliente restregando con una esponja abrasivo. • limpiar la parte interna del portafiltro y la junta de goma.
PROBLEMA No sale café exprés CAUSAS PROBABLES • Falta de agua en el depósito. • Orificios de las boquillas del portafiltro obstruidos. • Vaporizador de la caldera café exprés obstruido. • Depósito insertado incorrectamente, válvula situada en la parte inferior cerrada. El café exprés gotea por los bordes del portafiltro y no por los orificios. • Portafiltro colocado incorrectamente. • La junta de la caldera café exprés ha perdido elasticidad.
P Ler com atenção este livrete de instruções antes de instalar e usar o aparelho. Só assim se podem obter os melhores resultados e a máxima segurança de utilização. DESCRIÇÃO DO APARELHO A seguinte terminologia será continuamente usada nas páginas seguintes. 1. Porta-filtro para café moído 2. Filtro 1 chávena 3. Filtro 2 chávenas 4. Porta-filtro para discos de café (se previsto) 5. Manípulo do vapor 6. Calcador 7. Escova 8. Cabo de alimentação 9. Luz piloto OK 10.
lo quando o nível chega a cerca de dois centímetros do fundo. AQUECIMENTO PRÉVIO DA MÁQUINA Para se obter um café expresso à temperatura ideal, é absolutamente necessário aquecer previamente a máquina: girar o manípulo selector para a posição (fig. 4) pelo menos meia hora antes de fazer o café, certificando-se de ter deixado o porta-filtro encaixado na máquina (certificar-se sempre que o manípulo do vapor esteja fechado).
O standard ESE é um sistema aceite pelos maiores produtores de discos de café e permite preparar um café expresso de modo simples e limpo. IMPORTANTE: limpar sempre o dispositivo para cappuccino depois do uso. Proceder do seguinte modo 3.Encaixar o porte filtro este último na máquina, rodando-o sempre até ao fundo (fig. 5).
LIMPEZA DO DUCHE DA CALDEIRA EXPRESSO Pelo menos uma vez por ano é necessário limpar o duche da caldeira expresso do seguinte modo: • Assegurar-se que a máquina de café não esteja quente e a ficha esteja tirada da tomada. • Com uma chave de fendas, desapertar o parafusos que fixa o duche da caldeira expresso (fig. 23). • Limpar com um pano húmido a zona da caldeira onde estava colocado o duche. • Escovar o duche com um pouco de detergente para pratos até que os furos estejam limpos.
PROBLEMA Não sai o café expresso CAUSAS PROVÁVEIS • Falta de água no reservatório •Os furos do bico do porta-filtro estão obstruídos • O duche da caldeira expresso está obstruído. • O reservatório está mal introduzido e a válvula no fundo não está aberta O café expresso pinga pelos bordos do porta-filtro em vez de pelos furos.