
Reference Guide
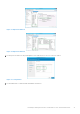
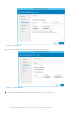
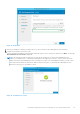
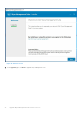
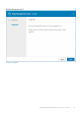
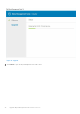
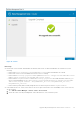
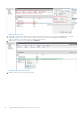
Table Of Contents
- Dell Wyse Management Suite Version 3.x High Availability Guide
- Contents
- Introduction
- High availability architecture
- High availability on Windows Server 2012 R2/2016/2019
- Achieve high availability on Windows Server 2012 R2/2016/2019
- Achieve high availability for MySQL InnoDB
- Achieve high availability on MongoDB
- Achieve high availability for Teradici devices
- Install Wyse Management Suite on Windows Server 2012 R2/2016/2019
- Post installation checks
- Upgrade Wyse Management Suite version 1.3 to 1.4
- Upgrading from Wyse Management Suite version 1.4/1.4.1/2.x/2.1 to Wyse Management Suite version 3.x
- Troubleshooting

Figure 72. Destination
9. Recheck the Installation Summary information before we proceed with the Wyse Management Suite installation.
10. Complete the Installation on both the nodes.
Type the Destination Installation folder path and Shared UNC path for the local repository and then click Next. The message
The installation was successful is displayed.
NOTE:
The shared UNC path should be kept out of both the Windows Server where Wyse Management Suite
application is installed. Before you install Wyse Management Suite application on Node 2, ensure to delete the 'Data'
folder present in the Wyse Management Suite Local Repository; which was created during installation on Node 1. After
'Data' folder is deleted from the shared UNC WMS Local Repository path, you can install Wyse Management Suite
Application in the Node 2 of the Windows Cluster.
Figure 73. Installation successful
Install Wyse Management Suite on Windows Server 2012 R2/2016/2019
73