
Reference Guide


5 键入 CTRL+O 保存对 haproxy.cfg 文件的更改。
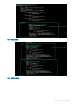
以下文本是示例 HAProxy 配置文件:
global
log /dev/log local0
log /dev/log local1 notice
chroot /var/lib/haproxy
daemon
#maxconn is maximum allowed connections
maxconn 60000
defaults
log global
mode tcp
timeout connect 5000ms
timeout client 50000ms
timeout server 50000ms
errorfile 400 /etc/haproxy/errors/400.http
errorfile 403 /etc/haproxy/errors/403.http
errorfile 408 /etc/haproxy/errors/408.http
errorfile 500 /etc/haproxy/errors/500.http
errorfile 502 /etc/haproxy/errors/502.http
errorfile 503 /etc/haproxy/errors/503.http
errorfile 504 /etc/haproxy/errors/504.http
frontend fe_teradici_5172
bind :5172
mode tcp
backlog 4096
maxconn 70000
default_backend be_teradici_5172
backend be_teradici_5172
mode tcp
option log-health-checks
option tcplog
balance leastconn
server emsdk1 :5172 check server emsdk2 5172 check : timeout queue 5s timeout server
86400s
option srvtcpka
#frontend fe_teradici_5172
#replace IP with IP of your Linux proxy machine bind Eg: 10.150.105.119:5172
#default_backend servers
#backend servers
#Add your multiple back end windows machine ip with 5172 as port
# maxconn represents number of connection- replace 10 with limit #(below 20000)
# "server1" "server2" are just names and not keywords
#server server1 10.150.105.121:5172 maxconn 20000 check
#server server2 10.150.105.124:5172 maxconn 20000 check
6 通过运行以下命令验证 HAProxy 配置:
sudo haproxy –f /etc/haproxy/haproxy.cfg –c
如果配置有效,则会显示消息:配置有效。
7 运行以下命令重新启动 HAProxy 服务:
Sudo service haproxy restart
8 运行以下命令以停止 HAProxy:
serviceSudo service haproxy stop
实现 Teradici 设备的高可用性
33