
Install Guide


Accessing file repository
File repositories are places where files are stored and organized. Wyse Management Suite has two types of repositories:
• Local Repository—During the Wyse Management Suite private cloud installation, provide the local repository path in the Wyse
Management Suite installer. After the installation, go to Portal Admin > File Repository and select the local repository. Click the
Edit option to view and edit the repository settings.
• Wyse Management Suite Repository—Log in to Wyse Management Suite public cloud, go to ,Portal Admin > File Repository
and download the Wyse Management Suite repository installer. After the installation, register the Wyse Management Suite repository
to Wyse Management Suite Management server by providing the required information.
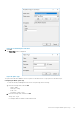
You can enable the Automatic Replication option to replicate files that are added to any of the file repositories to other repositories.
When you enable this option, an alert message is displayed. You can select the
Replicate existing files check box to replicate the
existing files to your file repositories.
Replicate existing file option is applicable if the repository is already registered. When a new repository is registered, then all the files are
copied to the new repository. You can view the file replication status in the Events page.
NOTE:
• The Image Pull templates are not replicated automatically to other repositories. You must copy these files
manually.
• File Replication feature is supported only on repositories from Wyse Management Suite 1.4 and later versions.
• You cannot import self-signed certificate of the remote repository to the Wyse Management Suite server. If the CA
Validation is enabled for remote repository, then the replication of files from the remote repository to the local
repository fails.
To use Wyse Management Suite repository, do the following:
1. Download the Wyse Management Suite repository from the public cloud console.
2. After the installation process, start the application.
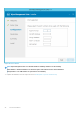
3. On the Wyse Management Suite Repository page, enter the credentials to register the Wyse Management Suite repository to Wyse
Management Suite server.
4. If you enable the Register to Public WMS Management Portal option, you can register the repository to Wyse Management Suite
public cloud.
5. Click the Sync Files option to send the sync file command.
6. Click Check In and then click Send Command to send the device information command to the device.
7. Click the Unregister option to unregister the on-premises service.
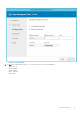
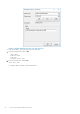
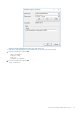
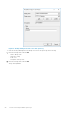
8. Click Edit to edit the files.
a. From the drop-down list of Concurrent File Downloads option, select the number of files.
b. Enable or disable Wake on LAN option.
c. Enable or disable Fast File Upload and Download (HTTP) option.
• When HTTP is enabled, the file upload and download occurs over HTTP.
• When HTTP is not enabled, the file upload and download occurs over HTTPS.
d. Select the Certificate Validation check box to enable the CA validation for public cloud.
NOTE:
• 1. When CA Validation from Wyse Management Suite server is enabled, the certificate should be present in
the client. All the operations such as, Apps and Data, Image Pull/Push is successful. If certificate is not
present in the client, the Wyse Management Suite server provides one generic audit event message Failed
to Validate Certificate Authority under Events page. All the operations such as, Apps and Data, Image Pull/
Push is not successful.
2. When CA Validation from Wyse Management Suite server is disabled, then the communication from server
and client happens in secure channel without Certificate Signature validation.
e. Add a note in the provided box.
f. Click Save Settings .
D
Accessing file repository 45