
Install Guide


Deployment of application policies and operating system images to thin clients can be scheduled immediately or later based on the device
time zone or any other specified time zone.
Inventory of devices—This option can be located by clicking the Devices tab. By default, this option displays a paginated list of all the
devices in the system. The administrator can choose to view a subset of devices by using various filter criteria, such as groups or
subgroups, device type, operating system type, status, subnet, and platform or time zone.
To navigate to the Device Details page for that device, click the device entry listed on this page. All the details of the device are displayed.
The Device Details page also displays all the configuration parameters that are applicable to that device, and also the group level at which
each parameter is applied.
This page also enables the administrators to set configuration parameters that are specific to that device by enabling the Device
Exceptions button. Parameters configured in this section override any parameters that were configured at the groups and/or global level.
Reports—Administrators can generate and view canned reports based on the predefined filters. To generate canned reports, click the
Reports tab on the Portal Administration page
Mobile application—Administrator can receive alert notifications and manage devices using mobile application available for the Android
devices. To download the mobile application and the quick start guide, click the Alerts and Classification tab on the Portal
Administration page.
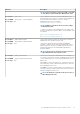
Creating policy group and updating configuration
To create a policy and to update the configuration, do the following:
1. Log in as an administrator.
2. To create a policy group, do the following:
a. Select Groups & Configs, and click the + button on the left pane.
b. Enter the group name and description.
c. Select the Enabled check-box.
d. Enter the group token.
e. Click Save.
3. To update or edit a policy group, do the following:
a. Click Edit Policies, and select the operating system that the policy is intended to manage.
b. Select the policies to be modified, and complete the configuration.
c. Click Save and Publish.
NOTE:
• For more details on various configuration policies supported by Wyse Management Suite, see
Dell Wyse
Management Suite Administrator’s Guide
at support.dell.com.
• You can create a rule to automatically create a group and/or assign a device to a group based on specific
attributes such as subnet, time zone, and location.
Registering new thin client
NOTE:
For information on customer security environment, see Wyse Device Agent.
A thin client can be registered with Wyse Management Suite manually through the Wyse Device Agent (WDA). You can also register a thin
client automatically by configuring appropriate option tags on the DHCP server or configuring appropriate DNS SRV records on the DNS
server.
If you want devices in different subnets to automatically check into different Wyse Management Suite groups with multiple subnets, use
the DHCP option tags to register a thin client. For example, devices in TimeZone_A can check into ProfileGroup configured for
TimeZoneA.
If you want to enter the Wyse Management Suite server information at TLD, and if you have installed Wyse Management Suite Pro to
allow automatic group assignment based on device rules, use the DNS SRV records on the DNS server to register a thin client. For
example, if the device checks in from TimeZoneA, assign it to the ProfileGroup configured for TimeZoneA.
For the Wyse Management Suite on a private cloud with self-signed certificates, the thin clients must have the following versions of Wyse
Device Agents or firmware installed for secure communication:
• Windows Embedded Systems—13.0 or later versions
Installing Wyse Management Suite on private cloud
23