
Install Guide
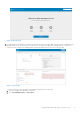
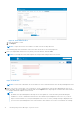
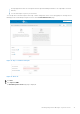


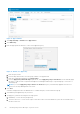
Table Of Contents
- Edge Device Manager Version R16 Quick Start Guide
- Introduction
- Installing Edge Device Manager on private cloud
- Uninstalling Edge Device Manager
- Troubleshooting Edge Device Manager
- Introduction to remote database
- Custom installation
- Feature list
- Creating and configuring DHCP option tags
- Creating and configuring DNS SRV records
- Supported devices
- Support matrix
- Terms and definitions

Figure 10. Portal administration
c. Enter the number of seats.
d. Click Export.
NOTE: To export the license, select WMS 1.1 or WMS 1.0 from the drop-down list.
The summary page shows the details of the license after the license is successfully imported.
11. Enter your Simple Mail Transfer Protocol (SMTP) server information, and click Save.
NOTE: You can skip this screen and complete the setup or make changes later in the console.
Figure 11. Email alert
NOTE: You must enter valid SMTP server information to receive email notifications from the Wyse Management Suite.
12. Import your Secure Sockets Layer (SSL) certificate to secure communications with the Wyse Management Suite server.
Enter the public, private, and apache certificate and click the Import button. Importing the certificate takes three minutes
to configure and restart Apache tomcat services.
NOTE:
● By default, the Wyse Management Suite imports the self-signed SSL certificate that is generated during the
installation to secure communication between the client and the Wyse Management Suite server. If you do not
import a valid certificate for your Wyse Management Suite server, a security warning message is displayed when
you access the Wyse Management Suite from a machine other than the server where it is installed. This warning
12 Installing Edge Device Manager on private cloud