
Administrator Guide


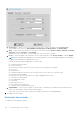
Table Of Contents
- Dell Wyse ThinOS Version 8.5 Administrator’s Guide
- Introduction
- Getting started
- Configuring ThinOS using the First Boot Wizard
- Connecting to a remote server
- Using your desktop
- Configuring thin client settings and connection settings
- Connecting to a printer
- Connecting to a monitor
- Locking the thin client
- Signing off and shutting down
- Additional getting started details
- Classic desktop features
- Login dialog box features
- Accessing system information
- Global Connection settings
- Configuring the connectivity
- Configuring the network settings
- Configuring the remote connections
- Configuring the central configurations
- Configuring the VPN Manager
- Configuring the connection brokers
- Configuring Citrix
- Configuring the Citrix broker connection
- Citrix HDX RealTime Multimedia Engine or RealTime Optimization Pack
- Citrix icon refresh
- Using multiple audio in Citrix session
- Using Citrix NetScaler with CensorNet MFA authentication
- Configuring ICA connections
- ICA Self Service Password Reset
- QUMU or ICA Multimedia URL Redirection
- HTML5 Video Redirection
- ICA SuperCodec
- Anonymous logon
- Configuring the Citrix UPD printer
- Introduction to Flash Redirection
- Configuring VMware
- Configuring Microsoft Remote Desktop
- Configuring Dell vWorkspace
- Configuring Amazon Web Services or WorkSpaces
- Configuring Citrix
- Configuring thin client settings
- Introduction to TCX Flash Redirection
- Performing diagnostics
- BIOS management on ThinOS
- Security
- Automating updates and settings using central configuration
- Examples of common printing configurations
- Important notes
- Troubleshooting
- Firmware upgrade
- Frequently asked questions

set of software or hardware, instead of using a different codec. This results in more scalability on system work load and network
bandwidth occupation.
NOTE: In ThinOS v8.5, the RDP 8.1 session uses the original H.264 codec.
For more information about Remote Desktop Protocol (RDP)10 AVC/H.264 improvements in Windows 10 and Windows Server
2016, see cloudblogs.microsoft.com/enterprisemobility/2016/01/11/remote-desktop-protocol-rdp-10-avch-264-improvements-
in-windows-10-and-windows-server-2016-technical-preview.
Using Microsoft WebSocket
Microsoft WebSocket provides a mechanism for fast, secure two-way communication between a client and a server over the
web using HTTP(S).
The WebSocket protocol enables two-way communication between the browser-based applications and the servers that does
not rely on the multiple HTTP connections. The protocol consists of a handshake followed by basic message framing, layered
over Transmission Control Protocol (TCP). The data is transferred immediately over a full-duplex single socket connection,
allowing messages to be sent and received from both endpoints in real time.
As a pre-requisite, you must enable the WebSocket protocol on Windows Server 2016.
ThinOS behavior
● In the previous TS Gateway connection, the setup uses a two half-duplex communications between Terminal Server (TS)
Gateway server and thin client.
● In the ThinOS version 8.5, the session connection setup uses a duplex communication between the TS Gateway and thin
client.
NOTE: TSG2 and TSG3 are downward compatible.
If the WebSocket connection fails or the TS Gateway server or thin client version does not support WebSocket, then TSG3
or TSG2 is used.
● In comparison with TSG3, when the WebSocket handshake succeeds during the Create OUT Channel, the OUT Channel
and IN Channel use the duplex communication between the TS Gateway and thin client. Therefore, the second HTTP 1.1
connection for IN Channel is not established.
● A single HTTPS configuration with the WebSocket protocol is a two-step process.
1. On the thin client, a single HTTPS connection to TS gateway is configured. The thin client performs the handshake, and
provides the authentication information and target server information.
2. The thin client logs in to the session host server through the TS gateway connection.
NOTE:
You can capture the Network analysis file and check if the SslStream of the connection is upgraded to
WebSocket.
Configuring Dell vWorkspace
Workspace virtualization delivers a list of applications or desktops together as a single complete virtual workspace. It isolates
and centralizes an entire computing workspace. vWorkspace provides flexible, location and platform independent access by
delivering virtual workspace from multiple virtualization platforms.
This section provides information about how to configure a Dell vWorkspace broker connection on your ThinOS device.
Configuring the Dell vWorkspace broker connection
To configure the vWorkspace broker setup:
1. From the desktop menu, click System Setup, and then click Remote Connections.
The Remote Connections dialog box is displayed.
2. In the Broker Setup tab, from the drop-down list, select Dell vWorkspace, and do the following:
● Broker Server—Enter the IP address/ Hostname/ FQDN of the Broker Server.
● Auto Connect List—Enter the name of the desktops that you want to launch automatically after logging in to the
respective broker. More than one desktop can be listed. Each desktop name is separated by a semi-colon, and is
case-sensitive.
Configuring the connection brokers
107