
Administrator Guide


NOTE: Be sure to check with your vendor that the printer can accept Line Printer Request print requests.
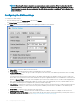
a Select LPD —Select the port you want from the list.
b Printer Name —(Required) Enter name you want displayed in your list of printers.
c Printer Identication—Enter the type or model of the printer in the exact text of the Windows printer driver name—including
capitalizations and spaces.
This name must be either the device driver name for the printer under the Microsoft Windows system, or a key to map to the
device driver. If not specied, the name will be defaulted to the printer-supplied identication for standard direct-connected USB
printers or Generic / Text for non-USB connected printers upon connection to Windows hosts. The driver name mapping takes
place either through a printer-mapping le read by the system as part of the global prole (wnos.ini) or by MetaFrame servers
through the MetaFrame printer conguration le (\winnt\system32\wtsprnt.inf).
d LPD Hosts—The DNS or WINS name of the server for the network printer. An IP address of the printer on the network can also
be entered.
If the printer is attached to another thin client on your network, the entry in the LPD Hosts box is the name or address of that
thin client.
e LPD Queue Name—An LPD host maintains a named queue for each supported printer. Enter the name of the queue associated
with the printer to be used.
This name can be dierent for each vendor. This eld is required and must be correct so that the network printer accepts
incoming print jobs properly. For example, auto can be used for HP LaserJet 4200n PCL6 as per documentation found on the HP
Web site.
NOTE
: If the printer is attached to another thin client on your network, the LPD Queue Name must match
the content of the Printer Name box on the thin client with the printer attached.
f Printer Class— (Optional) Select the printer class from the list.
g Enable the printer device—Must be selected to enable the printer. It enables the device so it displays on the remote host.
3 Click OK to save the settings.
Conguring
thin client settings 131