
Concept Guide


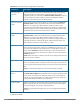


Table Of Contents
- About this Guide
- About Instant
- Setting up a W-IAP
- Automatic Retrieval of Configuration
- Instant User Interface
- Initial Configuration Tasks
- Customizing W-IAP Settings
- Modifying the W-IAP Host Name
- Configuring Zone Settings on a W-IAP
- Specifying a Method for Obtaining IP Address
- Configuring External Antenna
- Configuring Radio Profiles for a W-IAP
- Configuring Uplink VLAN for a W-IAP
- Changing the W-IAP Installation Mode
- Changing USB Port Status
- Master Election and Virtual Controller
- Adding a W-IAP to the Network
- Removing a W-IAP from the Network
- VLAN Configuration
- IPv6 Support
- Wireless Network Profiles
- Configuring Wireless Network Profiles
- Configuring Fast Roaming for Wireless Clients
- Configuring Modulation Rates on a WLAN SSID
- Multi-User-MIMO
- Management Frame Protection
- Disabling Short Preamble for Wireless Client
- Editing Status of a WLAN SSID Profile
- Editing a WLAN SSID Profile
- Deleting a WLAN SSID Profile
- Wired Profiles
- Captive Portal for Guest Access
- Understanding Captive Portal
- Configuring a WLAN SSID for Guest Access
- Configuring Wired Profile for Guest Access
- Configuring Internal Captive Portal for Guest Network
- Configuring External Captive Portal for a Guest Network
- Configuring Facebook Login
- Configuring Guest Logon Role and Access Rules for Guest Users
- Configuring Captive Portal Roles for an SSID
- Configuring Walled Garden Access
- Authentication and User Management
- Managing W-IAP Users
- Supported Authentication Methods
- Supported EAP Authentication Frameworks
- Configuring Authentication Servers
- Understanding Encryption Types
- Configuring Authentication Survivability
- Configuring 802.1X Authentication for a Network Profile
- Enabling 802.1X Supplicant Support
- Configuring MAC Authentication for a Network Profile
- Configuring MAC Authentication with 802.1X Authentication
- Configuring MAC Authentication with Captive Portal Authentication
- Configuring WISPr Authentication
- Blacklisting Clients
- Uploading Certificates
- Roles and Policies
- DHCP Configuration
- Configuring Time-Based Services
- Dynamic DNS Registration
- VPN Configuration
- IAP-VPN Deployment
- Adaptive Radio Management
- Deep Packet Inspection and Application Visibility
- Voice and Video
- Services
- Configuring AirGroup
- Configuring a W-IAP for RTLS Support
- Configuring a W-IAP for Analytics and Location Engine Support
- Managing BLE Beacons
- Clarity Live
- Configuring OpenDNS Credentials
- Integrating a W-IAP with Palo Alto Networks Firewall
- Integrating a W-IAP with an XML API Interface
- CALEA Integration and Lawful Intercept Compliance
- Cluster Security
- W-IAP Management and Monitoring
- Uplink Configuration
- Intrusion Detection
- Mesh W-IAP Configuration
- Mobility and Client Management
- Spectrum Monitor
- W-IAP Maintenance
- Monitoring Devices and Logs
- Hotspot Profiles
- ClearPass Guest Setup
- IAP-VPN Deployment Scenarios
- Acronyms and Abbreviations

252 | Adaptive Radio Management Dell Networking W-Series Instant 6.5.1.0-4.3.1.0 | User Guide
When the client match feature is enabled on a W-IAP, the W-IAP measures the RF health of its associated
clients. In the current release, the client match feature is supported only within a W-IAP cluster. If any of the
following trigger conditions is met, clients are moved from one W-IAP to another for better performance and
client experience:
l Dynamic Load Balancing—Client match balances clients across W-IAPs on different channels, based on the
client load on the W-IAPs and the signal to noise ration (SNR) levels the client detects from an underutilized
W-IAP. If a W-IAP radio can support additional clients, the W-IAP will participate in client match load
balancing and clients can be directed to that W-IAP radio, subject to the predefined SNR thresholds. For
better load balancing, clients are steered from busy channels to idle channels.
l Sticky Clients—The client match feature also helps mobile clients that tend to stay associated to a W-IAP
despite low signal levels. W-IAPs using client match continually monitor the client's RSSI as the client roams
between W-IAPs, and move the client to a W-IAP when a better radio match can be found. This prevents
mobile clients from remaining associated to the W-IAPs with less than ideal RSSI, which can cause poor
connectivity and reduce performance for other clients associated with that W-IAP.
l Band Steering—W-IAPs using the client match feature monitor the RSSI for clients that advertise a dual-
band capability. If a client is currently associated to a 2.4 GHz radio and the W-IAP detects that the client
has a good RSSI from the 5 GHz radio, the W-IAP steers the client to the 5 GHz radio, as long as the 5 GHz
RSSI is not significantly worse than the 2.4 GHz RSSI, and the W-IAP retains a suitable distribution of clients
on each of its radios.
l Channel Utilization—Based on the percentage of channel utilization, clients are steered from a busy channel
to an idle channel.
l Client Capability Match—Based on the client capability match, clients are steered to appropriate channel, for
example, HT20, HT40, or VHT80.
Starting from the Instant 6.3.1.1-4.0 release, spectrum load balancing is integrated with the client match
feature. Client match allows the W-IAPs in a cluster to be divided into several logical W-IAP RF neighborhood
called domains, which share the same clients. The VC determines the distribution of clients and balances client
load across channels, regardless of whether the W-IAP is responding to the probe requests of wireless clients.
You can configure client match parameters in the Instant UI or the CLI. When client match is enabled, the
dashboard in the main window displays the Client Match link on selecting a W-IAP in the Access Points tab
or a client in the Clients tab. Clicking this link provides a graphical representation of radio map view of a W-IAP
and the client distribution on an W-IAP radio. For more information, see Client Match on page 48.
In the Instant UI
1. For client match configuration, specify the following parameters in the RF>ARM > Show advanced
options tab: