Dell OptiPlex FX130 and FX170 Re-Imaging Guide
Notes, Cautions, and Warnings NOTE: A NOTE indicates important information that helps you make better use of your computer. CAUTION: A CAUTION indicates potential damage to hardware or loss of data if instructions are not followed. WARNING: A WARNING indicates a potential for property damage, personal injury, or death. ______________ Information in this publication is subject to change without notice. © 2012 Dell Inc. All rights reserved.
Contents How to Write Disk Images to Dell OptiPlex FX130 and FX170 Thin Clients ............................................................................4 Step 1: Creating the Re-Imaging Utility on a USB Flash Drive ..................4 Step 2: Retrieving the Disk Images ...........................................................8 Step 3: Using the Re-Imaging Utility to Write the Disk Image to the Thin Client ................................................................................................
How to Write Disk Images to Dell OptiPlex FX130 and FX170 Thin Clients This document describes how to create a re-imaged utility on a USB Flash drive and use it to write a disk image to your Dell OptiPlex FX130 and FX170 thin clients.
Once the EXE file has been downloaded, follow these steps to create your bootable USB key: 1. Run the executable as an administrator. 2. In the User Account Control dialog box, select Yes. 3. Click I Agree in the EULA screen to continue.
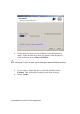
4. Select the drive letter of your USB key from the dropdown menu. If the desired drive does not appear in the dropdown, click in the box next to Show All Drives. CAUTION: Selecting Show All Drives will populate the list with every available drive, including the C:\ drive. Be certain you are selecting the desired drive before continuing. 5. 6. If you want to format the drive, click the checkbox titled Format. This will erase everything else from your key. Select Create.
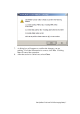
. 8. A dialog box will appear to confirm the changes you are making. If all the information is correct, click Yes. Clicking No will cancel the operation. After the action is carried out, select Close.
Step 2: Retrieving the Disk Images Visit support.dell.com to locate and download the latest operating system image to re-image your OptiPlex FX130 or FX170 thin clients. The OS disk images can be found on the product support pages. The IT Re-Imaging Utility offers three ways to write the disk image. The first option is to copy the disk image to a USB Flash drive. You can copy at least one disk image on your flash drive if its capacity is at least 4 GB.
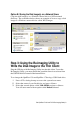
Option B: Storing the Disk Image(s) on a Network Share Copy the disk image(s) to a Windows shared drive or NFS mounted directory. The screenshot below shows an example of how to copy a disk image to a Windows network drive called WES images. Step 3: Using the Re-Imaging Utility to Write the Disk Image to the Thin Client Plug the USB key with Re-Imaging Utility into the thin client.
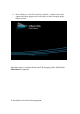
4 Press or wait 10 seconds to continue. A splash screen will appear and a blue progress bar will display as the re-imaging utility begins to load. After the bootup is complete the Devon IT Re-Imaging Utility Dell Edition Main Menu is displayed.
Use the arrow keys to select an option that corresponds to the way you saved your disk image. If you copied your disk image directly to the USB flash drive, then select <1> and press . If you copied your disk image to an NFS mounted directory, then select <2> and press . If you copied your disk image to Windows Network drive, then select <3> and press .
Specific Instructions for Option 1: Writing the local image from USB 1 A list of available disk images found on the local USB drive is displayed. Select the appropriate disk image file for the thin client you are re-imaging. 2 Press to flash the terminal with the selected image. 3 The message Writing image to disk is displayed, along with a progress bar showing the current status of the reimaging process. Do not turn off your thin client at this time.
Specific Instructions for Options 2 and 3 – Writing the Image from an NFS Mount or Windows Server 1 Enter the base location of the network share and press . For example, if you store your disk image on a Windows network drive named images located on a server with an IP address of 10.0.5.12, then type: //10.0.5.12/images. 2 Enter a valid username and press . 3 Enter the password for this user. Press to continue.
6 Select the option in the list that corresponds to the appropriate disk image file for the thin client you are re-imaging. 7 Press to flash the terminal with the selected image. 8 The message Writing image to disk is displayed, along with a progress bar showing the current status of the reimaging process. Do not turn off your thin client during this time.
Final Steps 1 Once the re-imaging stage has completed, press to reboot. Do not remove the USB flash drive yet. 2 Once you receive the message Please remove the disc and close the tray (if any) and press Enter to continue you can safely remove your USB flash key from the thin client. 3 Your thin client now boots with the new operating system.
To clone the disk image to an NFS mounted server, select <6> and press . To clone the disk image to Windows Share Network, select <7> and press . To clone the disk image to an FTP server, select <8> and press . 4 If you are asked for credentials, you will need to enter a valid username, password and, in the case of a Windows Share, a domain name. 5 Once a connection has been established, the image cloning will begin.
5 A list of available BIOS images found on the flash drive will be displayed. Select the appropriate BIOS. Only BIOS images that correspond to the terminal will appear. 6 Press to begin the writing process. You will be asked if you wish to preserve the Terminal’s Vital Data. It is highly recommended that you select Yes to preserve the UUID of the terminal. 7 Once the writing process has finished, you will be taken back to the Main Menu.
Other Uses of the Re-Imaging Utility Running a Factory Reset A factory reset on terminals can be run to bring the thin client back to the state it was when it was first unboxed and used. 1 Follow the previous steps to open the boot menu and access the Re-Imaging Utility. When the boot menu appears, select the flash drive containing the Re-Imaging Utility and press . 2 Once the boot up is complete the Devon IT Re-Imaging Utility Dell Edition Main Menu is displayed.
Checking the System Information The System Information of the terminal can be checked from the ReImaging Utility at any time. 1 Follow the previous steps to open the boot menu and access the Re-Imaging Utility. When the boot menu appears, select the flash drive containing the Re-Imaging Utility and press . 2 Once the boot up is complete the Devon IT Re-Imaging Utility Dell Edition Main Menu is displayed. 3 Use the arrow keys to select <9> Get System Information and press .
Zeroing the DOM The Re-Imaging Utility has the option to zero the DOM to free up hard memory. 1 Follow the previous steps to open the boot menu and access the Re-Imaging Utility. When the boot menu appears, select the flash drive containing the Re-Imaging Utility and press . 2 Once the boot up is complete the Devon IT Re-Imaging Utility Dell Edition Main Menu is displayed. 3 Use the arrow keys to select <13> Zero the DOM and press .
Getting Help Contacting Dell For customers in the United States, call 800-WWW-DELL (800-999-3355). NOTE: If you do not have an active Internet connection, you can find contact information on your purchase invoice, packing slip, bill, or Dell product catalog. Dell provides several online and telephone-based support and service options. Availability varies by country and product, and some services may not be available in your area.