
User's Manual

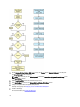
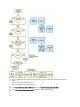
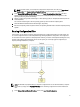
Table Of Contents
- Dell Systems Build And Update Utility Version 2.2 User's Guide
- About Dell OpenManage Systems Build And Update Utility
- Launching SBUU
- Using SBUU In Different Scenarios
- Deploying Your Current Bare-Metal Dell System
- Deploying More Than One System With The Same Configuration
- Deploying More Than One System With Slightly Different Configurations
- Deploying Multiple Systems Of Different Models
- Deploying Multiple Systems With The Same Configuration And Different Operating Systems
- Reusing Configuration Files
- Creating Bootable USB
- Creating an ISO image
- Frequently Asked Questions

The Import Configuration screen is displayed.
2. Specify the location from where you want to import the configuration file and click Continue.
The progress screen is displayed, followed by the Imported Configuration File Details screen.
3. Click Systems Build and Update Utility Home.
4. Edit the existing configuration for the Firmware Update, Hardware Configuration, and Server Operating System
Installation modules, if required.
5. Create the ISO image for this configuration.
For more information, see Creating An ISO image.
Creating Bootable USB
You can create a bootable USB key from the Dell OpenManage media image on Red Hat Enterprise Linux and SUSE
Linux Enterprise operating systems.
To create a bootable USB:
1. Plug in the USB key to the system.
NOTE: Make sure that no other USB media is mounted on the system.
NOTE: Make sure that the size of the USB key is more than that of the media image.
2. Insert the Dell OpenManage media in the system.
3. To see all the connected USB media devices, type the following command:
/media/cdrom/server_assistant/driver_tool/src/make_bootable_usb.sh --scan
4. To create the bootable USB media from the Dell OpenManage media, type the following command:
/media/cdrom/server_assistant/driver_tool/src/make_bootable_usb.sh <path-to-
mounted-dvd> <path-to-usb-device>
For example:
/media/cdrom/server_assistant/driver_tool/src/make_bootable_usb.sh /media/
cdrom /dev/sdb
5. Remove the USB key and use this key to boot the target system.
NOTE: If the Linux automount feature is active on the USB device, unmount the USB before removing it.
Creating an ISO image
To create an ISO image:
1. On the Systems Build and Update Utility Home screen, click Apply/Export Configuration.
The Configure Apply/Export Options screen is displayed.
2. Select the Create Auto-deployment Bootable Image option and click Destination to specify the location where you
want to save the ISO image.
3. On the ISO Save Location screen, specify the location where you want to save the ISO image and click Continue.
If you choose USB as the location, you can also make the USB key bootable.
The Configure Apply/Export Options screen is displayed.
4. Click Apply/Export.
The ISO image is created.
You can create a bootable media to boot the systems that you want to update or deploy.
22