
Users Guide


返回目录页
启动 Systems Build and Update Utility
Dell™SystemsBuildandUpdateUtility1.1用户指南
要启动 Dell™SystemsBuildandUpdateUtility:
1. 将 Dell Systems Management Tools and Documentation DVD 插入系统的驱动器。
2. 重新引导系统。
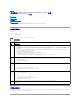
此时将显示引导菜单屏幕。
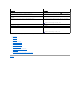
图4-1 所示为引导菜单屏幕。
或者,可以按如下操作在远程系统上启动 Systems Build and Update Utility:
1. 在客户端系统上,访问 Dell Remote Access Controller (DRAC) 4 或 DRAC 5 GUI。
2. 单击“Media”(介质)选项卡。
3. “Virtual Media”(虚拟介质)屏幕将会显示。
4. 确保“Attach/Detach Status”(连接/分离状态) 的属性是 “ Attached”(连接)。
要访问 Systems Build and Update Utility 可引导介质的位置或 Dell Systems Management Tools and Documentation DVD 的 ISO 映像,请相应选择系统驱动器位置或
浏览查找“ISO Image File”(ISO 映像文件)。
单击“Connect”(连接)。
5. “Virtual Media Status”(虚拟介质状态)屏幕将会显示。Dell Systems Management Tools and Documentation 介质现在连接到主机系统。
单击“Power Management”(电源管理)。
6. 要将主机系统引导到 Systems Build and Update 介质,应选择“Power Control Operations”(电源控制操作)下的“ Power Cycle System”(关机后再打开 系统电
源)。
单击“Apply”(应用)。
单击“Console”(控制台)。
7. “Console Redirection”(控制台重定向)屏幕将会显示。
单击“Connect”(连接)。
现在即可从客户端系统访问主机系统上的引导菜单屏幕,然后就能远程使用 Systems Build and Update Utility。
图 4-1.引导菜单 屏幕
表4-1 列出了此屏幕上的选项及其说明。
表 4-1.引导菜单选项
注:如果系统上没有安装 Virtual Media Active X Control,继续前系统会提示安装。