
User's Manual

Using The Systems Build and Update Utility 31
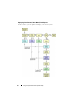
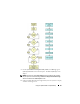
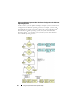
6
The
Network Adapter(s) Configuration
screen displays. Enter the
appropriate information about the network adapters on your system. Click
Continue
.
7
The
Enter Configuration Information for Microsoft Windows 2003
Server Service Pack 2
screen displays (based on the operating system you
chose in step 3). Fill in the appropriate fields and click
Continue
.
8
The
Operating System Installation Summary
screen displays. You can
change your configuration settings until this point by clicking
Back
.
To save your configuration, click
Go Back to Home Page
. See step 9.
To apply the configuration on your system immediately, click
Apply Now
.
This launches step 12 through step 15 to install the operating system on
your current system.
NOTE: The Apply Now option is enabled only if you have not selected any system
on the Select System (s) screen.
9
The
Systems Build and Update Utility Home
screen displays. Click
Apply/Export Configuration
.
10
The
Configure Apply/Export Options
screen displays.
You can export the operating system installation configuration for later use
(select
Export Configuration
). The
Apply Configuration to Current
System
is selected by default.
Click
Apply/Export
.
11
The
Script Generation Progress
screen displays.
12
Next, the deployment progress screen displays.
If you selected the option to install the Dell OpenManage Server
Administrator on the
Enter Configuration Information for Microsoft
Windows 2003 Server Service Pack 2
screen, you are either prompted for
the Server Administrator CD or the Server Administrator
.exe
copies from
the DVD to a local destination on your system.
13
You are prompted to install the operating system CD/DVD.
14
SBUU copies the operating system files to your system.
15
The operating system installer launches. Your system may reboot multiple
times.
Your system is ready with the operating system and server administrator
installed.