Dell SupportAssist Plugin For Dell OpenManage Essentials Version 1.1.
Notes, Cautions, and Warnings NOTE: A NOTE indicates important information that helps you make better use of your computer. CAUTION: A CAUTION indicates either potential damage to hardware or loss of data and tells you how to avoid the problem. WARNING: A WARNING indicates a potential for property damage, personal injury, or death. © 2013 Dell Inc.
Contents Notes, Cautions, and Warnings...................................................................................................2 1 Overview.......................................................................................................................................7 Key Features.............................................................................................................................................................7 Features Supported With Dell Service Contracts.........
Viewing The Case List.............................................................................................................................................25 Sorting The Case List Data By Column Name.........................................................................................................26 Filtering The Case List Data By Column Name And Keyword.................................................................................26 Returning The Case List Data To The Default Sorting........
Services..................................................................................................................................................................46 Security...................................................................................................................................................................
Overview 1 Dell SupportAssist collects information about your computer hardware and software, and automatically creates support cases when issues arise. This helps Dell to provide you an enhanced, personalized, and efficient support experience. Dell uses this data to help solve common problems and design and market the products and services features you use most.
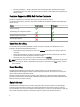
• Proactive parts dispatch — Based on examination of the troubleshooting data, if the Dell technical support agent determines that a part needs to be replaced in your environment, a replacement part is dispatched to you with your consent. Features Supported With Dell Service Contracts The features supported in your environment may vary based on your Dell service contract. The following table provides a comparison of the features available with the Dell Basic Hardware and Dell ProSupport service contracts.
The information encrypted in the data log file sent back to Dell includes the following categories of data, among others: • User Information — Computer name, domain, IP address, and Dell Service Tag. • Hardware Configuration — Installed devices, processor(s), memory, network devices, and usage. • Software Configuration — Operating system, installed applications, and application usage.
Contacting Dell NOTE: If you do not have an active Internet connection, you can find contact information on your purchase invoice, packing slip, bill, or Dell product catalog. Dell provides several online and telephone-based support and service options. Availability varies by country and product, and some services may not be available in your area. To contact Dell for sales, technical support, or customer service issues: 1. Visit dell.com/support 2. Select your support category. 3.
Installing, Upgrading, And Uninstalling Dell SupportAssist 2 The following sections provide information about installing, upgrading, and uninstalling Dell SupportAssist. Prerequisites The following are the prerequisites: • Dell PowerEdge servers running Dell OpenManage Essentials version 1.0.
• Optional: Dell OpenManage Server Administrator (OMSA) installed and operational on all managed PowerEdge devices. • SNMP agent enabled on all managed PowerEdge, EqualLogic, PowerVault, iDRAC7, CMC, Force 10, and PowerConnect devices for OpenManage Essentials discovery. • All managed PowerEdge, EqualLogic, PowerVault, iDRAC7, CMC, Force 10, and PowerConnect devices configured to send SNMP traps to the OpenManage Essentials server.
• The OpenManage Essentials management server on which the Dell SupportAssist client is installed must be able to communicate with the Dell SupportAssist server hosted by Dell over the HTTPS protocol. Related Links Minimum Requirements Downloading The Installation Package To download the installation package: 1. Visit support.dell.com and locate the SupportAssist installation package. 2. Download the installation package to your OpenManage Essentials management server.
7. Provide the following information for the primary person to whom Dell must send alert notifications, case status notifications, and so on: – First Name — The first name can contain letters, quotation marks [ ’ ], periods [ . ], spaces, and must not exceed 50 characters. – Last Name — The last name can contain letters, quotation marks [ ’ ], periods [ . ], spaces, and must not exceed 50 characters. – Phone Number — In 123-456-7890 format, or in 123-456-7890 x 123 format (to include an extension).
NOTE: SupportAssist requires both DSET and Lasso in order to install and operate. If you cancel either DSET or Lasso installation, SupportAssist installation will exit. Your system will not be changed, and SupportAssist will not be installed. The Install Wizard Completed dialog box is displayed. 12. Click Finish. The SupportAssist client opens in a web browser and the First-Time Setup dialog box is displayed.
Uninstalling Dell SupportAssist To uninstall: 1. On the OpenManage Essentials management server, click Start → Control Panel → Programs and Features. The Programs and Features window is displayed. 2. Select Dell SupportAssist, and then click Uninstall. 3. If the Programs and Features dialog box is displayed, prompting you to confirm the uninstallation, click Yes. SupportAssist and its troubleshooting tools are now uninstalled from your OpenManage Essentials server.
Dell SupportAssist Interface 3 The top-right corner of the SupportAssist dashboard displays links that you can use to navigate the interface. The following table describes the links that are displayed. Link Description SupportAssist Community Opens the SupportAssist User Group website in a new browser window.
Column Description • • • • Customer Deferred — Dell technical support has deferred the case at the customer’s request. Submitted — SupportAssist has submitted the case. No Case — No case exists for this device. Reopened — The case was previously closed, and has been reopened. Case Number The numeric identifier assigned to the support case. Case Title The case name, which identifies: • • • • • Progress The current support case progress status.
Column Description Date Opened The date and time when the support case was opened. You can set the number of support cases displayed per page by using the Display Cases drop-down box. The navigation icons enable you to navigate the pages of the Case List.
You can set the number of devices displayed per page by using the Display Devices drop-down box. The navigation icons enable you to navigate the pages of the Device Inventory.
Field Description • • • • • Windows Linux ESX/ESXi iDRAC7 CMC The available options for Storage are: • • EqualLogic MDSeries The available options for Switch are: • • PowerConnect Force10 Username Enables you to view or edit the user name. Password Enables you to view or edit the password in a masked format. Enable Password Enables you to view or edit the enable password in a masked format. NOTE: The Enable Password field is displayed only when the Device Type selected is Switch.
Field Description Frequency Enables selecting the frequency at which system logs are collected. The available options are: • • • Specify day and time NOTE: The Specify day and time option is enabled only if the Enable system log collection scheduling option is selected in the Preferences page. Start Date None Weekly Monthly Enables selecting the day and time when you want to collect the system logs.
Configuring Proxy Server Settings Preferences The Preferences page enables you to configure Email Settings, Support Collection, and Maintenance Mode. The following table provide information about the options displayed under Email Settings. Field Description Receive email notification when a new support case is opened Select this option to receive an e-mail notification when a new support case is opened. Preferred email Language Enables you to select the preferred language for e-mail notifications.
Field Description Company Information Enables you to view the company name. Primary Select this option to view the primary contact information. Secondary Select this option to view the secondary contact information. First Name Enables you to view or edit the first name of the primary or secondary contact. Last Name Enables you to view or edit the last name of the primary or secondary contact. Phone Number Enables you to view or edit the phone number of the primary or secondary contact.
Using Dell SupportAssist 4 This following sections provide information about configuring and using Dell SupportAssist. Launching Dell SupportAssist To launch SupportAssist: 1. On the OpenManage Essentials management server, do one of the following: – Double-click the Dell SupportAssist desktop icon. – Click Start→ All Programs→ Dell OpenManage Applications→ Dell SupportAssist→ Dell SupportAssist.
NOTE: By default, the Case List is sorted by Date Opened, in descending order. See the following sections for more sorting options. NOTE: Pre-existing support cases (opened prior to SupportAssist installation), and cases opened by means other than SupportAssist, do not appear in the Case List report. NOTE: The Service Contract column in the SupportAssist dashboard displays unknown for all support cases created prior to the SupportAssist upgrade.
The report refreshes to display the data according to your criteria. Related Links Case List Viewing The Case List Returning The Case List Data To The Default Sorting To return to the default Case List view (Date Opened, in descending order), click the Cases tab. The report refreshes to the default sorting criteria. Any new cases or updates to the current cases appear in the report. Cases that are closed since the last refresh no longer appear.
Sorting The Device Inventory Data By Column Name To sort the device inventory display data by column name, click any column header. The report refreshes to display the data in an ascending or descending order of the column header you clicked. Related Links Device Inventory Viewing The Device Inventory Filtering The Device Inventory Data By Column Name And Keyword To filter the device inventory display data by column name and keyword: 1. Select the column name from the Filter By: list. 2.
• 100 per page By default, the dashboard is set to display 50 devices per page. Related Links Device Inventory Viewing The Device Inventory Refreshing The Case List Or Device Inventory Display Data The Case List or Device Inventory display data can be refreshed in two ways: • Click the icon that appears in the Case List or Device Inventory dashboard to update the displayed data using the currently selected filters. This is handy for displaying updated information between poll cycles.
– 4. Email Address — Provide the e-mail address in the name@company.com format. It must contain a minimum of five characters, and not exceed 50 characters. Click Save Changes.
– Select Automatically start a log collection when a new support case is generated, to enable the automatic collection of system logs. – Clear Automatically start a log collection when a new support case is generated, to disable the automatic collection of system logs. NOTE: By default, the Automatically start a log collection when a new support case is generated option is selected. 4. Click Save Changes.
NOTE: Disabling the scheduling of system log collection for a specific device type only disables the generation of system log collection at periodic intervals on those devices. It does not disable SupportAssist from generating a system log collection and uploading it to Dell, if a support case is opened for those devices. NOTE: The Settings tab is accessible only if you are logged on as a member of the OpenManage Essentials Administrators or Power Users group. 1. Click the Settings tab.
Related Links Preferences Setting Dell SupportAssist To Maintenance Mode SupportAssist can also be set in or out of Maintenance Mode. Maintenance Mode disables automatic case generation activity, thereby allowing you to make infrastructure changes without generating unnecessary alerts. To set SupportAssist in or out of maintenance mode: NOTE: The Settings tab is accessible only if you are logged on as a member of the OpenManage Essentials Administrators or Power Users group. 1. Click the Settings tab.
NOTE: If the proxy server credentials are not provided, SupportAssist connects to the proxy server as an anonymous user. 5. 6. If the proxy server requires authentication, select Proxy requires authentication, and then provide the following information in the corresponding fields: – Username — The user name must contain one or more printable characters, and not exceed 104 characters. – Password — The user password must contain one or more printable characters, and not exceed 127 characters.
NOTE: If you have opted to not receive e-mail notification when a new support case is generated, SupportAssist does not send the connectivity confirmation e-mail as well. For more information about e-mail notification settings, see Configuring E-Mail Notification Settings. SupportAssist initiates an e-mail connectivity test. – If the test is successful, a confirmation e-mail message is sent to you. The message provides the connectivity status and a reminder to configure your devices for monitoring.
– CMC The options for Storage are: – EqualLogic – MDSeries The options for Switch are: – 4. PowerConnect – Force10 Type the credentials in the corresponding fields: NOTE: For Force 10 and PowerConnect Ethernet switches, the Username, Password, and Enable Password fields are optional. However, information must be provided for these fields if the Force 10 or PowerConnect Ethernet switch is configured with these details.
To edit the credentials for a device: NOTE: Editing the credentials for a device is enabled only if you are logged on as a member of the OpenManage Essentials Administrators or Power Users group. 1. Click the Devices tab. The Device Inventory is displayed. 2. Select a device in the Device Inventory table. NOTE: You can edit the credentials for only one device at a time. If you select multiple devices, the Edit Device Credentials link is disabled.
To reset the device-specific credentials to the default device type credentials: NOTE: To reset the device-specific credentials to the Default Device Type Credentials, you must be logged on as a member of the OpenManage Essentials Administrators or Power Users group. 1. Click the Devices tab. The Device Inventory is displayed. 2. Select a device in the Device Inventory table. NOTE: You must select only one device before you click Edit Device Credentials.
The System Logs page is displayed. 2. Select the device category from the Device Type list. 3. Select the credential category from the Credential Type list. 4. Select Overwrite the device-specific credentials with the Default Device Type Credentials for all devices belonging to the current Device Type and Credential Type. The Confirmation dialog box is displayed.
Device Type Device or Operating System Schedule Server Windows Monthly; Monday of the first week at 12:00 AM Linux Monthly; Monday of the first week at 12:00 AM ESX/ESXi Monthly; Monday of the first week at 12:00 AM iDRAC7 Monthly; Monday of the first week at 12:00 AM CMC Monthly; Monday of the first week at 12:00 AM Dell EqualLogic Weekly; Monday at 12:00 AM Dell PowerVault MD series Weekly; Monday at 12:00 AM Dell PowerConnect Monthly; Monday of the first week at 12:00 AM Dell Force 10
The options for Storage are: – EqualLogic – MDSeries The options for Switch are: 4. – PowerConnect – Force10 Under System Log Collection Schedule, set the Frequency to Weekly or Monthly. NOTE: If you want to disable the scheduling of system logs for a specific Device Type and Credential Type, set the Frequency to None. 5. In the Specify date and time fields, select an appropriate schedule. The options available vary based on the selected Frequency. 6. Click Save Changes.
FATAL, ERROR, WARN, INFO, and DEBUG, with special values of OFF and ALL. A registry value of ERROR results in logs messages of FATAL, and ERROR, since FATAL is a higher level than ERROR. The LogFileLevel Windows Registry key can be located at HKEY_LOCAL_MACHINE\SOFTWARE\Wow6432Node\Dell\Dell Integrated Support in 64-bit operating systems and at HKEY_LOCAL_MACHINE\SOFTWARE\Dell\Dell Integrated Support in 32-bit operating systems.
* Dell Technical Support launch points, community forums, blogs, and much more * Dell product manuals for hardware and software products – 3. Click the link under Dell OpenManage Essentials (OME) Additional Information & Updates to view Dell OpenManage Essentials Frequently Asked Questions, updates, videos, and much more Click Close to return to the SupportAssist dashboard.
Troubleshooting 5 This chapter describes procedures you can use to troubleshoot Dell SupportAssist issues Installing Dell SupportAssist SupportAssist installation requires elevated Microsoft User Authentication (UAC) privileges, and may fail if you attempt to install by double-clicking on the installer executable. If this occurs, install SupportAssist as follows: 1. Right-click the installer executable. 2. Select Run as administrator.
Service Contract The Service Contract column on the Case List report, may display a warning icon or Unknown. See the following sections for more information about these messages. Service Contract Warning A warning icon may appear in the Service Contract column of some cases if the associated device is not covered under a Dell service contract or the service contract has expired. If any cases display a warning icon in the Service Contract column: 1.
Integrated Support\logs in 64-bit operating systems and at C:\Program Files \Dell\Dell Integrated Support \logs in 32-bit operating systems, to find details. If there are no discernible details in the log file, and the server is not reachable, call Dell technical support. – If communication is successful, but no data updates occur, the dashboard may be identifying itself with an ID that is unknown to the server. If this occurs, look through the log-file.