SupportAssist Version 1.1 For Microsoft System Center Operations Manager User's Guide December 2012 Rev.
Notes, Cautions, and Warnings NOTE: A NOTE indicates important information that helps you make better use of your computer. CAUTION: A CAUTION indicates either potential damage to hardware or loss of data and tells you how to avoid the problem. NOTE: A WARNING indicates a potential for property damage, personal injury, or death. Copyright © 2014 Dell Inc. All rights reserved. This product is protected by U.S. and international copyright and intellectual property laws.
Contents Chapter 1: Overview...................................................................................................................... 5 Key Features.........................................................................................................................................................................5 Features Supported With Dell Service Contracts....................................................................................................... 5 Case Data Handling..........
Default System Log Collection Schedule.....................................................................................................................27 Enabling Or Disabling The Scheduling Of System Log Collection......................................................................... 27 Disabling The Scheduling Of System Log Collection For A Specific Device Type............................................
1 Overview Dell SupportAssist is a service capability that collects information about your computer hardware and software, and automatically creates support cases when issues arise. This helps Dell to provide you an enhanced, personalized, and efficient support experience. Dell uses this data to help solve common problems and design and market the products and services features you use most.
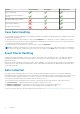
Feature Basic Hardware ProSupport ProSupport Plus Remote monitoring Automated log and configuration collection Automatic support case creation Proactive parts dispatch ProSupport Plus reporting Case Data Handling For increased performance, SupportAssist case data is cached prior to display in the dashboard, and is not displayed in real time. When launched, SupportAssist: ● Queries Dell once every three minutes for cases in the Submitted state to determine if it needs to update the case status.
2 Installing And Setting Up Dell SupportAssist The following sections provide information about installing and setting up Dell SupportAssist.
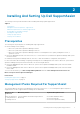
Devices to be monitored Monitoring Feature Required Management Packs ● ● ● ● Dell Server View Library Dell Windows Server (Scalable Edition) Dell Windows Server (Detailed Edition) Dell Windows Server Overrides (Informational Alerts On) ● Dell Operations Library Common iDRAC DRAC Monitoring ● ● ● ● ● ● ● ● Dell Dell Dell Dell Dell Dell Dell Dell Feature Monitoring (optional) Base Hardware Library Operations Library Common DRAC Model DRAC View DRAC Operations Library DRAC (SCOM 2007/SCE 2010) DRAC (SC2
● Microsoft ASP.Net ● IIS 7.x with Windows authentication enabled ● Web browser — Internet Explorer 8, 9, 10, or 11 and Mozilla Firefox 23 or 24; supported only on Windows-based operating systems. Related references Minimum Requirements For Installing SupportAssist on page 8 Hardware Requirements For information about the hardware requirements specific to your environment, see the latest Operations Manager 2007 R2 Sizing Helper Tool or System Center 2012 Operations Manager Sizing Helper Tool at microsoft.
NOTE: Microsoft User Access Control (UAC) requires that the installation is performed with elevated privileges that are obtained only through the Run as administrator option. If you are logged on to the server running Operations Manager as an administrator-level user, double-click the installer package to install SupportAssist. However, when the Open File - Security Warning dialog box is displayed, click Run to proceed.
The SupportAssist application opens in a web browser and the First-Time Setup dialog box is displayed. The SupportAssist application installed on your system registers with the SupportAssist server hosted by Dell, and sends you a registration confirmation email. NOTE: If there is an issue with registering the SupportAssist application with the SupportAssist server and your system connects to the Internet through a proxy server, ensure that you configure the proxy server credentials in SupportAssist.
3 Dell SupportAssist Interface The top-right corner of the SupportAssist dashboard displays links that you can use to navigate the interface. The following table describes the links that are displayed. Link Description SupportAssist Community Opens the SupportAssist User Group website in a new browser window.
Column Description ● ● ● ● ● In Progress — The case is currently being worked by Dell technical support. Customer Deferred — Dell technical support has deferred the case at the customer’s request. Submitted — SupportAssist has submitted the case. No Case — No case exists for this device. Reopened — The case was previously closed, and has been reopened. Case Number The numeric identifier assigned to the support case.
Refreshing The Case List Or Device Inventory Display Data on page 32 Device Inventory The Device Inventory displays the supported Operations Manager-discovered devices. The Edit Device Credentials link allows you to edit the credentials of a selected device. The Send System Logs link allows you to collect the system logs from a selected device and uploads it to Dell. You can filter the devices that are displayed by selecting an option from the Filter By drop-down box.
● Remote Connection ● Preferences ● Contact Information Related references Dell SupportAssist Interface on page 12 System Logs on page 15 Proxy Settings on page 16 Remote Connection on page 16 Preferences on page 17 Contact Information on page 18 System Logs The System Logs page enables you to: ● Edit the credentials required to collect the system logs from supported devices ● Schedule system log collections The following table provides information about the fields displayed under Edit Device Credentials.
Related references Settings on page 14 Related tasks Configuring The Default Device Type Credentials on page 20 Scheduling The System Log Collection on page 26 Overwriting The Device-Specific Credentials With The Default Device Type Credentials on page 25 Proxy Settings The Proxy Settings page enables you to configure the proxy server settings. The following table provides information about the items displayed in the Proxy Settings page.
Field Description Confirm Password Enables you to retype the password provided in the Password field in a masked format. Related references Settings on page 14 Related tasks Configuring A Remote Connection on page 21 Preferences The Preferences page enables you to configure Email Settings, Support Collection, and Maintenance Mode. The following table provides information about the options displayed under Email Settings.
Contact Information The Contact Information page enables you to view and edit the primary and secondary contact information. The following table provides information about the items displayed in the Contact Information page. Field Description Company Information Enables you to view or edit the company name. Primary Select this option to view the primary contact information. Secondary Select this option to view the secondary contact information.
4 Using Dell SupportAssist The following sections provide information about configuring and using Dell SupportAssist.
Configuring Proxy Server Settings If your system connects to the Internet through a firewall or proxy server, you must configure the proxy server settings in SupportAssist. To configure the proxy server settings: NOTE: The Settings tab is accessible only if you are logged on as a member of either the Administrators or Domain Admins group. 1. Click the Settings tab. The System Logs page is displayed. 2. Click Proxy Settings. The Proxy Settings page is displayed. 3. Select Use Proxy Settings.
NOTE: Windows user names must be of the form [Domain\Username]. You can also use a period [ . ] to indicate the local domain. Examples of Windows user names: .\Administrator; MyDomain\MyUsername ● Password — The user password must contain one or more printable characters, and not exceed 127 characters. NOTE: Repeat step 2 and step 3 if you want to provide the Administrator credentials for more than one Credential Type at a time. 4. Click Save Changes.
NOTE: The username must be provided in the domain\username format. You can use a period [.] to indicate the local domain. 5. Click Apply. SupportAssist validates the management group credentials by attempting to establish a remote connection. If the remote connection is successful, the management group credentials are saved.
NOTE: When the Send network identification information to Dell option is disabled, some of the data about your network is not transmitted to Dell. This may impede Dell technical support from resolving your issue. NOTE: If your devices are covered under the Dell ProSupport Plus service contract, when the Send network identification information to Dell option is disabled, you will not receive some reporting information about your devices.
Related references Device Inventory on page 14 Related tasks Configuring The Default Device Type Credentials on page 20 Resetting The Device-Specific Credentials To The Default Device Type Credentials on page 24 Overwriting The Device-Specific Credentials With The Default Device Type Credentials on page 25 Enabling Or Disabling The Automatic Collection Of System Logs By default, when a support case is opened or updated, SupportAssist is configured to automatically collect the system logs from the device th
NOTE: You can only select a device that has a valid Service Tag. If a device does not have a valid Service Tag, the check box for that device is disabled. The Edit Device Credentials link is enabled. 3. Click Edit Device Credentials. The Edit Device Credentials dialog box is displayed. 4. Click Reset to Default Device Type Credentials. NOTE: The Reset to Default Device Type Credentials link is displayed only if you had previously configured the selected device with specific credentials.
Related tasks Editing Device Credentials on page 23 Sending The System Logs Manually When a support case is opened or updated, the SupportAssist application, runs the collection tools on the devices that generated the alerts, and then uploads the system logs to Dell. In certain conditions, if required by Dell technical support, you may be required to manually collect the system logs and send it to Dell.
Default System Log Collection Schedule The following table provides the default system log collection schedule for each supported device.
Disabling The Scheduling Of System Log Collection For A Specific Device Type To disable the scheduling of system log collection for a specific device type: NOTE: Disabling the scheduling of system log collection for a specific device type only disables the generation of system log collection at periodic intervals on those devices. It does not disable SupportAssist from generating a system log collection and uploading it to Dell, if a support case is opened for those devices.
● If the system on which SupportAssist is installed connects to the Internet through a proxy server, configure the proxy settings in SupportAssist. See Configuring Proxy Server Settings. If the communication problem persists, contact the network administrator for further assistance. Verifying The Server Certificate To verify the server certificate on ddldropbox.us.dell.com using Internet Explorer: 1. Open https://ddldropbox.us.dell.com. A 404 — File or directory not found error may be displayed. 2.
Support case information is automatically available for Operations Manager-managed Dell PowerEdge servers with valid Service Tags, when SupportAssist connects to the Dell support case and service contract databases over the Internet. NOTE: If you do not have Internet access, case information is not populated. It is downloaded and displayed when you next connect to the Internet and open the Case List report.
● ● ● ● ● 10 per page 20 per page 30 per page 50 per page 100 per page By default, the dashboard is set to display 50 cases per page. Related references Case List on page 12 Viewing The Device Inventory To view the Device Inventory, click the Devices tab on the Dell SupportAssist dashboard. NOTE: By default, the Device Inventory is sorted by Device Name, in ascending order. See the following sections for more sorting options.
The report refreshes to the default sorting criteria. Any newly-discovered devices appear in the report. Devices that have been removed since the last refresh no longer appear. Related references Device Inventory on page 14 Setting The Number Of Devices Displayed Per Page To change the total number of rows displayed in a page, select the number of cases to display from the Display Devices: list.
3. Select the type of contact: ● Primary ● Secondary 4. Make the required changes to any of the following fields: ● First Name — The first name can contain letters, quotation marks [ ’ ], periods [ . ], spaces, and not exceed 50 characters. ● Last Name — The last name can contain letters, quotation marks [ ’ ], periods [ . ], spaces, and not exceed 50 characters. ● Phone Number — In 123-456-7890 format, or in 123-456-7890 x 123 format (to include an extension).
● DSET_Report_for[ 192.168.1.254_SvcTag_AL12G26_2012-03-07T132648 ].zip The report file is encrypted with the password, dell (all lowercase). The report information can then be viewed by opening the dsetreport.hta file in your web browser. NOTE: You should open the reports only when asked to do so by Dell technical support. Your report will not be reviewed unless you have an open support case.
ERROR, WARN, INFO, and DEBUG, with special values of OFF and ALL. A registry value of ERROR results in logs messages of FATAL, and ERROR, since FATAL is a higher level than ERROR. The LogFileLevel Windows Registry key can be located at HKEY_LOCAL_MACHINE\SOFTWARE\Wow6432Node\Dell\Dell SupportAssist in 64-bit operating systems and at HKEY_LOCAL_MACHINE\SOFTWARE\Dell\Dell SupportAssist in 32-bit operating systems.
5 Uninstalling Dell SupportAssist To uninstall: 1. On the management server running Operations Manager, click Start > Control Panel > Programs and Features. The Programs and Features window is displayed. 2. Select Dell SupportAssist, and then click Uninstall. 3. If the Programs and Features dialog box is displayed, prompting you to confirm the uninstallation, click Yes. SupportAssist and the system log collection tools are uninstalled.
6 Troubleshooting This chapter describes procedures you can use to troubleshoot Dell SupportAssist issues Topics: • • • • • • • • • • Installing Dell SupportAssist Launching Dell SupportAssist Service Tag Warnings Service Contract Collection Failure Collection Failed To Upload Services Security Verifying the installation of the root certificate Installing Root Certificates Installing Dell SupportAssist SupportAssist installation requires elevated Microsoft User Authentication (UAC) privileges, and may fa
Service Contract Warning A warning icon may appear in the Service Contract column of some cases if the associated device is not covered under a Dell service contract or the service contract has expired. If any cases display a warning icon in the Service Contract column: 1. Move the pointer over the warning icon to display a tooltip. 2. Click the Dell Support link displayed in the tooltip to open the service contract information page.
○ After configuring the proxy server settings, verify if the SupportAssist dashboard can connect to the SupportAssist server through the proxy server by performing the email connectivity test. See Confirming Connectivity Through The Proxy Server. ● If the SupportAssist dashboard does not seem to connect to the SupportAssist server or behave appropriately, ensure that the SupportAssist Windows service is running: 1. Click Start > Run. The Run dialog box is displayed. 2. Type services.msc, and then click OK.
Installing Root Certificates Before you begin, ensure that: ● You are logged in to the user account with which SupportAssist was installed. ● You have administrator privileges. ● The SupportAssist service is running. To resolve SSL connection issues, you must install the following root certificates in the appropriate folders of the current user and local computer. Table 1. Certificate Files And Installation Folder Certificate Files Installation Folder Dell_Inc_Enterprise_Issuing_CA1.
7 Related Documents And Resources Other Documents You May Need In addition to this guide, you can access the following guides available at the Dell Support website. ● Dell Server Management Pack Suite For Microsoft System Center Operations Manager And System Center Essentials Installation Guide ● Dell Server Management Pack Suite For Microsoft System Center Operations Manager And System Center Essentials User's Guide ● Dell SupportAssist Version 1.
Contacting Dell NOTE: If you do not have an active Internet connection, you can find contact information on your purchase invoice, packing slip, bill, or Dell product catalog. Dell provides several online and telephone-based support and service options. Availability varies by country and product, and some services may not be available in your area. To contact Dell for sales, technical support, or customer service issues: 1. Go to dell.com/support. 2. Select your support category. 3.