
User guide


Back to Contents Page
Wireless Mini-Card(s)
Dell™Studio™1569ServiceManual
Removing the Mini-Card(s)
Replacing the Mini-Card(s)
Before working inside your computer, read the safety information that shipped with your computer. For additional safety best practices information, see the
Regulatory Compliance Homepage at www.dell.com/regulatory_compliance.
If you ordered a wireless Mini-Card with your computer, the card is already installed.
Your computer supports two Mini-Card slots:
l One full Mini-Card slot – Wireless Wide Area Network (WWAN)
l One half Mini-Card slot – Wireless Local Area Network (WLAN)
Removing the Mini-Card(s)
1. Follow the procedures in Before You Begin.
2. Remove the battery (see Removing the Battery).
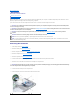
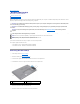
3. Loosen the two captive screws that secure the Mini-Card cover to the computer base.
4. Lift the Mini-Card cover at an angle and ease the tabs out of the computer base.
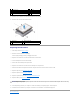
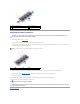
5. Disconnect the antenna cables from the Mini-Card.
6. Remove the screw that secures the Mini-Card to the system board.
CAUTION: Onlyacertifiedservicetechnicianshouldperformrepairsonyourcomputer.DamageduetoservicingthatisnotauthorizedbyDell™
is not covered by your warranty.
CAUTION: To avoid electrostatic discharge, ground yourself by using a wrist grounding strap or by periodically touching an unpainted metal
surface.
CAUTION: To help prevent damage to the system board, remove the main battery (see Removing the Battery) before working inside the
computer.
CAUTION: When the Mini-Card is not in the computer, store it in protective antistatic packaging (see "Protecting Against Electrostatic Discharge"
in the safety instructions that shipped with your computer).
NOTE: Dell does not guarantee compatibility or provide support for Mini-Cards from sources other than Dell.
NOTE: Depending on the configuration of the computer when it was sold, the
Mini-Card slot may or may not have a Mini-Card installed in the slot.
1
Mini-Card cover
2
captive screws (2)
3
tabs (2)
4
computer base