
Users Guide

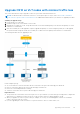
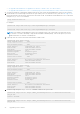
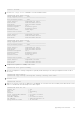
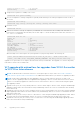
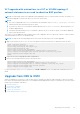
Table Of Contents
- Dell EMC SmartFabric OS10 Installation, Upgrade, and Downgrade Guide
- Contents
- About this guide
- Installing SmartFabric OS10
- Preparing for an upgrade
- Dell EMC SmartFabric OS10 certificate expiration and recommended action
- Supported upgrade paths—Full Switch mode deployments
- Supported upgrade paths—SFS mode in Dell EMC VxRail deployments
- Supported upgrade paths—Dell EMC PowerEdge MX deployments
- Platform-specific prerequisites
- Prerequisites for solution deployments
- Upgrading OS10 software
- Downgrading OS10 software
- Upgrade PCIe firmware from DIAG OS
- Upgrade PCIe firmware from OS10 hshell
- Links to ONIE Firmware Updater and DIAG OS Release Notes
- Frequently asked questions

Install started.
4. Use the show image status command to view the installation status.
VLT-Peer1# show image status
Image Upgrade State: idle
==================================================
File Transfer State: idle
--------------------------------------------------
State Detail: Completed: No error
Task Start: 2018-08-16T19:38:37Z
Task End: 2018-08-16T19:38:44Z
Transfer Progress: 100 %
Transfer Bytes: 417828173 bytes
File Size: 417828173 bytes
Transfer Rate: 58152 kbps
Installation State: idle
--------------------------------------------------
State Detail: Completed: Success
Task Start: 2018-08-16T19:40:57Z
Task End: 2018-08-16T19:45:16Z
VLT-Peer2# show image status
Image Upgrade State: idle
==================================================
File Transfer State: idle
--------------------------------------------------
State Detail: Completed: No error
Task Start: 2018-08-16T19:41:49Z
Task End: 2018-08-16T19:42:09Z
Transfer Progress: 100 %
Transfer Bytes: 417828173 bytes
File Size: 417828173 bytes
Transfer Rate: 21092 kbps
Installation State: idle
--------------------------------------------------
State Detail: Completed: Success
Task Start: 2018-08-16T19:42:59Z
Task End: 2018-08-16T19:47:19Z
5. Change the boot partition to standby on VLT-Peer1.
VLT-Peer1# boot system standby
6. Save the configuration to startup-configuration. Optionally obtain a backup of the startup configuration in EXEC mode on
VLT-Peer1.
VLT-Peer1# write memory
VLT-Peer1# copy config://startup.xml config://<backup file name>
7. Reload VLT-Peer1.
VLT-Peer1# reload
8. Wait for VLT-Peer1 to come up. VLT adjacency is established. VLT-Peer1 becomes the secondary node. Wait until VLT-Peer1
starts to forward traffic after the delay-restore timer expires.
VLT-Peer1# show vlt 100
Domain ID : 100
Unit ID : 2
Role : secondary
Version : 2.3
Local System MAC address : 0c:33:d1:73:cd:00
Role priority : 32768
VLT MAC address : 0c:33:d1:e7:5e:00
IP address : fda5:74c8:b79e:1::2
Delay-Restore timer : 90 seconds
Upgrading OS10 software
27