
User's Manual


14 Using the Graphical User Interface
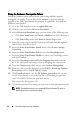
Fixing the Hardware Prerequisite Failure
Install the hardware prerequisites before proceeding with the upgrade,
downgrade, or update. You can also click Continue to proceed with the
upgrade of the Dell OpenManage component, if applicable. To install the
hardware prerequisites:
1
Go to the Dell Support website at
support.dell.com
.
2
Click the icon seen below
Drivers & Downloads
.
3
In the
Drivers and Downloads
page, perform either of the following steps:
•Click
Select Model
under the
Choose a Model
section. Proceed to step 5.
•Click
Enter a Tag
under the
Choose by Service Tag
section.
4
Enter the service tag of your Dell system in the
Enter a service tag
field
and click
Go
. Proceed to step 9.
5
From the
Select Your Product Family
menu, select
Servers, Storage,
Networking
.
6
From the
Select Your Product Line
menu, select
PowerEdge Server
.
7
From the
Select Your Product Model
list, select your PowerEdge system,
and click
Confirm
.
8
From the
Operating System
and
Driver Language
drop-down menus,
select the appropriate operating system and language for your system.
9
From the
Category
drop-down menu, select
Systems Management
.
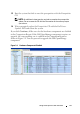
10
From the table of results displayed, click
CD ISO - PowerEdge Updates
Prerequisites v1.0
in the
File Title(s)
column.
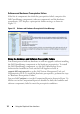
11
Click
Download Now
to save the
PE Updates prereq cd.iso
file on your
system. Copy this file to a system that has a CD-burning program and
create a bootable CD from the provided
.iso
file.
This creates the
Prerequisites
CD.
12
Use the
Prerequisites
CD to bring your system up to meet prerequisite levels.
NOTE: Set the boot order in your system BIOS such that the CD drive is
placed ahead of the system hard drive.