
Setup Guide


Creating Run As Account for SNMP monitoring
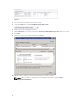
1. Launch OpsMgr 2012, and click Administration.
2. In the Administration pane, browse to Run As Configuration → Accounts.
3. Right-click Accounts and click Create Run As Account.
The Introduction screen is displayed.
NOTE: For more information on Run As Account for Network Monitoring, see the Microsoft
TechNet site at technet.microsoft.com/en-us/library/hh212920.aspx.
4. Click Next.
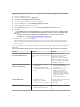
The General Properties screen is displayed.
5. Select Community String from the Run As Account type: drop-down list.
6. Type the community string name in the Display name: text box and click Next.
7. Provide the account credentials in the Community string text box and click Next.
The Distribution Security screen is displayed.
8. Select the Less secure - I want the credentials to be distributed automatically to all managed
computers option, and click Create.
9. After the wizard is complete, click Close.
Associating Multiple Run As Accounts
1. Follow step 1 to step 6 under Configuring OpsMgr 2012 to monitor Traps and Trap-Based Unit
Monitors.
2. On the Add a Run As Account screen, select the A selected class, group, or object option.
3. Click Select → Class.
The Class Search screen is displayed.
NOTE: You can also associate the community string Run As Account with Object and Group.
For more information, see the Microsoft documentation for OpsMgr 2012 at
technet.microsoft.com.
4. In the Filter by (optional) text box enter the class name. Depending on the type of device, type Dell
Server
, Dell CMC, Dell DRAC/MC, or Dell RAC classes.
5. Click Search.
6. Under Available items, select the class you want to add.
7. Click OK.
8. On the Add Run As account screen, click OK.
9. Repeat step 2 to step 8 for each type of class you want to manage.
10. Click Save.
11. After the wizard is complete, click Close.
13