
Users Guide


Notification by email
The email feature helps you to get an email notification when a new update is available for download.
1. In the Dell Repository Manager window, click Source → Schedule Automatic Search.
The Automatic Search window is displayed. You can select Cancel at any time to exit without
making any changes.
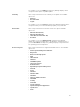
2. Under Email, select any one of the following:
• SMTP
• Microsoft Exchange
NOTE: If you select the SMTP , you have to provide the Sender Details and SMTP Options. You
can use the Use Anonymous authentication option while authenticating a SMTP service over
network.
NOTE: If the login credential is different from the default credentials, you have to provide the
Email ID, Password, User Name and Domain details.
NOTE: For email clients like Gmail, Yahoo and Rediffmail the SMTP configurations are available
online. You should provide the SMTP Server, Port Number and Proxy Server details to
configure the SMTP Options for the corresponding mailing clients. If you do not have the Proxy
Server details, contact your system administrator.
3. Select the Bypass Proxy check box, to bypass the proxy settings for the local address.
4. Select the Use SSL check box, to use Secure Socket Layer (SSL) if the email client requires SSL
service.
5. After the configuring, click Send Test Email to verify the mail setup.
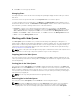
NOTE: If you select the Microsoft Exchange option, you have to provide the Sender Details
and Select MS Exchange Options.
NOTE: If the login credentials are different from the default credentials, you have to provide the
Email ID, Password, User Name and Domain details.
6. To check the exchange server connectivity, select MS Exchange server from Select MS Exchange
Options.
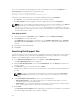
7. Select Auto discover URL check-box to automatically discover the URL.
NOTE: Auto Discover takes 5 - 10 minutes to detect the URL. It is recommended to manually
type the URL in the MS Exchange URL.
8. Select the correct MS Exchange Version from the drop down list.
The supported versions are: Exchange2007_SP1, Exchange2010, Exchange2010_SP1,
Exchange2010_SP2 and Exchange2013.
NOTE: Contact your system administrator, in case you are not sure about the MS Exchange
Version.
9. After the configuring, click Send Test Email to verify the mail setup.
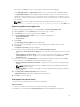
NOTE: You can use the Add Recipients option to Add>> or Remove<< the recipients. The
sender’s email address automatically adds to the recipient’s list while sending the notification
mail.
10. Click Save to use this configuration in future.
69