
Users Guide
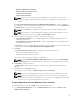

• My Custom Repositories — Allows you to select an existing repository as the base repository.
4. Click Next.
The Connect to OME Server window is displayed.
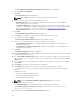
5. Provide the host details to access Dell OpenManage Essentials in the Create Repository for Dell
OpenManage Essentials window.
6. Provide the Host Name or IP Address and Port Number to access Dell OpenManage Essentials.
NOTE: Select Use different user credentials, if the user identification is different from the
Windows login credentials.
7. Click Connect.
The Dell OpenManage Essentials Inventory window is displayed while retrieving the inventory from
the OME server.
NOTE: A Connection error message is displayed if the host details are not correct.
NOTE: You can Reset the configuration at any time to change the OME server.
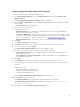
8. Once the OME inventory details are available, select one of the following options you want to
include in the repository:
• Latest updates for all devices — The available updates for existing and outdated devices are
added to the repository.
• Latest updates for only out-of-date devices — Only the latest updates for all outdated devices
are added to the repository.
9. Click Next to close the Create Repository for Dell OpenManage Essentials window and continue.
The Dell OpenManage Essentials Inventory window is displayed.
NOTE: Click Resync to retrieve the updated inventory data, if you have modified or removed
certain systems from the systems managed by Dell OpenManage Essentials.
10. Click Next to continue.
The Summary window is displayed.
NOTE: OME 1.0 and DRM 1.8 must be installed on the same system; however, DRM 1.8 can
access OME 1.1 and higher versions inventory data from a remote system. In DRM 1.8, you must
click Connect to obtain inventory data from OME irrespective of the version of OME it interacts.
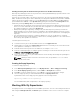
11. The Summary window displays the properties of the repository based on the selections.
In the Summary window, you have the option to choose the type of bundles/components that you
would like to add in the repository.
Available options are:
• Windows x32 Bundles and Components
• Windows x64 Bundles and Components
• Linux Bundles and Components
NOTE: The types of bundles or components are selected by default based on the inventory file
that is being used. However, you can inter change the selections.
NOTE: By default Windows x32 Bundles and Components option is selected.
12. Click Finish to create the repository.
13. Click Close on the New repository inventory window.
22