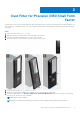
Precision 3450 Small Form Factor Dust Filter Install Guide May 2021 Rev.
Notes, cautions, and warnings NOTE: A NOTE indicates important information that helps you make better use of your product. CAUTION: A CAUTION indicates either potential damage to hardware or loss of data and tells you how to avoid the problem. WARNING: A WARNING indicates a potential for property damage, personal injury, or death. © 2020-2021 Dell Inc. or its subsidiaries. All rights reserved. Dell, EMC, and other trademarks are trademarks of Dell Inc. or its subsidiaries.
Contents Chapter 1: Before you begin ......................................................................................................... 4 Chapter 2: Dust Filter for Precision 3450 Small Form Factor......................................................... 5 Chapter 3: After installing the accessory.......................................................................................7 Chapter 4: Getting help and contacting Dell...........................................................................
1 Before you begin Steps 1. Save and close all open files and exit all open applications. 2. Shut down your system: Click Start > Power > Shut down . NOTE: If you are using a Linux operating system, see the documentation of your operating system for shut-down instructions. 3. Disconnect your system and all attached devices from their electrical outlets. 4. Disconnect all attached network devices and peripherals, such as keyboard, mouse, and monitor from your system.
2 Dust Filter for Precision 3450 Small Form Factor The dust filter for the Precision 3450 Small Form Factor helps protect the system from fine dust particles. After installation, you can set a pre-boot reminder in the BIOS to clean or replace the dust filter at customized time interval using the interval setting in the BIOS. Steps 1. Follow the instructions in before you begin. 2. Align the top edge of the dust filter with the top edge of the system. 3.
NOTE: To clean the dust filter, brush or gently vacuum and then wipe down the external surfaces with a moist cloth.
3 After installing the accessory Steps 1. Replace all screws and ensure that no stray screws remain. 2. Connect any external devices, peripherals, or cables you removed before working on your system. 3. Connect your system and all attached devices to their electrical outlets. 4. Turn on your system.
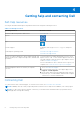
4 Getting help and contacting Dell Self-help resources You can get information and help on Dell products and services using these self-help resources: Table 1. Self-help resources Self-help resources Resource location Information about Dell products and services www.dell.com My Dell Tips Contact Support In Windows search, type Contact Support, and press Enter. Online help for operating system www.dell.com/support/windows www.dell.