
Deployment Guide
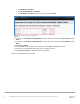
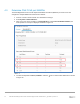

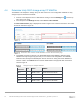

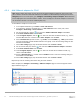
Table Of Contents
- 1 Introduction
- 2 Hardware overview
- 3 Topology overview
- 4 Preparation
- 5 S4148U-ON switch configuration
- 6 S4148U-ON validation
- 7 Configure Unity FC storage
- 8 Configure storage on ESXi hosts
- 9 Configure ESXi hosts for LAN traffic
- A Validated components
- B Technical support and resources
- C Support and feedback

14 Dell EMC Networking FCoE-to-Fibre Channel Deployment with S4148U-ON in F_port Mode | version 1.0
4 Preparation
Note: Exact iDRAC steps in this section may vary depending on hardware, software and browser versions
used. See the PowerEdge server documentation for steps to connect to the iDRAC.
4.1 Reset server CNAs to factory defaults
Note: Resetting to defaults is only necessary if installed CNAs have been modified from their factory default
settings.
1. Connect to the server's iDRAC in a web browser and launch the virtual console.
2. In the virtual console, from the Next Boot menu, select BIOS Setup.
3. Reboot the server.
4. From the System Setup Main Menu, select Device Settings.
5. From the Device Settings page, select the first CNA port.
6. From the Main Configuration Page, click the Default button followed by Yes to load the default
settings. Click OK.
7. Click Finish. Notice if the message indicates a reboot is required for changes to take effect.
8. Click Yes to save changes. Click OK.
9. Repeat for each CNA port listed on the Device Settings page.
10. If required per step 7, reboot the system and return to System Setup to configure NIC partitioning.
4.2 Configure NIC partitioning on CNAs
In this section, each QLogic CNA port is partitioned into one Ethernet and one FCoE partition.
Note: This is only done on CNA ports that carry converged traffic. In this example, these are the two 10GbE
QLogic 578xx CNA ports on each server that are connected to the leaf switches. It is not done on the 1GbE
port connected to the OOB management network.
If the system is already in System Setup from the prior section, skip to step 4.
1. Connect to the server's iDRAC in a web browser and launch the virtual console.
2. In the virtual console, from the Next Boot menu, select BIOS Setup.
3. Reboot the server.
4. On the System Setup Main Menu, select Device Settings.
5. Select the first CNA port.
6. Select Device Level Configuration. Set Virtualization Mode to NPar (if not already set) and click
Back.
7. Select NIC Partitioning Configuration.
8. Select Partition 1 Configuration.
a. Set NIC Mode to Enabled.
b. Set iSCSI Offload Mode to Disabled.
c. Set FCoE Mode to Disabled and click Back.
9. Select Partition 2 Configuration.