
Install Guide
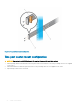
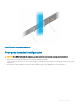
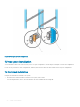


Figure 14. Switch rail attachment
2 After you have installed both switch rails, line them up on the previously mounted Ready-Rails and slide the switch in until it is ush
with front of rack.
About three inches prior to full insertion, the rail locking feature engages to keep the switch from inadvertently sliding out of the rack
and falling.
NOTE
: Do not the use the mounted Ready-Rails as a shelf or a workplace.
Ground wire installation
After you have installed the S4048T-ON switch in a rack, complete the installation of the ground wire.
You previously installed the GND lug and bracket assembly, with ground wire attached, to the S4048T-ON chassis, see Ground lug and
bracket installation.
Provide the following items:
• One 2-hole UL-certied GND lug to attach ground wire to rack
• Two National Electric Code (NEC) compliant screws to attach the GND lug to the rack
• Antioxidant compound
• Crimping tool
1 Measure and cut a length of wire sucient to reach between the system-installed GND lug and the rack-end GND lug.
2 Attach the end of the wire to the rack-end GND lug.
a Coat the bare end of the wire with an antioxidant compound.
b Insert the end of the wire into the lug.
c To secure the connection, crimp the lug end.
S4048T-ON installation
25