
Install Guide

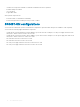
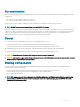
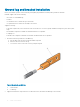
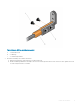
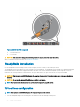

Figure 9. S4048T-ON PSU-side ground
a 1—Pan head screws
b 2—L-bracket
CAUTION
: Take care not to damage the attached ground wire as you proceed to install the switch.
After you install the switch in the rack, see Ground wire installation.
ReadyRails installation
Use the ReadyRails™ rack mounting system to easily congure your rack so that you can install your switch.
The ReadyRails system is provided for 1U front-rack and two-post installations. The ReadyRails system includes two separately packaged
rail assemblies and two rails that are shipped attached to the sides of the switch. Install the ReadyRails system using the 1U tool-less
method or one of three possible 1U tooled methods—two-post ush mount, two-post center mount, or four-post threaded.
CAUTION
: Your system is not NEBS Earthquake Z4-compliant if you use the 1U tool-less square-hole or two-post installation
methods.
CAUTION: Do not use the mounted ReadyRails as a shelf or a workplace.
NOTE: The illustrations in this document are not intended to represent a specic switch.
1U tool-less conguration
NOTE
: Your system is not NEBS Earthquake Z4-compliant if you use this method.
1 Face the ReadyRails ange ears outward, place one rail between the left and right vertical posts.
20
S4048T-ON installation