
Install Guide


S4048T-ON installation
To install the S4048T-ON system, Dell EMC recommends completing the installation procedures in the order presented in this guide.
Always handle the S4048T-ON and its components with care. Avoid dropping the system or its eld replaceable units (FRUs).
NOTE: ESD damage can occur if components are mishandled. Always wear an ESD-preventive wrist or heel ground strap when
handling the S4048T-ON and its components. As with all electrical devices of this type, take all the necessary safety precautions
to prevent injury when installing this system.
Topics:
• Unpack the S4048T-ON system
• Ground lug and bracket installation
• ReadyRails installation
• Ground wire installation
• Optic installation
• System power-up
• Before you install an OS
Unpack the S4048T-ON system
NOTE
: Before unpacking the system, inspect the container and immediately report any evidence of damage.
When unpacking system, make sure that the following items are included:
• One S4048T-ON switch
• One RJ-45 to DB-9 female cable
• One ReadyRails™ kit for rack installation, two mounting brackets, bolts, and cage nuts
• One grounding GND lug, L-bracket, and screws for chassis
• One set of self-adhesive rubber pads for free-standing installation, four pads are included
• Two PSUs
• Two AC country/region-specic power cords
• Getting Started Guide
• Safety and Regulatory Information
• Warranty and Support Information
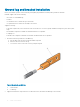
Unpack
1 Place the container on a clean, at surface and cut all straps securing the container.
2 Open the container, or remove the container top.
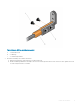
3 Remove the switch from the container carefully. Place it on a secure and clean surface.
4 Remove all packing material.
5 Inspect the product and accessories for damage.
5
S4048T-ON installation 17