
Install Guide

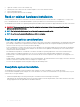
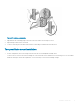
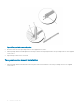
Table Of Contents
- S3048-ON Installation Guide January 2019
- About this guide
- The S3048–ON switch
- Site preparations
- NEBS compliance
- Install the S3048–ON
- Power supplies
- Fans
- Management ports
- Specifications
- Chassis physical design
- IEEE Standards
- Agency compliance
- USA Federal Communications Commission Statement
- European Union EMC Directive Conformance Statement
- Japan VCCI Compliance for Class A Equipment
- Korean Certification of Compliance
- Safety Standards and Compliance Agency Certifications
- Electromagnetic compatibility
- Product recycling and disposal
- Dell EMC support

Install the S3048–ON
To install the S3048–ON switch, complete the installation procedures in the order presented in this chapter.
Always handle the S3048–ON and its components with care. Avoid dropping the switch or its eld replaceable units (FRUs).
This chapter describes the installation procedures as follows:
1 Unpack
2 Rack or cabinet hardware installation
3 Switch installation
4 Optics installation
5 Power up the switch
NOTE: ESD damage can occur if components are mishandled. Always wear an ESD-preventive wrist or heel ground strap when
handling the S3048–ON and its components. As with all electrical devices of this type, take all the necessary safety precautions
to prevent injury when installing this switch.
Topics:
• Unpack
• Rack or cabinet hardware installation
• Switch installation
• Ground cable
• Optics installation
• Switch power-up
Unpack
NOTE
: Before unpacking the switch, inspect the container and immediately report any evidence of damage.
When unpacking the S3048-ON switch, make sure that the following items are included:
• One S3048-ON switch
• One RJ-45 to DB-9 female cable
• Two sets of rail kits, no tools required
• One PSU, a second PSU is sold separately
• Three fan units
• One AC country/region-specic power cord
• Dell Networking S3048–Open Networking (ON) Getting Started Guide
• Safety and Regulatory Information
• Warranty and Support Information
Unpacking steps
1 Place the container on a clean, at surface and cut all straps securing the container.
5
Install the S3048–ON 15