
Deployment Guide

45 VCF on VxRail Multirack Deployment using BGP EVPN
7.1 Create a local user in the workload domain vCenter Server
Before adding the VxRail cluster, image the workload domain nodes. Once complete, perform the VxRail first
run of the workload domain nodes using the external vCenter server.
Create a local user in the vCenter Server as this is an external server that the VMware Cloud Foundation
deploys. This is required for the first run of VxRail.
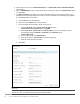
1. Log in to the workload domain vCenter Server Appliance through VMware vSphere Web Client.
2. Select Menu > Administration > Single Sign-On
3. Click Users and Groups.
4. Click Users.
5. Select domain vSphere.local.
6. Click Add User.
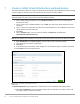
7. In the Add User pop-up window, enter the values for the mandatory fields.
8. Enter vxadmin as the Username and Password. Confirm the Password.
9. Click Add.
10. Wait for the task to complete.
7.2 VxRail initialization
This section outlines the general steps that are needed to initialize a VxRail cluster.
1. Install the VxRail nodes into the two racks in the data center.
2. Attach the appropriate cabling between the ports of the VxRail nodes and the switch ports.
3. Power on the four primary E-series nodes in both racks to form the initial VxRail cluster.
4. To access the VxRail ESXi management on VLAN 1641, connect a workstation or laptop that is
configured for VxRail.
5. Using a web browser, go to the default VxRail IP address, 192.168.10.200, to begin the VxRail
initialization process.
6. Complete the steps provided within the initialization wizard.
Using the values provided, VxRail performs the verification process. Once the validation is complete, the
initialization process builds a new VxRail cluster. The building progress of the cluster displays in the status
window provided. When the Hooray! message displays, the VxRail initialization is complete, and the new
VxRail cluster is built.