
Setup Guide


Table Of Contents
- Removing and Installing the Battery and Battery Cable on PERC Controllers
- Removing and Installing the Battery and Battery Cable on PERC Controllers
- Important Safety Information
- Removing the Transportable Battery Backup Unit (TBBU) from a PERC x/E Adapter
- Installing the New BBU and Battery Cable
- Installing the TBBU on a PERC x/E Adapter
- Removing the DIMM from a PERC x/i Controller
- Disconnecting the BBU from a PERC x/i Controller
- Installing the DIMM and BBU to a PERC x/i controller
- Important Safety Information
- Removing and Installing the Battery and Battery Cable on PERC Controllers
- 在 PERC 控制器上拆装电 池和电池电缆
- 拆裝 PERC 控制器的 電池和電池電纜
- Retrait et installation de la batterie et de son câble sur les contrôleurs PERC
- Retrait et installation de la batterie et de son câble sur les contrôleurs PERC
- Informations importantes concernant la sécurité
- Retrait de la TBBU d'une carte PERC x/E
- Installation d'une nouvelle BBU et du câble de la batterie
- Installation de la TBBU sur une carte PERC x/E
- Retrait de la barrette DIMM d'un contrôleur PERC x/i
- Retrait de la BBU d'un contrôleur PERC x/i
- Installation de la barrette DIMM et de la BBU sur un contrôleur PERC x/i
- Informations importantes concernant la sécurité
- Retrait et installation de la batterie et de son câble sur les contrôleurs PERC
- Entfernen und Installieren des Akkus und des Akkukabels bei PERC- Controllern
- Entfernen und Installieren des Akkus und des Akkukabels bei PERC-Controllern
- Wichtige Sicherheitshinweise
- Entfernen der Akkubaugruppe (TBBU) von einem PERC x/E-Adapter
- Installation des neuen Akkus und des Akkukabels
- Installation der Akkubaugruppe am PERC x/E-Adapter
- Entfernen des DIMM-Moduls von einem PERC x/i-Controller
- Entfernen der Akkueinheit von einem PERC x/i-Controller
- Installieren des DIMM-Moduls und der Akkueinheit an einem x/i-Controller
- Wichtige Sicherheitshinweise
- Entfernen und Installieren des Akkus und des Akkukabels bei PERC-Controllern
- PERC コントローラの バッテリーとバッテリー ケーブルの取り外しと取 り付け
- PERC 컨트롤러의 전지 및 전지 케이블 제거/설치
- Установка и удаление батареи и кабеля батареи на контроллерах PERC
- Установка и удаление батареи и кабеля батареи на контроллерах PERC
- Важная информация о безопасности
- Снятие переносного блока резервного питания (Transportable Battery Backup Unit — TBBU) адаптера PERC x/E
- Установка нового модуля резервного питания и кабеля батареи
- Установка блока TBBU в адаптер PERC x/E
- Извлечение модуля памяти контроллера PERC x/i
- Отключение блока BBU от контроллера PERC x/i
- Установка модуля памяти DIMM и блока BBU в контроллер PERC x/i
- Важная информация о безопасности
- Установка и удаление батареи и кабеля батареи на контроллерах PERC
- Extracción e instalación de la batería y el cable de la batería en controladoras PERC
- Extracción e instalación de la batería y el cable de la batería en controladoras PERC
- Información de seguridad importante
- Extracción de la unidad de batería de reserva transportable (TBBU) de un adaptador PERC x/E
- Instalación de la nueva BBU y el cable de la batería
- Instalación de la TBBU en un adaptador PERC x/E
- Extracción del módulo DIMM de una controladora PERC x/i
- Desconexión de la BBU de una controladora PERC x/i
- Instalación del módulo DIMM y la BBU en una controladora PERC x/i
- Información de seguridad importante
- Extracción e instalación de la batería y el cable de la batería en controladoras PERC
54
Entfernen und Installieren des Akkus und des Akkukabels bei PERC-Controllern
Entfernen der Akkubaugruppe (TBBU) von einem PERC x/E-Adapter
In diesem Abschnitt ist beschrieben, wie die Akkubaugruppe von einem
im System installierten PERC
x
/E-Adapter entfernt wird.
ANMERKUNG: Die Akkubaugruppe am PERC x/E-Adapter besteht aus
einem DIMM-Speichermodul und dem eigentlichen Pufferakku.
1
Fahren Sie das System mit dem installierten PERC
x
/E-Adapter sowie
angeschlossene Speichergeräte normal herunter, und entfernen Sie den
PERC
x
/E-Adapter aus dem System. Weitere Informationen erhalten Sie
im
Benutzerhandbuch für Dell PowerEdge Expandable RAID Controller x/i
und x/E
.
2
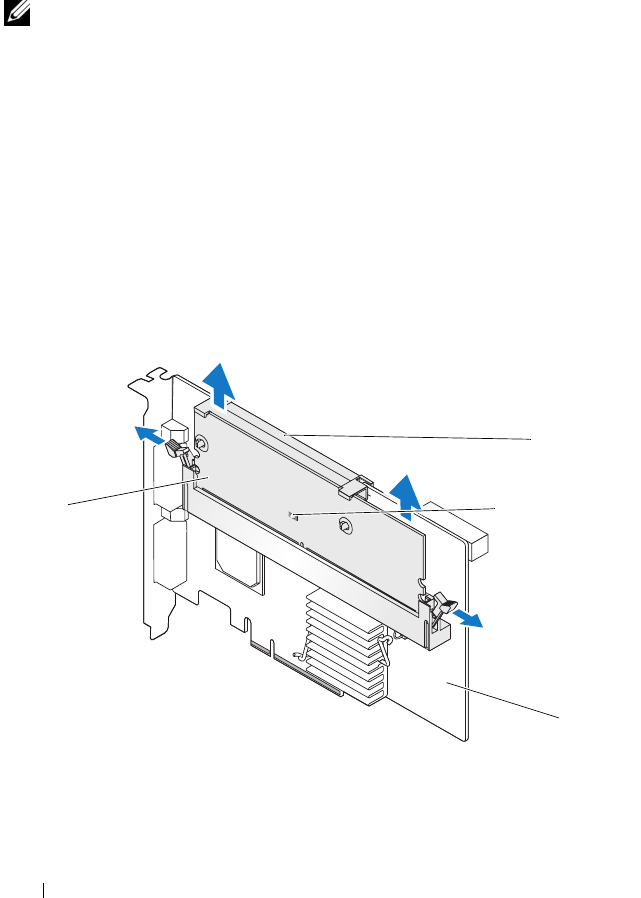
Überprüfen Sie den Controller visuell und stellen Sie fest, ob die Dirty-
Cache-LED am Speichermodul leuchtet. Siehe Abbildung 1. Wenn die
LED leuchtet, setzen Sie den Controller wieder im System ein und setzen
Sie die Systemabdeckung auf. Verbinden Sie das System mit dem
Netzstrom, schalten Sie das System ein und wiederholen Sie Schritt 1.
Abbildung 1. Position der Dirty-Cache-LED am PERC x/E-Adapter
1 Speichermodul 2 Batterie
3 Dirty-Cache-LED 4 PERC x/E-Adapter
4
3
1
2