
User`s guide


Setting Up Integrated Mirroring 17
a
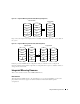
In the Mirroring Properties screen, select the primary disk for the IM volume (the disk
with the data you want to mirror). Use the arrow keys to move to the Mirrored Pair
column for this disk, and use the + and - keys to select
Primary
as the value.
b
Use the arrow keys to select the secondary (mirrored) disk for the IM volume. Use the +
and - keys to select
Secondary
as the value for the Mirrored Pair column.
c
Press
Esc
, then use the arrow keys to select
Save changes then exit this menu
. Then press
Enter
.
d
A message now warns you that data on the mirrored or SCSI disks will be lost. Press
Enter
to accept data erasure from the disk, or press any other key to discard the changes.
e
If you press
Enter
in Step 5d,
the next screen provides an opportunity (by pressing
F3
) to
confirm that data loss is OK. Or, press any other key to discard the changes.
f
After pressing
F3
, you are returned to the Main menu. To verify the change in mirroring
properties, use the arrow keys to select an adapter. Then press
Enter
to return to the
Adapter Properties screen.
g
Use the arrow keys to select Mirroring Properties
,
and press
Enter.
The IM volume exists as soon as you save the changes, and the Mirroring Properties screen displays
the IM volume properties and status.
Detailed IM Configuration Procedure
This section provides more detail on the BIOS-based CU screens that are used to configure an IM
volume. See "Other BIOS-Based CU Screens" on page 21
for descriptions of the other BIOS-based
CU screens that are not used for this task.
NOTE:
Your system may have a different version of the Fusion-MPT BIOS. Therefore, the
screens that you see may be slightly different from the examples shown here.
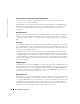
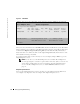
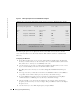
Main Menu
Figure 3-2 shows an example of the Main menu that appears when the BIOS-based CU starts.