
Owner's Manual


Deployment Guide 19
5
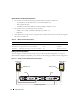
Ensure that the nodes can communicate with the public and the private networks.
a
On node 1, open a command prompt window.
b
At the command prompt, type the following and press <Enter>:
ping <
public_host_name
>
ping <
private_host_name
>
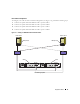
where <
public_host_name
> and <
private_host_name
> are the host names for the public and
private network adapters in the remaining nodes.
If the node’s network adapters do not respond to
ping
commands, check your network
configuration and then repeat this step.
NOTE: The virtual IP address is configured later and cannot be pinged at this point.
6
Repeat step 1 through step 5 on node 2.
Installing the Host-Based Software Needed for Dell|EMC
To install the EMC Naviagent software using the EMC software that came with your Dell|EMC system,
follow the procedures in your Dell|EMC documentation.
Verifying the Storage Assignment to the Nodes
1
On the Windows desktop, right-click
My Computer
and select
Manage
.
2
In the
Computer Management
window, click
Device Manager
.
3
Expand
Disk drives
.
4
Under
Disk drives
, ensure that one of the following appear for each LUN assigned in the storage:
• Two SCSI disk devices (direct-attached configuration)
• Four SCSI disk devices (SAN configuration)
5
Expand
Storage
and click
Disk Management
.
If the
Welcome to the Initialize and Convert Disk Wizard
appears, perform step a through step d.
Otherwise, go to step 6.
a
In the
Welcome to the Initialize and Convert Disk Wizard
window, click
Next
.
b
In the
Disks
window of the
Select Disks to Initialize
window, select the disks that are associated
with your storage LUNs and click
Next
.
c
In the
Select Disks to Convert
window, deselect the disk(s) that you selected in step b and
click
Next
.
NOTE: This procedure ensures that your disks are configured as Basic disks.
d
Click
Finish
.