
User`s guide


Battery: Dell OptiPlex GX1 Small-Form-Factor System User's Guide
file:///C|/infodev/2013/eDoc/OpGX1/UG/battery.htm[2/21/2013 11:47:21 AM]
Program" for instructions.
CAUTION: Before you remove the computer cover, see "Safety First—For You and Your
Computer."
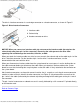
2. Remove the computer cover
.
3. Remove the battery.
See Figure 3
in "Inside Your Computer" for the location of the battery.
NOTICE: If you pry the battery out of its socket with a blunt object, be careful not to touch the
system board with the object. Make certain that the object is inserted between the battery and
the socket before attempting to pry out the battery. Otherwise, you may damage the system
board by prying off the socket or by breaking circuit traces on the system board.
Pry the battery out of its socket with your fingers or with a blunt, nonconductive object, such as a plastic
screwdriver.
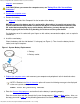
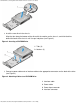
4. Install the new battery.
Orient the battery with the side labeled "+" facing up (see Figure 1). Then insert the battery into the
socket, and snap it into place.
Figure 1. System Battery Replacement
1 Battery
2 Battery socket
5. Replace the computer cover
, and reconnect your computer and peripherals to their electrical outlets
and turn them on.
NOTE: If Enabled, the Chassis Intrusion option will cause the following message to be displayed
at the next system start-up:
ALERT! Cover was previously removed.
6. Enter the System Setup program
, and confirm that the battery is operating properly.
Enter the correct time and date through the System Setup program's Time
and Date options. Also, use
the copy you made in step 1
of the preceding procedure to restore the correct settings for other system