Dell EMC OpenManage Installation Guide — Microsoft Windows Version 9.3.
Notes, cautions, and warnings NOTE: A NOTE indicates important information that helps you make better use of your product. CAUTION: A CAUTION indicates either potential damage to hardware or loss of data and tells you how to avoid the problem. WARNING: A WARNING indicates a potential for property damage, personal injury, or death. © 2019 Dell Inc. or its subsidiaries. All rights reserved. Dell, EMC, and other trademarks are trademarks of Dell Inc. or its subsidiaries.
Contents 1 Introduction................................................................................................................................. 5 What’s new in this release....................................................................................................................................................5 Software Availability........................................................................................................................................................
Running Prerequisite Checker In CLI Mode..................................................................................................................... 28 Installing Managed System Software In CLI Mode......................................................................................................... 28 Uninstalling Systems Management Software..................................................................................................................29 5 Using Microsoft Active Directory.....
1 Introduction This topic provides information about: • • • • Installing Server Administrator on managed systems. Installing and using the Remote Enablement feature. Managing remote systems using Server Administrator Web Server. Configuring the system before and during a deployment or upgrade. NOTE: If you are installing management station and managed system software on the same system, install identical software versions to avoid system conflicts.
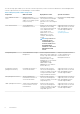
The custom setup option enables you to select the software components you want to install. The table lists the various managed system software components that you can install during a custom installation. Table 1. Managed System Software Components Component What is installed Deployment Scenario Systems to install on Server Administrator Web Server Web-based Systems Management functionality that enables you to manage systems locally or remotely.
Component What is installed Deployment Scenario Systems to install on Remote Enablement (Management Interface) Instrumentation Service and CIM Install to perform remote Provider systems management tasks. Install Remote Enablement on one system and Server Administrator Web Server on another system. You can use the system with the Server Administrator to remotely monitor and manage the systems which have Remote Enablement installed. Supported systems.
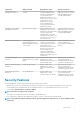
For information about the Security Management, see the Dell EMC OpenManage Server Administrator User’s Guide at www.dell.com/ openmanagemanuals. Other Documents You Might Need For more information, see the following guides: • • • • • • • • • • • • • • The Lifecycle Controller Version 3.40.40.40 User's Guide provides information about using the Lifecycle Controller.
2 Preinstallation Setup Ensure that you perform the following before installing Server Administrator: • • • • Read the installation instructions for the operating system. Read the Installation Requirements to ensure that the system meets or exceeds the minimum requirements. Read the applicable readme files and the Dell EMC OpenManage Systems Software Support Matrix. Close all applications running on the system before installing the Server Administrator applications.
Return Code Description —4 Not an implemented return code. —5 The prerequisite checker does not run. The user failed to change the working directory to %TEMP%. —6 The destination directory does not exist. The prerequisite checker does not run. —7 An internal error has occurred. The prerequisite checker does not run. —8 The software is already running. The prerequisite checker does not run. —9 The WSH is corrupted, is a wrong version, or is not installed. The prerequisite checker does not run.
NOTE: Ensure that the web browser is configured to bypass the proxy server for local addresses. Multilingual User Interface Support The installer provides Multilingual User Interface (MUI) support available on the following operating systems: • Microsoft Windows Server 2016 The MUI Pack are a set of language-specific resource files that you can add to the English version of a supported Windows operating system.
Table 3. Availability of Systems Management Protocol by Operating Systems Operating System SNMP CIM/WMI Supported Microsoft Windows operating systems. Available from the operating system installation media. Always installed. Digital Certificates All Server Administrator packages for Microsoft are digitally signed with a certificate that helps guarantee the integrity of the installation packages.
Configuring SNMP Agents The systems management software supports the SNMP systems management standard on all supported operating systems. The SNMP support may or may not be installed depending on the operating system and how the operating system was installed. An installed supported systems management protocol standard, such as SNMP, is required before installing the systems management software.
Installing WinRM On Windows Server, Windows client operating system, and WinRM 2.0 is installed by default. On Windows Server, WinRM 1.1 is installed by default. Certificate Authority Signed Self-Signed Certificate You need a certificate signed by a CA or a self‑signed certificate (generated using the SelfSSL tool) to install and configure the Remote Enablement feature on the system. NOTE: It is recommended that you use a certificate signed by a CA.
4. Provide the appropriate permission(s) to the respective users and click OK. WMI To configure user authorization for WMI servers: 1. Click Start > Run. 2. Type wmimgmt.msc, and then click OK. The Windows Management Infrastructure (WMI) screen is displayed. 3. Right-click the WMI Control (Local) node in the left pane, and then click Properties. The WMI Control (Local) Properties screen is displayed. 4. Click Security and expand the Root node in the namespace tree. 5. Navigate to Root > DCIM > sysman. 6.
3 Installing Managed System Software On Microsoft Windows Operating Systems On Microsoft Windows, an autorun utility is displayed when you insert the Dell EMC OpenManage Systems Management Tools and Documentation software. This utility allows you to choose the systems management software you want to install on the system. If the autorun program does not start automatically, use the autorun program from the DVD root or the setup program in the srvadmin \windows directory on the Dell EMC OpenManage Systems Ma
You want to Select View the status of local and remote storage attached to a managed Storage Management. system and obtain storage management information in an integrated graphical view. Remotely access an inoperable system, receive alert notifications when a system is down, and remotely restart a system. iDRAC Command Line Tools. NOTE: Install the Simple Network Management Protocol (SNMP) agent on the managed system using the operating system medium before installing the managed system software.
• • • • • • • • Command Line Interface WMI SNMP Operating System Logging DRAC Command Line Tools Intel SNMP Agent Broadcom SNMP Agent QLogic SNMP Agent During a Typical installation, individual management station services that do not meet the specific hardware and software requirement for that service are not installed on the managed systems.
8. Select Custom and click Next. The Custom Setup dialog box is displayed. 9. Select the required software features you want to install on the system. If you are installing Server Administrator on an unsupported system, the installer displays only the Server Administrator Web Server option. A selected feature has a hard drive icon depicted next to it. A feature that is not selected has a red X depicted next to it.
Creating And Distributing The Typical Unattended Installation Package The Typical Setup unattended installation option uses the Dell EMC Systems Management Tools and Documentation DVD as the unattended installation package. The msiexec.exe /i .msi /qn command accesses the DVD to accept the software license agreement and installs all the required Server Administrator features on selected remote systems.
Specifying Log File Locations For managed system MSI installation, run the following command to perform an unattended installation while specifying the log file location msiexec.exe /i .msi /l*v "C:\openmanage\logs\SysMgmt.log" Unattended Installation Features Unattended installation provides the following features: • • • A set of optional command line settings to customize an unattended installation. Customization parameters to designate specific software features for installation.
Setting Result /f[p|o|e|d|c|a|u |m|s|v] This command repairs a product. /fp – This option reinstalls a product if a file is missing. /fo – This option reinstalls a product if a file is missing or if an older version of a file is installed. /fe – This option reinstalls a product if a file is missing or an equal or older version of a file is installed. /fd – This option reinstalls a product if a file is missing or a different version of a file is installed.
The following table provides the list of feature IDs for each software feature. NOTE: The software feature IDs mentioned in the table are case-sensitive. Table 6.
System Recovery On Failed Installation The Microsoft Software Installer (MSI) provides the ability to return a system to its fully working condition after a failed installation. MSI does this by maintaining an undo operation for every standard action it performs during an install, upgrade, or uninstall. This operation includes restoration of deleted or overwritten files, registry keys, and other resources.
Upgrade For an unattended upgrade, the msiexec.exe /i SysMgmtx64.msi /qn command accesses the DVD to accept the software license agreement and upgrades all the required Server Administrator features on selected remote systems. All major user settings are retained during an unattended upgrade. NOTE: If the upgrade installation fails, uninstall the existing installation and retry. NOTE: There is no upgrade support from existing OM version to OM 9.3.2. 1.
Repair If you want to repair an installed Server Administrator component that is damaged: 1. Navigate to the Windows Control Panel. 2. Click Add/Remove Programs. 3. Click Server Administrator and click Change. The Welcome to the Install Wizard for Server Administrator dialog box is displayed. 4. Click Next. The Program Maintenance dialog box is displayed. 5. Select the Repair option and click Next. The Ready to Repair the Program dialog box is displayed. 6.
Uninstalling Managed System Software Features Using The Operating System Perform the following tasks to uninstall managed system software features using the operating system. 1. Navigate to the Windows Control Panel. 2. Click Add/Remove Programs. 3. Click Server Administrator, and then click Remove. The Add or Remove Programs dialog box is displayed. 4. Click Yes to confirm uninstallation of Server Administrator.
4 Installing Managed System Software On Microsoft Windows Server and Microsoft Hyper-V Server The Server Core installation option of the Microsoft Windows Server and Hyper-V Server operating system provides a minimal environment for running specific server roles that reduce the maintenance and management requirements and the attack surface for those server roles. A Windows Server or Hyper-V Server installation installs only a subset of the binaries that are required by the supported server roles.
Uninstalling Systems Management Software To uninstall managed system software, type msiexec /x SysMgmtx64.msi at the command prompt.
5 Using Microsoft Active Directory If you use Active Directory service software, configure it to control access to the network. The Active Directory database is modified to support remote management authentication and authorization. Server Administrator, as well as Integrated Remote Access Controllers (iDRAC), Remote Access Controllers (RAC), can now interface with Active Directory. With this tool, you can add and control users and privileges from one central database.
Figure 1. Typical Setup for Active Directory Objects In addition, you can set up Active Directory objects in a single domain or in multiple domains. Setting up objects in a single domain does not vary, whether you are setting up RAC, or Server Administrator objects. When multiple domains are involved, however, there are some differences. The following figure shows the set up of the Active Directory objects in a single domain.
Setting Up Objects In A Single Domain To set up the objects in a single domain scenario, perform the following tasks: 1. Create two Association Objects. 2. Create two RAC Product Objects, RAC1 and RAC2, to represent the two DRAC 4 cards. 3. Create two Privilege Objects, Priv1 and Priv2, in which Priv1 has all privileges (administrator) and Priv2 has login privileges. 4. Group User1 and User2 into Group1. 5.
Setting Up Server Administrator Active Directory Objects In Multiple Domains For Server Administrator, the users in a single Association can be in separate domains and need not be in a Universal group. The following is a very similar example to show how Server Administrator systems in separate domains affect the setup of directory objects. Instead of RAC devices, you will have two systems running Server Administrator (Server Administrator Products sys1 and sys2). sys1 and sys2 are in different domains.
• • Adding Users and Privileges to Active Directory Configuring the Systems or Devices Configuring The Active Directory Product Name To configure the Active Directory product name: 1. Locate the omsaoem.ini file in the installation directory. 2. Edit the file to add the line adproductname=text, where text is the name of the product object that you created in Active Directory. For example, the omsaoem.ini file contains the following syntax if the Active Directory product name is configured to omsaApp.
CAUTION: The Dell Schema Extender uses the SchemaExtenderOem.ini file. To ensure that the Dell Schema Extender utility functions properly, do not modify the name or the contents of this file. 1. Click Next on the Welcome screen. 2. Read the warning and click Next. 3. Select Use Current Log In Credentials or enter a user name and password with schema administrator rights. 4. Click Next to run the Dell Schema Extender. 5. Click Finish.
Elements Description Class Type Structural Class SuperClasses Computer Attributes dellAssociationMembers Table 13. dellOmsa2AuxClass Class Elements Description OID 1.2.840.113556.1.8000.1280.1.2.1.1 Description This class is used to define the privileges (Authorization Rights) for Server Administrator. Class Type Auxiliary Class SuperClasses None Attributes dellOmsaIsReadOnlyUser dellOmsaIsReadWriteUser dellOmsaIsAdminUser Table 14.
Table 16. Server Administrator-Specific Attributes Added to the Active Directory Schema Attribute Name/Description Assigned OID/Syntax Object Identifier Single Valued dellOMSAIsReadOnlyUser 1.2.840.113556.1.8000.1280.1.2.2.1 TRUE if the User has Read-Only rights in Server Administrator Boolean (LDAPTYPE_BOOLEAN 1.3.6.1.4.1.1466.115.121.1.7) dellOMSAIsReadWriteUser 1.2.840.113556.1.8000.1280.1.2.2.2 TRUE if the User has Read-Write rights in Server Administrator Boolean (LDAPTYPE_BOOLEAN 1.3.6.1.4.1.
Creating A Product Object To create a Product Object: NOTE: Server Administrator users must use Universal-type Product Groups to span domains with their product objects. NOTE: When adding Universal-type Product Groups from separate domains, create an Association object with Universal scope. The default Association objects created by the Schema Extender utility are domain Local Groups and do not work with Universal-type Product Groups from other domains. 1.
2. Select the Users tab and click Add. 3. Type the User or User Group name or browse to select and click OK. Click the Privilege Object tab to add the privilege object to the association that defines the user’s or user group’s privileges when authenticating to a system. NOTE: Add only one Privilege Object to an Association Object. To Add A Privilege 1. Select the Privileges Object tab and click Add. 2. Type the Privilege Object name or browse and click OK.
6 Frequently Asked Questions What ports do systems management applications use? The Server Administrator uses the default port 1311. These ports are configurable. For port information of a particular component, see the User Guide of that respective component.
What do I do when the creation of WinRM listener fails with the following error message? The CertificateThumbprint property must be empty when the SSL configuration will be shared with another service This error occurs when the Internet Information Server (IIS) is already installed and configured for HTTPS communication. Details about coexistence of IIS and WinRM is available at technet.microsoft.com/en-us/library/cc782312.aspx.
Does systems management Install support Windows Advertised installation? No. Systems management Install does not support Windows Advertised installation - the process of automatically distributing a program to client computers for installation, through the Windows group policies. How do I check the disk space availability during custom installation? In the Custom Setup screen, you must click an active feature to view the hard drive space availability or to change the installation directory.
What are the names of all the systems management features under Windows? The following table lists the names of all systems management features and their corresponding names in Windows. Table 18.