
Users Guide


Managing Physical Disk Power Using The QoS Option
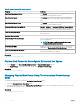
To manage physical disk power through the QoS option:
1 Select the Customized Power Save Mode option.
2 In the Spin Down Congured Drives drop-down menu, select Enabled.
3 The Quality of Service (QoS) option is enabled.
Enter the Start Time and Time Interval to spin up.
4 Click Apply.
Related link
Managing The Physical Disk Power
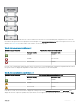
Managing The Time Interval For The QoS Option
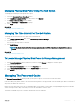
To manage the time interval for the QoS option at the virtual disk level:
1 In the Quality Of Service (QoS) page, select Enable Quality of Service Settings.
2 Set the Start Time.
The start time can range from 1 to 24 hours.
3 Click Apply Changes.
NOTE
: The Enable Quality of Service Settings option is enabled only if the Spin Down Congured Drives option is
enabled.
Related link
Managing The Physical Disk Power
To Locate Manage Physical Disk Power In Storage Management
1 In the Server Administrator window, under the system tree, expand Storage to display the controller objects.
2 Select a controller object.
3 Click Information/Conguration on the controller Properties page.
4 Select Manage Physical Disk Power from the Available Tasks drop-down menu.
5 Click Execute.
Managing The Preserved Cache
The Managed Preserved Cache feature provides you the option to ignore or restore the controller cache data.
In the write-back policy, data is written to the cache before being written to the physical disk. If the virtual disk goes oine or is deleted for
any reason, the data in the cache is lost.
Data in the cache may also be lost in case of unintended cable or power failure. If such a failure, Storage Management preserves the data
written on the preserved or dirty cache until you recover the virtual disk or clear the cache.
This feature is available only on SAS controllers with rmware version 6.1 and later.
Controllers
79