Dell OpenManage Server Administrator Version 7.
Notes, Cautions, and Warnings NOTE: A NOTE indicates important information that helps you make better use of your computer. CAUTION: A CAUTION indicates either potential damage to hardware or loss of data and tells you how to avoid the problem. WARNING: A WARNING indicates a potential for property damage, personal injury, or death. © 2012 Dell Inc.
Contents Notes, Cautions, and Warnings...................................................................................................2 1 Introduction..................................................................................................................................9 Dell OpenManage Systems Management Software................................................................................................9 Server Administrator Components on a Managed System...................................
Upgrading Managed System Software..................................................................................................................37 Upgrading Guidelines.......................................................................................................................................37 Upgrade............................................................................................................................................................37 Modify................................
Configuring the SNMP Agent on Systems Running VMware ESXi........................................................................59 Configuring the System to Send Traps to a Management Station Using the vSphere CLI..............................59 Troubleshooting......................................................................................................................................................60 7 Installing Dell OpenManage Software on Citrix XenServer ......................................
When I run Dell OpenManage Install, I see unreadable characters on the Prerequisite check information screen...........................................................................................................................................79 I have installed Server Administrator and Dell Online Diagnostics in the same directory and Dell Online Diagnostics fails to work, what do I do?...............................................................................................
What are the additional components that can be installed on a system that already has Server Administrator installed?...................................................................................................................................88 What happens if I install the RPM package on an unsupported system or on an unsupported operating system?............................................................................................................................................
1 Introduction This topic provides information on: • Installing Dell OpenManage Server Administrator (OMSA) on managed systems. • Installing and using the Remote Enablement feature. • Managing remote systems using OpenManage Server Administrator Web Server. • Configuring the system before and during a deployment or upgrade. NOTE: If you are installing management station and managed system software on the same system, install identical software versions to avoid system conflicts.
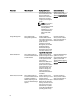
Component What is installed Deployment Scenario Systems to install on Instrumentation and the Server Administrator Web Server installs Server Administrator. Use Server Administrator to monitor, configure, and manage the system. systems, see the Dell Systems Software Support Matrix at support.dell.com/ manuals. NOTE: If you choose to install only Server Instrumentation (without selecting Remote Enablement), you must also install the Server Administrator Web Server.
Component What is installed Deployment Scenario Systems to install on you diagnose the probable cause of a system crash. Intel SNMP Agent Intel Simple Network Management Protocol (SNMP) Agent Install to enable Server Administrator to obtain information about Network Interface Cards (NICs). Only on Dell PowerEdge systems on which Server Instrumentation is installed and which are running on Microsoft Windows operating system.
• The Dell Lifecycle Controller 2 Version 1.00.00 User's Guide provides information on using the Lifecycle Controller. • The Dell Management Console User’s Guide provides information about installing, configuring, and using Dell Management Console. • The Dell Systems Build and Update Utility User’s Guide provides information on using the Systems Build and Update Utility.
2 Preinstallation Setup Ensure that you perform the following before installing Server Administrator: • Read the installation instructions for the operating system. • Read the Installation Requirements to ensure that the system meets or exceeds the minimum requirements. • Read the applicable Dell OpenManage readme files and the Dell Systems Software Support Matrix located at support.dell.com/manuals.
Return Code Description 2 A warning condition, or conditions, is associated with the software. It is recommended that you resolve the conditions causing the warning before proceeding with the installation of the software. To continue, select and install the software using the custom installation. 3 An error condition, or conditions, is associated with the software. Resolve the conditions causing the error before proceeding with the installation of the software.
• Do not install managed system and management station RAC components on the same system. Install only the managed system RAC components, as they offer the required functionality. Common causes for a return code of 3 (failure) from the prerequisite checker: • You are not logged in with built-in Administrator privileges. • The MSI package is corrupt or one of the required XML files is corrupt. • Error during copying from a DVD or network access problems while copying from a network share.
Multilingual User Interface Support The Dell OpenManage installer provides Multilingual User Interface (MUI) support available on the following operating systems: • Windows Server 2008 (64-bit) • Windows Server 2008 (64-bit) R2 • Windows Server 2008 (64-bit) R2 SP1 • Windows Small Business Server 2011 (64-bit) The MUI Pack are a set of language-specific resource files that you can add to the English version of a supported Windows operating system. The Dell OpenManage 7.
NOTE: Dell OpenManage software detects the MSI version on the system. If the version is lower than 3.1, the prerequisite checker prompts you to upgrade to MSI version 3.1. After upgrading the MSI to version 3.1, reboot the system to install other software applications such as Microsoft SQL Server.
To enable this logging service during a silent install, open the registry editor and create the following path and keys: HKEY_LOCAL_MACHINE\Software\Policies\Microsoft\Windows\Installer Reg_SZ: Logging Value: voicewarmup The letters in the value field can be in any order. Each letter turns on a different logging mode. Each letter's actual function is as follows for MSI version 3.
Configure the SNMP agent to change the community name, enable set operations, and send traps to a management station. To configure the SNMP agent for proper interaction with management applications such as IT Assistant, perform the procedures described in the Dell OpenManage Server Administrator User’s Guide at support.dell.com/ manuals.
NOTE: Changing the port number to an invalid or in-use port number may prevent other applications or browsers from accessing Server Administrator on the managed system. IP Address to Bind to Specifies the IP address(es) for the managed system that Server Administrator binds to when starting a session. Select All to bind to all IP addresses applicable for the system. Select Specific to bind to a specific IP address.
Remote Enablement Requirements The Remote Enablement feature is currently supported on: • Microsoft Windows • Microsoft Hyper-V • Hyper-V Server • Red Hat Enterprise Linux • SUSE Enterprise Linux • VMware ESXi and ESX • Citrix XenServer 6.
9. Right-click Personal, select All tasks → Request New Certificate . 10. Click Next. 11. Select the appropriate certificate type, Mostly (Computer), and click Enroll. 12. Click Finish. Creating the HTTPS Listener With the Valid CA Signed Certificate Run the installer and click the link on the prerequisite checker to create the HTTPS listener. Using the SelfSSL Tool to Generate Self-Signed Certificates To generate a self-signed certificate using the SelfSSL tool : 1. Create a certificate. 2.
8. Click Close. 9. Click OK. 10. On the Console window, expand Certificates (Local Computer) in the left navigation pane. 11. Expand Personal. 12. Select Certificates. 13. In the right-hand pane, double-click the required certificate. The Certificate screen is displayed. 14. Click Details tab. 15. Select Thumbprint. 16. Copy the thumbprint to the clipboard. You can use this parameter while creating the HTTPS listener. 17. Click OK.
The WMI Control (Local) Properties screen is displayed. 4. Click Security and expand the Root node in the namespace tree. 5. Navigate to Root → DCIM → sysman. 6. Click Security. The Security screen is displayed. 7. Click Add to add the required users or groups (local/domain) to the list. 8. Provide the appropriate permission(s) to the respective users and click OK. 9. Click OK. 10. Close the Windows Management Infrastructure (WMI) screen.
Installing Dependent RPMs To install the dependent RPMs not available on the operating system media: 1. Make sure that Pegasus RPMs are uninstalled. 2. Check if the openwsmand and sfcbd binaries are already installed using make-install. Check by running the commands: openwsman or sfcbd or you can check the existence of the binaries in the /usr/local/sbin directory. 3. If the binaries are installed, uninstall these binaries. 4.
Execute the following command to configure sfbc and openwsman as per the default configurations: ./ autoconf_cim_component.sh NOTE: To configure openwsman on the managed node to run on a different port, use the -p option with autoconf_cim_component.sh. This is optional and by default the openwsman is configured to run on port 443.
1. 2. 3. Back up these files: – /etc/pam.d/openwsman – /etc/pam.d/sfcb – /etc/pam.d/system-auth Replace the content of /etc/pam.d/openwsman and /etc/pam.d/sfcb with auth required pam_stack.so service=system-auth auth required /lib/security/pam_nologin.so account required pam_stack.so service=system-auth Replace the content of /etc/pam.d/system-auth with %PAM-1.0 This file is auto-generated. User changes will be destroyed the next time authconfig is run. auth required /lib/security/$ISA/pam_env.
4. Replace the content of /etc/pam.d/common-account with account sufficient pam_unix2.so account sufficient pam_winbind.so Workaround for the Libssl Issue If the required library needed by openwsman is present on the system, the autoconf_cim_component.sh script tries to resolve the libssl.so issue. However, if the library is not present, then the script reports the same. Check if the latest version of the libssl library is installed on the system and then create a soft link with libssl.so.
Installing Managed System Software on Microsoft Windows Operating Systems 3 On Microsoft Windows, an autorun utility is displayed when you insert the Dell Systems Management Tools and Documentation DVD. This utility allows you to choose the systems management software you want to install on the system. If the autorun program does not start automatically, use the setup program in the SYSMGMT\srvadmin\windows directory on the Dell Systems Management Tools and Documentation DVD.
You want to Select Remotely access an inoperable system, receive alert notifications when a system is down, and remotely restart a system. Remote Access Controller. NOTE: Install the Simple Network Management Protocol (SNMP) agent on the managed system using the operating system medium before installing the managed system software.
NOTE: The Remote Enablement feature is available only through the Custom Setup option. NOTE: Server Administrator installation also installs some of the required Visual C++ runtime components on the system. Custom Installation The sections that follow describe how to install Server Administrator and other managed system software using the Custom Setup option. NOTE: Management station and managed system services can be installed in the same or in different directories.
If you are prompted to reboot the system, select from the following reboot options to make the installed managed system software services available for use: – – Yes, reboot my system now. No, I will reboot my system later. NOTE: If you have selected Remote Enablement during installation, an error message A provider, WinTunnel, has been registered in the Windows Management Instrumentation namespace ROOT\dcim\sysman to use the LocalSystem account.
Mapping a Drive to Act as the Typical Unattended Installation Package 1. Share an image of the Dell Systems Management Tools and Documentation DVD with each remote system on which you want to install Server Administrator. You can accomplish this task by directly sharing the DVD or by copying the entire DVD to a drive and sharing the copy. 2. Create a script that maps a drive from the remote systems to the shared drive described in step 1. This script should execute msiexec.
• Distributing Custom Unattended Installation Packages Specifying Log File Locations For managed system MSI installation, run the following command to perform an unattended installation while specifying the log file location msiexec.exe /i SysMgmt.msi /l*v "C:\openmanage\logs\SysMgmt.log" Unattended Installation Features Unattended installation provides the following features: • A set of optional command line settings to customize an unattended installation.
Setting Result /fc – This option reinstalls a product if a file is missing or the stored checksum value does not match the calculated value. /fa – This option forces all files to be reinstalled. /fu – This option rewrites all required user-specific registry entries. /fm – This option rewrites all required system-specific registry entries. /fs – This option overwrites all existing shortcuts. /fv – This option runs from the source and re-caches the local package.
MSI Return Code An application event log entry is recorded in the SysMgmt.log file. The following table shows some of the error codes returned by the msiexec.exe Windows Installer Engine. Table 8. Windows Installer Return Codes Error Code Value Description ERROR_SUCCESS 0 The action is completed successfully. ERROR_INVALID_PARAMETER 87 One of the parameters was invalid. ERROR_INSTALL_USEREXIT 1602 The user canceled the installation.
MSI packages must not be repackaged; doing so changes the feature structure and Globally Unique Identifier (GUID), which break any provided patches or updates. When it is necessary to make any changes to a vendor-provided MSI package, use a .mst transform file. NOTE: A GUID is 128-bit long, and the algorithm used to generate a GUID guarantees unique GUID. The product GUID uniquely identifies the application.
The Dell OpenManage Server Administrator prerequisite status screen is displayed and runs the prerequisite checks for the managed station. Any relevant informational, warning, or error messages are displayed. Resolve all error and warning situations, if any. 3. Click the Install, Modify, Repair, or Remove Server Administrator option. The Welcome to the Install Wizard for Dell OpenManage Server Administrator screen is displayed. 4. Click Next. The Dell Software License Agreement is displayed. 5.
Repair If you want to repair an installed Server Administrator component that is damaged: 1. Navigate to the Windows Control Panel. 2. Click Add/Remove Programs. 3. Click Dell Server Administrator and click Change. The Welcome to the Install Wizard for Dell OpenManage Server Administrator dialog box is displayed. 4. Click Next. The Program Maintenance dialog box is displayed. 5. Select the Repair option and click Next. The Ready to Repair the Program dialog box is displayed. 6.
When the selected features are uninstalled, the Install Wizard Completed dialog box is displayed. 6. Click Finish to exit the Server Administrator uninstallation. If you are prompted to reboot the system, select from the following reboot options: – Yes, reboot my system now. – No, I will reboot my system later. All Server Administrator features are uninstalled. Uninstalling Managed System Software Features Using the Operating System 1. Navigate to the Windows Control Panel. 2.
The program executes to uninstall managed systems software on each remote system. 3. Reboot each remote system to complete uninstallation. Unattended Uninstall Command Line Settings The Command Line Settings for MSI Installer table shows the unattended uninstall command line settings available for unattended uninstallation. Type the optional settings on the command line after msiexec.exe /x SysMgmt.msi with a space between each setting. For example, running msiexec.exe /x SysMgmt.
Installing Managed System Software on Supported Linux and VMware ESX 4 The Dell OpenManage installer supports both 32-bit and 64-bit architecture. The following table explains the operating system installation matrix for Dell OpenManage. Table 9. Operating System Installation Matrix for Dell OpenManage Operating System Architecture OpenManage 32-bit Architecture OpenManage 64-bit Architecture Red Hat Enterprise Linux 5.8 64-bit Not supported Install Red Hat Enterprise Linux 6.
The second install method uses the Server Administrator RPM packages provided in the custom directories and the Linux rpm command. Write Linux scripts that install Server Administrator locally or across a network on single or multiple systems. Using a combination of the two install methods is not recommended and may require that you manually install the required Server Administrator RPM packages provided in the custom directories, using the Linux rpm command.
Dynamic Kernel Support Prerequisites For managed system software to use DKS, make sure the following dependencies are met before starting Server Administrator. • The running kernel must have loadable module support enabled. • The source for building kernel modules for the running kernel is available from /lib/modules/`uname –r`/build. On systems running SUSE Linux Enterprise Server, the kernel-source RPM provides the necessary kernel source.
Server Administrator detects that the device driver you copied to the /var/omsa/dks/ directory supports the running kernel and uses that device driver. OpenIPMI Device Driver The Server Instrumentation feature of Server Administrator requires the OpenIPMI device driver that provides IPMIbased information and functionality. All supported Linux systems contain the required version of IPMI module in the default kernel itself. You do not have to install the IPMI RPM.
• Install the ucd-snmp or net-snmp package that is provided with the operating system if you use SNMP to manage the server. If you want to use supporting agents for the ucd-snmp or net-snmp agent, you must install the operating system support for the SNMP standard before you install Server Administrator. For more information about installing SNMP, see the installation instructions for the operating system you are running on the system.
1. Log in as root to the system running the supported operating system where you want to install the managed system components. 2. Insert the Dell Systems Management Tools and Documentation DVD into the DVD drive. 3. Mount the DVD, if required. 4. Navigate to /SYSMGMT/srvadmin/linux/supportscripts directory. Run the srvadmininstall.sh shell script, which performs an express installation. sh srvadmin-install.sh --express or sh srvadmin-install.
Table 10. RPM Directory Directory RPM Package SYSMGMT/srvadmin/linux/custom/ RHEL5/addStorageManagement/ Storage Management component packages SYSMGMT/srvadmin/linux/custom/ RHEL5/SAWebServer/ Server Administrator Web Server component packages SYSMGMT/srvadmin/linux/custom/ RHEL5/ServerInstrumentation/ Server Instrumentation packages The DVD provides RPMs that enable repository-based installation using clients such as Yum, Zypper, and Rug.
NOTE: Ensure that you install Server Instrumentation or Remote Enablement before installing Remote Access Controller or Storage Management. NOTE: If you choose to install the Remote Enablement feature, ensure that you install the dependent RPMs before installing this feature. 5. Start the Server Administrator services after the installation by using the command: sh srvadmin-services start NOTE: You can install Server Administrator on any system that meets operating system dependencies.
4. Navigate to /SYSMGMT/srvadmin/linux/supportscripts. 5. Execute the script with the sh srvadmin-install.sh command and accept the terms of the end-user license agreement. Executing the command displays a list of component options. If any of the components are already installed, then those components are listed separately with a check mark next to them. The Server Administrator installation options are displayed. 6.
Uninstalling Managed System Software To uninstall Managed System Software, log in as root. Uninstalling Managed System Software Using the Uninstall Script An uninstallation script is installed when you install Server Administrator. Execute the script by typing srvadminuninstall.sh and then pressing . Uninstalling Managed System Software Using the RPM Command The individual components of Dell OpenManage can be uninstalled without uninstalling all of Dell OpenManage.
Installing Managed System Software On Microsoft Windows Server 2008 Core and Microsoft Hyper-V Server 5 The Server Core installation option of the Microsoft Windows Server 2008 and Hyper-V Server operating system provides a minimal environment for running specific server roles that reduce the maintenance and management requirements and the attack surface for those server roles.
Related Links: Optional Command Line Settings Uninstalling Systems Management Software To uninstall managed system software, type msiexec /x sysmgmt.msi in the command prompt.
Installing Dell OpenManage Software on VMware ESXi 6 VMware ESXi is factory-installed on some Dell systems. For a list of these systems, see the latest Dell Systems Software Support Matrix at support.dell.com/manuals. Use Server Administrator Web Server version 7.0 to access VMware ESXi 4.0 U3, VMware ESXi 4.1 U2, VMware ESXi 5.0 U1 systems. Dell OpenManage Server Administrator is available as a .zip file for installing on systems running VMware ESXi. The zip file, OM-SrvAdmin-Dell-Web-7.1.0-.
• Server Administrator Storage Management • Remote Access Controller Related Links: Troubleshooting Using the VMware vSphere Management Assistant (vMA) The vMA allows administrators and developers to run scripts and agents to manage ESX/ESXi systems. For more information on vMA, see vmware.com/support/developer/vima/. 1. Log on to vMA as an administrator and provide the password when prompted. 2. Copy and unzip the OM-SrvAdmin-Dell-Web-7.1.0-.VIB-ESXi_.
5. Right-click the ESXi host added in the previous step and click Maintenance Mode. 6. From Plug-ins select Manage Plug-ins → download VMware Update Manager (The status is enabled if the download is successful.) Follow the instructions to install the VUM client. 7. Select the ESXi host. Click Update Manager → Admin view → Patch Repository → Import Patches and follow the online instructions to upload the patch successfully. The offline bundle is displayed. 8. Click Baselines and Groups. 9.
4.1. Enable the CIM OEM providers on the VMware ESXi system before accessing it using Server Administrator Web Server. NOTE: In ESXi 4.1 U2, ESXi 5.0 U1 Dell OpenManage CIM OEM provider is enabled by default. Enabling CIM OEM Providers Using vSphere Client (for VMware ESXi4.0/ESXi 4.1) To enable CIM OEM providers using VMware vSphere Client, you must have the vSphere Client tool installed.
1. Log in to the vMA as an administrator and provide the password when prompted. 2. Execute the command vicfg-advcfg --server --username --password --set 1 UserVars.CIMOEMProvidersEnabled NOTE: For ESXi 4.0, use CIMOEMProvidersEnabled and for ESXi 4.1, use CIMoemProviderEnabled. 3. For the changes to take effect without restarting the system, use the Restart Management Agents option in the DCUI on the local console of the VMware ESXi system.
NOTE: If you do not specify a user name and password, you are prompted to specify the same. 5. Enable SNMP using the command: vicfg-snmp.pl --server --username --password -E 6. View the SNMP configuration using the command: vicfg-snmp.pl --server --username --password -s 7. Test the SNMP configuration using the command: vicfg-snmp.pl --server --username --password -T NOTE: The .
Installing Dell OpenManage Software on Citrix XenServer 7 The Dell OpenManage Server Administrator is installed on Citrix XenServer using the Dell OpenManage Supplemental Pack. The OpenManage Supplemental Pack for Citrix XenServer 6.0 can be installed in two ways: • During the installation of XenServer • On a running system During the installation of XenServer To install the OpenManage Supplemental Pack for Citrix XenServer 6.0 during the installation of XenServer: 1.
OR $ xe-install-supplemental-pack .iso NOTE: If a previous version of OpenManage is already installed on the system, then the command to upgrade it to version 7.0 is ./install.sh. After the installation or upgrade of OpenManage, execute the following post-installation configuration script of Remote Enablement feature $ cd /opt/dell/srvadmin/etc $ ./autoconf_cim_component.sh -p 5986 3. When the installation is complete, unmount the ISO file or CD: $ cd ..
Using Microsoft Active Directory 8 If you use Active Directory service software, configure it to control access to the network. Dell has modified the Active Directory database to support remote management authentication and authorization. Dell OpenManage IT Assistant and Dell OpenManage Server Administrator, as well as Integrated Dell Remote Access Controllers (iDRAC), Dell Remote Access Controllers (DRAC), can now interface with Active Directory.
The following figure illustrates that the Association Object provide the connection that is needed for all of the authentication and authorization. Figure 1. Typical Setup for Active Directory Objects In addition, you can set up Active Directory objects in a single domain or in multiple domains. Setting up objects in a single domain does not vary, whether you are setting up RAC, Server Administrator, or IT Assistant objects. When multiple domains are involved, however, there are some differences.
Figure 2. Setting Up RAC Active Directory Objects in a Single Domain Setting Up Objects in a Single Domain To set up the objects in a single domain scenario, perform the following tasks: 1. Create two Association Objects. 2. Create two RAC Product Objects, RAC1 and RAC2, to represent the two DRAC 4 cards. 3. Create two Privilege Objects, Priv1 and Priv2, in which Priv1 has all privileges (administrator) and Priv2 has login privileges. 4. Group User1 and User2 into Group1. 5.
Figure 3. Setting Up RAC Active Directory Objects In Multiple Domains Setting Up RAC Active Directory Objects in Multiple Domain To set up the objects for this multiple domain scenario, perform the following tasks: 1. Ensure that the domain forest function is in Native mode. 2. Create two Association Objects, AO1 (of Universal scope) and AO2, in any domain. 3. Create two RAC Device Objects, RAC1 and RAC2, to represent the two remote systems. 4.
Figure 4. Setting up Server Administrator Active Directory Objects In Multiple Domains Setting Up Server Administrator Active Directory Objects for Multiple Domain To set up the objects for this multiple domain scenario, perform the following tasks: 1. Ensure that the domain forest function is in Native mode. 2. Create two Association Objects, AO1 and AO2, in any domain. The figure shows the objects in Domain1. 3. Create two Server Administrator Products, sys1 and sys2, to represent the two systems.
• Installing the Dell Extension to the Active Directory Users and Computers Snap-In • Adding Users and Privileges to Active Directory • Configuring the Systems or Devices Configuring the Active Directory Product Name To configure the Active Directory product name: 1. Locate the omsaoem.ini file in the installation directory. 2. Edit the file to add the line adproductname=text, where text is the name of the product object that you created in Active Directory. For example, the omsaoem.
Folder Name Installation Type NOTE: Only iDRAC6 is supported on xx1x systems and iDRAC7 is supported on xx2X systems. To use the LDIF files, see the instructions in the readme that is in the LDIF files directory. To use the Dell Schema Extender to extend the Active Directory Schema, perform the steps in Using the Dell Schema Extender. Copy and run the Schema Extender or LDIF files from any location.
SuperClasses Group Attributes dellProductMembers dellPrivilegeMember Table 15. dellPrivileges Class OID 1.2.840.113556.1.8000.1280.1.1.1.4 Description This class is used as a container Class for the Dell Privileges (Authorization Rights). Class Type Structural Class SuperClasses User Attributes dellRAC4Privileges dellRAC3Privileges dellOmsaAuxClass dellItaAuxClass Table 16. dellProduct Class OID 1.2.840.113556.1.8000.1280.1.1.1.
Class Type Structural Class SuperClasses dellProduct Attributes dellAssociationMembers Table 19. dellIta7AuxClass Class OID 1.2.840.113556.1.8000.1280.1.3.1.1 Description This class is used to define the privileges (Authorization Rights) for IT Assistant. Class Type Auxiliary Class SuperClasses None Attributes dellItaIsReadOnlyUser dellItaIsReadWriteUser dellItaIsAdminUser Table 20. dellItaApplication Class OID 1.2.840.113556.1.8000.1280.1.3.1.
Attribute Name/Description Assigned OID/Syntax Object Identifier Single Valued dellProductMembers Linked attribute. Link ID: 12071 Table 22. Server Administrator-Specific Attributes Added to the Active Directory Schema Attribute Name/Description Assigned OID/Syntax Object Identifier Single Valued dellOMSAIsReadOnlyUser 1.2.840.113556.1.8000.1280.1.2.2.1 Boolean (LDAPTYPE_BOOLEAN 1.3.6.1.4.1.1466.115.121.1.7) TRUE 1.2.840.113556.1.8000.1280.1.2.2.2 Boolean (LDAPTYPE_BOOLEAN 1.3.6.1.4.1.1466.115.
NOTE: Install the Administrator Pack on each management station that is managing the new Active Directory objects. If you do not install the Administrator Pack, you cannot view the new object in the container. NOTE: For more information about the Active Directory Users and Computers snap-in, see the Microsoft documentation.
1. In the Console Root (MMC) window, right-click a container. 2. Select New. 3. Select a RAC, Server Administrator, or IT Assistant object, depending on what you have installed. The New Object window is displayed. 4. Type in a name for the new object. 5. Select the appropriate Privilege Object. 6. Click OK. 7. Right-click the privilege object that you created and select Properties. 8. Click the appropriate Privileges tab and select the privileges that you want the user to have.
NOTE: Add multiple systems or RAC devices to an Association Object. To add Products 1. Select the Products tab and click Add. 2. Type the system, device, or group name and click OK. 3. In the Properties window, click Apply and then OK. Configuring the Systems or Devices For instructions on configuring the Server Administrator or IT Assistant systems using CLI commands, see Configuring Active Directory Using CLI on Systems Running Server Administrator.
Frequently Asked Questions 9 How do I install Dell OpenManage Server Administrator with only the CLI features? By choosing not to install the Server Administrator Web Server, you get CLI features only. What ports do Dell OpenManage applications use? The default port used by Server Administrator is 1311. The default ports used by Dell OpenManage IT Assistant are 2607 (for the connection service) and 2606 (for the network monitoring service). These ports are configurable.
4. Select Custom Setup and choose all the features that were originally installed. If you are not sure which features were installed, select all of them and perform the installation. NOTE: If you installed Server Administrator in a non-default directory, make sure to change it in Custom Setup as well. Once the application is installed, you can uninstall it from Add/Remove Programs.
Do I need to uninstall previous versions of Server Administrator before installing Citrix Metaframe? Yes. Uninstall previous versions of Server Administrator before installing Citrix Metaframe (all versions). As errors may exist in the registry after the Citrix Metaframe installation, you must reinstall Server Administrator. When I run Dell OpenManage Install, I see unreadable characters on the Prerequisite check information screen.
must be located in the SYSMGMT \srvadmin\windows\SystemsManagement. For more detailed information, go to msdn.microsoft.com and search for MEDIAPACKAGEPATH Property Does Dell OpenManage Install support Windows Advertised installation? No. Dell OpenManage Install does not support Windows Advertised installation - the process of automatically distributing a program to client computers for installation, through the Windows group policies.
c. If not, click Change and choose Microsoft Windows Based Script Host as the application that gets invoked to run the script. • WSH is the wrong version, corrupted, or not installed. WSH is installed during operating system installation, by default. Download WSH from msdn.microsoft.com. Is the time shown during installation or uninstallation by Windows Installer Services accurate? No.
Feature Name in WIndows Remote Access Controller Console (DRAC 4) Remote Access Controller 4 (DRAC 4) Red Hat Enterprise Linux or SUSE Linux Enterprise Server After installing Server Administrator, I cannot log in. Log out and then log in again to access the Server Administrator Command Line Interface (CLI). I see the following message when I try to install Server Administrator on a guest Linux operating system. ./srvadmin-install.sh: line 2295 : [: ==: unary operator expected.
Where can I find the source packages for Open Source RPMs? Source packages for Open Source RPMs are available on an orderable DVD image. What do I do when management station RAC utility installation fails due to missing RPM file? During the installation of the management station RAC utility (mgmtst-racadm RPM under /SYSMGMT/ ManagementStation/linux/rac directory on the Dell Systems Management Tools and Documentation DVD), the installation may fail due to missing RPM file dependencies on libstdc++.
What are the names of all the Dell OpenManage features under Red Hat Enterprise Linux or SUSE Linux Enterprise Server? The following table lists the names of all Dell OpenManage features and their corresponding init script names under Red Hat Enterprise Linux and SUSE Linux Enterprise Server operating systems. Table 26.
Name of RPM Description Other Server Administrator RPMs required provides the device drivers and libraries needed by systems management software to access information about the hardware on supported systems. srvadmin-isvc Server Administrator Instrumentation srvadmin-omilcore, srvadmin-deng, Service — Server Administrator and srvadmin-hapi provides a suite of systems management information for keeping supported systems on the network healthy.
Name of RPM Description Other Server Administrator RPMs required Integrated Dell Remote Access Controller. srvadmin-idracdrsc iDRAC Integration Layer — Integrated srvadmin-omilcore, srvadmin-deng, Dell Remote Access CLI and Web srvadmin-rac4 components, and Plug-in to Server Administrator. srvadmin-omacore add-RAC4 — Software for remote management of fourth generation Remote Access Controllers. For example, DRAC 4.
Name of RPM Description Other Server Administrator RPMs required management software to access information about the hardware on supported systems. srvadmin-tomcat Secure Port Server — Systems Management Managed Node Web Server package. srvadmin-omilcore, srvadmin-deng, srvadmin-omacore, and srvadmin-jre srvadmin-jre Server Administrator Sun Java Runtime Environment — Systems management managed node Java runtime.
Name of RPM Description Other Server Administrator RPMs required Instrumentation Service provides fault management information, prefailure information, and asset and inventory information to management applications. The Instrumentation Service monitors the health of the system and provides rapid access to detailed fault and performance information about the hardware on supported systems. The Instrumentation Service requires installation of systems management device drivers.
In this case, if you try to install Server Administrator later by running the sh srvadmin-install.sh command, the following message is displayed: Server Administrator version X.Y.Z is currently installed. Installed components are: • srvadmin-omilcore-X.Y.Z-N • srvadmin-hapi-X.Y.Z-N Do you want to upgrade Server Administrator to X.Y.Z? Press (y for yes| to exit): On pressing , only those Server Administrator packages (in the above example), srvadmin-omilcore-X.Y.Z-N and srvadmin-hapi-X.Y.
Daemon Name Name in Red Hat Enterprise Linux and SUSE Linux Enterprise Server racsvc DRAC 4 Administrator daemon. What kernel modules are loaded when Server Administrator is started? This is dependent on the type of systems instrumentation. The following table displays the kernel modules loaded when Server Administrator is started. Table 29.
10 Dell OpenManage Linux Installer Packages This section lists the Dell OpenManage Linux installer packages. Table 30. Meta RPMs RPM Description Dependent packages Required for OpenManage 6.4 6.5 7.0 7.
RPM Description Dependent packages Required for OpenManage 6.4 6.5 7.0 7.
RPM Description OM Dependant packages Required for OpenManage 6.4 6.5 7.0 7.
RPM Description OM Dependant packages Required for OpenManage 6.4 6.5 7.0 7.1 provides OM CLI tools. srvadminxmlsup XML support None library Server Y Administrato r GUI/CLI Y Y Y srvadminlibxslt XSLT support None library * Applicable on VMware ESX only Server Y Administrato r GUI/CLI Y Y Y Software inventory & updates using ITA Y Y Y 6.5 7.0 7.1 srvadmin-cm Change srvadminManagement omacore NOTE: inventory On a collector.
RPM Description and GUI package srvadmintomcat Dependant packages Required for OpenManage 6.4 6.5 7.0 7.
Table 34. Server Administrator Remote Enablement (Standard Agent) RPM Description OM Dependant packages Required for srvadminThe Dell itunnelprovid OpenManag er e Small Footprint CIM Broker (SFCB) provider that enables remote management of the server libcmpiCppI mpl0, openwsmanserver, sblim-sfcb sblim-sfcc libwsman1 None Openwsman libraries used by client and server components OpenManage 6.4 6.5 7.0 7.
RPM Description OM Dependant packages Required for OpenManage 6.4 6.5 7.0 7.1 Y Y Y 6.5 7.0 7.1 *N/A on VmWare ESX libcmpiCppI mpl0 Provides None helper library to implement Common Manageabilit y Programmin g Interface (CMPI) C++ plugins into SFCB *N/A on VmWare ESX Enabling Y remote management of server * — Should be installed from the OS media for RHEL6 and SLES11. Table 35.
RPM Description OM Dependant packages Required for OpenManage 6.4 6.5 7.0 7.1 srvadminstorelibsysfs Provides None library for interfacing with the kernel's sys filesystem. Used by LSI storelib libraries *N/A for VMware ESX Storage Y instrumentati on Y Y srvadminsysfsutils Provide None utilities for interfacing with sysfs file system.
** — Not applicable for OM 7.0 supplemental pack for Citrix Xen 6.0. Table 36. RAC Instrumentation, SNMP Monitoring, GUI and CLI Plugins RPM Description OM Dependant packages Required for OpenManage 6.4 6.5 7.0 7.
RPM Description OM Dependant packages Required for OpenManage 6.4 6.5 7.0 7.
RPM Description OM Dependant packages Required for OpenManage 6.4 6.5 7.0 7.1 Y Y Y 6.4 6.5 7.0 7.1 Y Y Y Y iDRAC in the remote modular system srvadminidrac-vmcli Provides CLI None tools that provide virtual media features from the management station to the iDRAC in the remote Rack and Tower system RAC CLI tools Y for virtual media feature Table 37.