
Users Guide
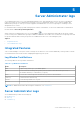
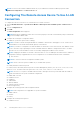
Table Of Contents
- Dell EMC OpenManage Server Administrator User's Guide Version 10.1.0.0
- Contents
- Introduction
- OMSA Customer Survey
- Installation
- What is new in this release
- Supported operating systems
- Updating individual system components
- Storage Management Service
- Instrumentation Service
- Remote Access Controller
- Logs
- Systems management standards availability
- Server Administrator Home Page
- Other Documents You May Need
- Obtaining Technical Assistance
- Contacting Dell EMC
- Setup And Administration
- Role-Based Access Control
- Authentication
- Encryption
- Assigning User Privileges
- Adding users to a domain on Windows operating systems
- Creating Server Administrator users for supported Red Hat Enterprise Linux and SUSE Linux Enterprise Server operating systems
- Disabling Guest And Anonymous Accounts In Supported Windows Operating Systems
- Configuring The SNMP Agent
- Configuring the SNMP agent on systems running supported Windows operating systems
- Changing the SNMP community name
- Configuring Your System To Send SNMP Traps To A Management Station
- Configuring The SNMP Agent On Systems Running Supported Red Hat Enterprise Linux
- SNMP Agent Access Control Configuration
- Server Administrator SNMP Agent Install Actions
- Changing The SNMP Community Name
- Configuring Your System To Send Traps To A Management Station
- Configuring the SNMP agent on systems running supported SUSE Linux enterprise server
- Sever Administrator SNMP Install Actions
- Enabling SNMP Access From Remote Hosts
- Changing The SNMP Community Name
- Configuring the SNMP agent on systems running supported Ubuntu server
- Configuring the SNMP agent on systems running supported VMware ESXi 6.X operating systems
- Configuring Your System To Send Traps To A Management Station
- Firewall Configuration On Systems Running Supported Red Hat Enterprise Linux Operating Systems And SUSE Linux Enterprise Server
- Using Server Administrator
- Logging In And Out
- Server Administrator Local System Login
- Server Administrator Managed System Login — Using the Desktop Icon
- Server Administrator Managed System Login — Using The Web Browser
- Central web server login
- Using The Active Directory Login
- Single Sign-On
- Configuring Security Settings On Systems Running A Supported Microsoft Windows Operating System
- The Server Administrator home page
- Using The Online Help
- Using The Preferences Home Page
- Using The Server Administrator Command Line Interface
- Logging In And Out
- Server Administrator services
- Managing your system
- Managing system or server module tree objects
- Server Administrator Home Page System Tree Objects
- Managing Preferences Home Page Configuration Options
- Server Administrator logs
- Working with remote access controller
- Viewing Basic Information
- Configuring The Remote Access Device To Use A LAN Connection
- Configuring The Remote Access Device To Use A Serial Port Connection
- Configuring The Remote Access Device To Use A Serial Over LAN Connection
- Additional Configuration For iDRAC
- Configuring Remote Access Device Users
- Setting Platform Event Filter Alerts
- Setting Alert Actions
- Troubleshooting
- Frequently Asked Questions
- Identifying the series of your Dell EMC PowerEdge servers

1. Click the Modular Enclosure > System/Server Module > Main System Chassis/Main System > Remote Access
object.
2. Click the Configuration tab.
3. Click Serial Over LAN .
The Serial Over LAN Configuration window appears.
4. Configure the following details:
● Enable Serial Over LAN
● Baud Rate
● Minimum Privilege Required
5. Click Apply Changes.
6. Click Advanced Settings to further configure BMC.
7. In the Serial Over LAN Configuration Advanced Settings window, you may configure the following information:
● Character Accumulate Interval
● Character Send Threshold
8. Click Apply Changes.
9. Click Go Back to Serial Over LAN Configuration to return to the Serial Over LAN Configuration window.
Additional Configuration For iDRAC
To configure the IPv4 and IPv6 properties using the Additional Configuration tab:
1. Click the Modular Enclosure→ System/Server Module → Main System Chassis/Main System→ Remote Access
object
2. Click the Configuration tab.
3. Click Additional Configuration.
4. Configure the IPv4 and IPv6 properties as Enabled or Disabled.
5. Click Apply Changes.
NOTE:
For information about license management, see the Dell License Manager User’s Guide available at dell.com/
openmanagemanuals.
Configuring Remote Access Device Users
To configure Remote Access Device users using the Remote Access page:
1. Click the Modular Enclosure > System/Server Module > Main System Chassis/Main System > Remote Access
object.
2. Click the Users tab.
The Remote Access Users window displays information about users that can be configured as BMC/iDRAC users.
3. Click User ID to configure a new or existing BMC/iDRAC user.
The Remote Access User Configuration window allows you to configure a specific BMC/iDRAC user.
4. Specify the following general information:
● Select Enable User to enable the user.
● Enter the name for the user in the User Name field.
● Select the Change Password check box.
● Enter a new password in the New Password field.
● Re-enter the new password in the Confirm New Password field.
5. Specify the following user privileges:
● Select the maximum LAN user privilege level limit.
● Select the maximum serial port user privilege granted.
6. Specify the User group for DRAC/iDRAC user privileges.
7. Click Apply Changes to save changes.
60
Working with remote access controller