
Web Client Guide


Control Panel | Getting Started with Dell OpenManage Network Manager
37
5
Notice that if you are editing an existing user, or creating a new one, you can use the links on
the right to configure connections with
Roles.
Roles, in particular, configure the OpenManage
Network Manager functional permissions for that user. For example the group of
Operators
would likely have more limited capabilities than
Administrators
.
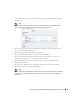
6
Click
Save
again, and the user you just configured should appear listed in the
Users and
Organizations
screen when you select
View > All Users
.
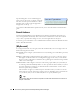
7
To assign a user to a role, click
Action > Permissions
and check the appropriate box next to
the role. Configure OpenManage Network Manager functional permissions for these roles in
Roles (see Redcell > Permission Manager on page 42).
Tip
You can Export Users to a comma-separated value (CSV) file.
Once you have configured a user, you can click
Action
and to do the following:
Edit
—Re-configure the selected user. Select the user’s Role in the editor, too. Roles configure
access and action permissions.
Permissions
—Manage the user’s access to and control over various parts of the portal.
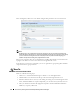
Manage Pages—
Configure the
Public
or
Private
pages for a user, depending on the selected tab.
Possible actions here include changing the look and feel of pages (for computers and mobile
browsers), adding pages and child pages, and importing or exporting page configurations.
Notice that you can configure meta tags, and javascript on these pages too.
Exports are in
.lar
format, and go to the download location configured in the browser you
are using. The export screen lets you select specific features, and the date range of pages to
export.
Tip
If you want to set up several pages already configured elsewhere for another user, or even for an entire
community of users, export those pages from their origin, then Manage > Pages menu for the user or
community.
Impersonate User
—Open a web client with the same permissions as the user configured here.
Impersonate User (Opens New Window)
—This allows you to see the effect of any configuration
changes you have made on a user. The new window (typically a new tab) also lets you click the
Sign Out
link in the upper right corner where you can return to your original identity
impersonation concealed.
Deactivate
—Retires a user configured on your system. You can also check users and click the
Deactivate
button above the listed users. Such users are not deleted, but are in a disabled
state. You can do an Advanced search for inactive users and
Activate
them or permanently
delete them.