
Users Guide


Setting Up Cisco CSR100V VNF Package | Configuring Virtualization
808 OMNM 6.5.3 User Guide
6
Click Execute.
7
Copy the image downloaded from your local disk to your company’s centralized file server
(such as an FTP Server) to redistribute the new snapshot image across additional OpenStack
VIMs.
Before the image descriptor is complete and ready to export, you need to modify the image
descriptor.
Modifying the VIM Software Image Descriptor
These instructions assume that you have already created a VIM image descriptor. If you have not
created the image descriptor, see
Creating a Software Image Descriptor for a Snapshot
on page
807.
Modify the VIM software image descriptor from the OpenManage Network Manager application as
follows.
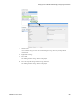
1
Navigate to the Software Images portlet.
The portlet’s location depends on your company’s configuration.
2
Right-click an image.
3
Select Manage.
The Manage new Software Image from VIM Parameters window is displayed.
4
Select the VIM that houses the snapshot image.
5
Select the snapshot image name.
For example:
CiscoCSR1000v-snapshot-2-16Ports:
uniqueImageID
The image ID, container format, disk format, size, and software image name fields are
populated.
6
Select a discovery profile.