
Users Guide


Resource Management Portlets and Editors | Resource Management
206 OMNM 6.5.3 User Guide
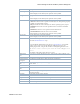
Pop-Up Menu
The Interfaces pop-up menu provides access to the following options. Right-click a row to access
these options.
MTU The maximum transmission unit (packet) size (256-9192).
Notes A text field for information about the interface.
Port Number A number assigned to user sessions and server applications in an IP network.
Rack Number The number that identifies on which rack the component (card, port, or interface) is
installed. This is useful when you have larger chassis that have internal racks.
VRF Name An identifier for the VRF.
Slot Number An interface attribute set by the OMNM product.
Speed The port/interface speed.
Subslot Number The number that identifies which slot on the card that the service module is
installed. Cards have the potential of supporting child modules, configurable service
modules installed on the card.
Menu Option Description
Edit Opens the Editing interfaceName window, where you view or modify the resources
general details or interface properties.
Details
(Click+Shift)
Displays the selected resource’s general details and the alarms, event history,
performance, and quality of service (QOS) details.
Topology Displays a topology map that includes the selected resources. See Presentation
Capabilities on page 229 for more about these maps.
Domain Access
Control
Opens the Domain Access Control window where you assign access rights to the
domain.
Actions Executes any actions associated with the selected resource. An error is displayed if
you do not have permission to execute actions or if there are no actions for the
selected resource.
Event
Management
Suppresses or updates alarms related to the selected resource. The following event
management options available are:
• Start Alarm Suppression starts alarm suppression after you enter a description
and then click Start. A Success/Failure confirmation message is displayed.
• Stop All Alarm Suppression discontinues all alarm suppression. A confirmation
message is displayed. You can also stop alarm suppression using the View Active
Suppressions option.
• Schedule Alarm Suppression opens the New Schedule suppressionAction window,
where you set the exception options and suppression targets parameters and then
set the schedule options.
• View Active Suppressions displays a list of active suppressions. A messages is
displayed if there are no active suppressions. You can stop selected alarm
suppressions from this list.
• View Event History shows event history for the selected resource in the Event
History portlet.
• Resync Alarms refreshes the information displayed with the latest information in
the database for the selected resource or all resources.
Except for View Event History, perform these actions on one or more interfaces.
Column Description