
Users Guide


Resource Management Portlets and Editors | Resource Management
166 OMNM 6.5.3 User Guide
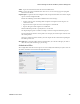
The summary view displays the
Name, Description, Default
(the green check indicates the default
profile), whether the profile is
Scheduled
and
Next Execution Date
for scheduled discovery
.
The Expanded portlet adds a Reference Tree snap panel that displays a tree of associations between
selected profiles and authentication and tasks that they execute. See
Discovery
on page 165 for
more about this portlet.
You can import discovery profiles to target multitenant domains with a command line importer.
The command is importprofiles and is in the owareapps/redcell/bin directory. This command takes
the import file name an argument. The required domains should be available in the OpenManage
Network Manager system before import occurs. Before importing discovery profiles to domains, any
referenced authentications should be available in the domains or should be imported first by using
the
importauths
command (the same way you would import discovery files). In other words, you
should either manually create authentications for domains or import authentication files using
importauths command before importing discovery files to those domains. Example XML files
(with the <customer> tag for domains) are in owareapps\redcell\db.
NOTE:
The date format follows the operating system’s conventions for the location and language selected.
Restarting the system changes system menus to the new language. If you want to revert back to the
original language in Linux, you may also need to update the cache file under /var/cache/gdm.
When OpenManage Network Manager discovers unknown devices, it examines the RFC1213 MIB
for hints of the device's capabilities, determining if it looks similar to a layer 3 router or a layer 2
switch. Since some device can do both, OpenManage Network Manager classifies such ambiguous
devices as routers. See
Base Driver
on page 105 for more about generic discovery capabilities.
When you right-click a profile, the following menu options appear:
New
—Opens
Discovery Profile Editor
in new profile mode. (see
General
on page 168)
If you have the multitenancy option installed, you can limit a discovery profile to a tenant site
or have it discover devices within the entire system. To create discovery profiles for a
particular site, select the site with
New (Specified Site)
right-click menu item for the
Discovery Profile portlet.
Edit
—Opens
Discovery Profile Editor
.
Copy
—Opens
Discovery Profile Editor
, and renames the selected profile as “CopyOf[Original
Name]”. Rename this copy appropriately before proceeding.
Execute
—Executes a discovery profile. This also produces an audit trail (see
Audit Trail/Job
Status
on page 151). A message appears indicating the success or failure of discovery
execution.
Discovery execution continues in the background even when you close the audit trail/jobs
screen, but the message indicating success/failure still appears when the discovery process is
done.
Execute With File
— Similar to the Execute option except profile discovery is from a file (.txt).
This allows you to discovery multiple IP addresses and/or subnets. Each line in the file
spedifies an IP address or an IP address range or a classless inter-domain routing (CIDR)
network.
Inspect
—This validates that the device responds to ping, the profile’s credentials, and that the
device is licensed for discovery. See
Inspection
on page 173.