
Users Guide


Editing Custom Attributes | Portal Configuration
150 OMNM 6.5.3 User Guide
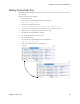
Editing Custom Attributes
The Edit Custom Attributes pop-up menu option is available from many portlets (Managed
Resources, Port, Contact, Vendor, or Location),
Edit custom attributes as follows.
1
Right-click the items whose attributes you want to modify.
For example, right-click an alarm from the Alarms portlet.
The Custom Attribute Editor displays the definitions appropriate for your selection. See
Redcell > Data Configuration
on page 30 for another way to get to this editor.
2
Click the edit tool.
3
Select Enable to activate the custom field.
4
Enter a label and optional tooltip.
The label is for the tooltip and is what you see in the portlets appropriate for the entity type
you have selected. The tooltip that appears when you hover the cursor over the custom field.
NOTE:
Tooltips do not always function where the custom attribute appears in the Web client. However, even If it
does not appear, other views, Web services, or reports may use it.
1
Click Apply.
2
Click Save to preserve any changes you have made.
3
Verify that the Custom Attributes panel now exists.
a. Right-click a resource.
b. Select Edit.
c. See if the Custom Attributes tab exists in the Extended Details.
d. a resource and look in the Extended Details/Custom Attributes panel to see them.
NOTE:
If you want to enter the longitude and latitude for your OpenManage Network Manager installation, go to
Control Panel’s Redcell > Application Settings to enter the information as a default location.