
Users Guide


Ensuring a Secure Dell OpenManage IT Assistant Installation 83
Ensuring a Secure Dell OpenManage
IT Assistant Installation
This section discusses several specific topics useful in implementing a more secure
Dell OpenManage™ IT Assistant installation. IT Assistant leverages HTTPS for secure
communications, as well as the Microsoft
®
Active Directory for role-based access.
For detailed information on security across the Dell OpenManage platform, including IT Assistant,
see the Dell OpenManage Installation and Security User’s Guide.
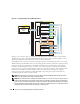
TCP/IP Packet Port Security
A TCP/IP packet communicates a request to a target system. Encoded within this packet is a port
number that is associated with a specific application. IT Assistant is accessed by specifying
https://
<hostname>:<portnumber>
. The default port number is 2607. Using https
requires the application being used to encrypt the data according to the Secure Socket Layer (SSL)
specification so that it is not possible for an observer to pick up and read sensitive information such
as passwords by watching packets on the network. The user is then authenticated through the
IT Assistant login page and their credentials checked against whatever role is mapped in Active
Directory or the local operating system. For information on the three roles supported by
IT Assistant, see "Role-Based Access Security Management."
NOTE: The IT Assistant user interface communicates to the IT Services Tier over port 2607.
Securing Managed Desktops, Laptops, and Workstations
Securing the Managed System’s Operating System
The first step in promoting a secure network environment is to ensure that all managed system
operating systems are running the most current service pack and/or any additional critical security
hotfixes. To simplify this process, Microsoft has introduced Software Update Services. See the
Microsoft website. Perform the same updates for other managed systems’ operating systems as well.
Session Time-out
An IT Assistant UI session can be configured to time-out after a defined period of inactivity.
To configure the session time-out interval, click on Preferences on the top IT Assistant navigation
bar and choose Web Server Properties. You can either disable session time-out altogether, or allow
for up to 30 minutes of inactivity.