
Users Guide


Configuring IT Assistant to Monitor Your Systems 57
3
Give the action a logical name in the
Name
field.
Tom is configuring a separate Alert Action for himself, Bob, John, and Jill. Each time he repeats the
procedure here, he uses the following names in the
Name
field:
• Tom ADMIN MGR e-mail
• DC 1st Shift Bob e-mail
• DC 2nd Shift John e-mail
• Weekend Admin Jill e-mail
4
From the
Ty p e
pull-down menu, choose
Email
.
5
In the
E-mail Configuration
dialog, specify a valid e-mail address (within your enterprise’s
SMTP server group) to receive the automatic notification.
NOTE: Tom can test the e-mail configuration he specified by using the Test Action button. A success/failure
message will be issued.
6
In
Alert Filter Association
, identify the Action Alert filter that will trigger this e-mail.
Tom supplies the names of the Alert Filters he set up in the previous procedure -- either
DC 1st Shift
,
DC 2nd Shift
, or
Weekend Admin
-- each time he performs this step.
7
A summary dialog shows your selections. Click
Finish
to accept, or
Back
to make changes.
Verify that the Alert Action you defined in step 3 appears in the
Summary of Alert Actions
window.
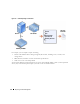
As a result of how Tom has configured Alert Action Filters and Alert Actions in IT Assistant, here is what
will happen:
• IT Assistant will continuously monitor all servers on Tom’s network.
• When any server reaches a warning or critical state, IT Assistant will automatically send Tom an e-mail
notification at the address he specified in the Alert Action wizard.
• When any server reaches a warning or critical state, IT Assistant will automatically send either Bob,
John, or Jill an e-mail notification depending on the date range specified in the Alert Action
Filter wizard.
Summary
This chapter has covered IT Assistant configuration in both the small-to-medium business and large
enterprise network environments. Following the examples shown here will allow you to more successfully
configure IT Assistant.
Many more features are available in IT Assistant than those illustrated here. Click the Help button in the
appropriate IT Assistant dialog box to see detailed online help about that feature.